Mokume gane is my favorite technique in polymer clay, this time I took more photos so I could share the process with you. Here's what you'll need to make your own sheet of
mokume gane clay.
- 1 - 2 oz. block of translucent polymer clay (I use sculpty premo)
- 1 - 2 oz. block of color of your choice (I think rich, dark colors look best, but it's your choice)
- gold or silver leaf
- pasta machine
- tissue blade
- acrylic roller
- TLS (transparent liquid scuplty)
- wet/dry sand paper in a selection of grits (I start with 100 and work up to 2000)

Divide the transparent clay into 4 equal pieces and divide the red (or your color of choice) in half and set 1 piece aside (you can use this for another project), divide the remaining piece in half, divide one of those pieces in half again and again, and again. Basically the pieces you need are 1/2 (of the half block), 1/4, 1/8, and 1/16, see the picture to get an idea what I'm talking about.

From left to right we'll call these shade 1, shade 2, shade 3, and shade 4. Condition and combine the translucent and red clay in your pasta machine, you'll end up with 4 various shades of red. It's hard to see in the picture, but the darkest shade is on the left. Using your pasta machine make each ball into a thick sheet (I use the 7 or 8 setting on my Atlas machine).

Next, cut each sheet into similar sizes (like the size of a playing card) and start stacking...a sheet of shade 1, a sheet of gold leaf, a sheet of shade 2, a sheet of gold leaf, a sheet of shade 3, a sheet of gold leaf, a sheet of shade 4, a sheet of gold leaf, repeat this again and finish with a sheet of shade 1. I use my fingers to place to gold leaf onto the clay and to smooth it down. Everything does not need to be perfect, the sheets of clay do not have to match up perfectly and the gold leaf does not have to be perfectly applied!

Now that the stack is complete use your fingers to poke into the clay, what this does is break up the gold leaf and make the layers uneven. After
smooshing the clay I roll it smooth with my acrylic roller and then comes the fun. Take your tissue blade and use it to slice off random pieces.

You'll end up with multiple odd shaped pieces and one flat piece that is the base of the stack. When I cover an ornament I use the pieces. I run them through my pasta machine on the thickest setting to make them uniform and use liquid sculpty to adhere them to the glass ornament. Keeping the clay as smooth as possible it very important and will make sanding easier. I usually wear gloves to prevent finger print and repeatedly go over everything with my acrylic roller.

This is everything that I was able to make from this batch. I have the ornament sitting on polyester batting to keep it from rolling around and everything else it laid directly on a glazed ceramic tile to bake. Bake according to the instructions on you clay, these were baked at 275 for 3o minutes.
After baking allow them to cool thoroughly and then the sanding begins. Always wet sand polymer clay to prevent the dust from getting everywhere. I have dry sanded and been very sorry...the dust gets everywhere and also irritates my throat (that can't be good). Wet/dry sandpaper can be found in the automotive department of "box" stores and hardware stores. I like to start with 100 grit and really work everything over, getting out all the lump and bumps and any finger prints (if I didn't wear gloves), then I progress to 220, 310, 400, 800, 1000, 2000. I use these grits because it's what I have on hand, you may use what ever works best for you. Sanding is essential for this technique, it really brings out the layers and makes the clay "pop".

After sanding I buff my pieces with a muslin wheel using my
dremel tool and then finish with an acrylic sealer. It usually takes me two days to complete a batch of
mokume gane, but the results are well worth it! If you have any questions about this technique, please don't hesitate to ask and good luck making your own or if you prefer, check out
my etsy store to purchase some mokume gane.


 I have to admit that these are not the best pictures I have ever taken, but it was one of those "OMG the cut off time is in 45 minutes" kind of photo shoots. This bag measures roughly 16" x 22".
 As you can see, it is pretty good sized, I think that it will hold my sketchbook and pencil case, plus all the other miscellaneous crap that I like to take with me.
 Look, it's the fabric I stenciled yesterday! There is also a cell phone pocket and another small pocket on the bottom. On the top side there is a large zippered pocket. I used black thread to sew everything, I hate when I open a bag and everything is the same color and I can't find the pockets, maybe it's just me. This is my prototype, so I'll be carrying this one around for a while to see how it works and if passes you may be seeing a similar one in my etsy shop in a few weeks.


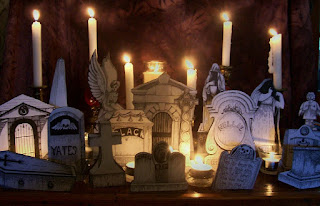


 Here's the cemetery I sent irasema for the Halloween '07 swap (BTW thank you for taking such an awesome picture irasema!!!) These drawings were inspired by cemeteries that I've been to and pictures that I've seen. This is a set of eleven. I've decide to add a few more tombstones to the collection this year and so I have been looking at pictures online and from my collection.


