Showing posts with label polymer clay. Show all posts

2.22.2012

Polymer Clay Skulls

I absolutely love these skull beads! I see them everywhere on Etsy and I have resisted buying them. It took me 10 minutes to find a seller that wasn’t in China!Skull Beads, 30 Pcs, Turquoise Beads, Howlite beads,  Day Of The Dead, Skulls
This week I discovered this stunning polymer clay sugar skull on Etsy and it hit me…I could make my own skull beads!!! These decorated skull are amazing!!!dia de los muertos - pendantIt was so easy and I have a TON of polymer clay. I think they turned out great.PC skull beadsI also made some chocolate bunnies (pinterest project), some art doll faces, and some cupcake charms/pins.PC misc stuffI’m not finished yet, I have to “frost” the rest of the cupcakes, paint the pink on the bunnies, and try embellishing some of the skulls. Now that everything is all out I have a lot of little things I want to try.

9.17.2010

Polymer Clay Cupcakes Mini Tutorial

You know I love cupcakes and so I was super excited to try to make my own mini cupcakes.

For the tutorial you will need polymer clay, glass head pins, flat head pins, translucent liquid Scuplty (TLS), various sized wire nuts, and amazing mold putty. I am going to assume that everyone has basic knowledge of working with polymer clay and some basic tools on hand. cupcake molds

We will start by using the wire nuts and the amazing mold putty to make molds for the cupcake bottoms. The bottoms can be made by hand by rolling a cylinder and making vertical lines on the sides, but I wanted easy and consistent. Amazing mold putty is easy to use, although it is a bit expensive (note the $19.99 price sticker, use a coupon!!!). The molds a flexible making it easy to pop the polymer clay out without using a releasing agent, like cornstarch. Scrap clay may also be used to make molds, but it won’t be flexible and you will need to coat the inside to make the clay easy to remove.cupcake molds 2
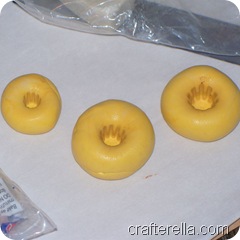
Mix the two parts of the putty together (check the package for more precise instructions), form into a ball and push the wire nut into the putty. Wire nuts are used to secure electrical wires and can be purchased at any hardware store. The impressions I made were so precise that the writing on the bottom of the nuts can be read on the molded clay. Once the putty is cured you can mold cupcake bottoms endlessly. The wire nuts make a tapered, perfectly fluted bottom. cupcake process

To make decorative stick pins mold a cupcake bottom and then insert a glass head pin through the center. You can see the yellow heads here, they will be covered with the frosting in the next step. Glass head pins are a must since these need to go into the oven to cure. To make charms add a rounded “muffin” top to the bottom and insert a flat head pin. frosted cupcakes

I made two different kinds of frosting. Piped, which is clay rolled into a “snake” and coiled up to a point and frosted with a glass bead cherry on top. To make frosting mix a small amount of polymer clay with a small amount of TLS using you fingers to really mix the two together to get a nice frosting texture. I used a mini popsicle stick to spread my frosting on my cupcakes.cupcakes ready for baking
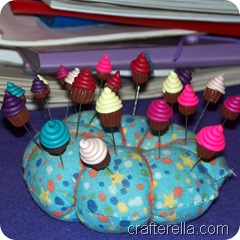
I stuck my pins into my poly filled pins cushion to bake for the recommended time. I have to say the the light pink ones are my favorite, but they are all really fun. You can sand the finished pieces (I didn’t) and add a coat of sealer. I’m going to dip mine in triple thick glaze and maybe sprinkle on some glitter or micro beads, but I needed to photograph them before I did that, they are so shiny after dipping its hard to get a clear picture of them.cupcakes finished

I’d love to see your finished cupcakes if you give this tutorial a try. Have a super crafty weekend!

7.08.2010

Book Review: Steampunkery by Christi Friesen

image

I was really excited to get Steampunkey by Christi Friesen, the images on the cover had me really excited and I was not disappointed!  Even if I had not read the book, the pictures alone were worth the investment.  I found her work inspiring and I couldn’t wait to get out my clay.  I did find the writing style with the “notes” a little annoying and being referred to the back of the book for suppliers and tips was a little repetitive, but that is all very minor in the end.  I learned a lot of interesting new techniques and I found all of the projects inspiring even if they weren’t quite my style.

For my first project I used her steampunk bug tutorial (it’s on here website for free).  I had all the supplies on hand and thought it would make a cute new accessory for me.steampunk bug 1I am really pleased with my first attempt and I am dying to make a heart pendant or pin.

This book has clear instructions, loads of pictures, and a list of suppliers to help you recreate all of the projects inside.  It also showcases some other designers. I have been really inspired by this book and can’t wait to apply it to my own projects.  If you would like to see some more of Christi’s work or try out some of her tutorials there are several free ones on her website.

Now I think I need a mini top hat, with some lace and feathers that I can wear my new pin on, I know just the perfect pattern…

3.25.2010

Progress, Lots of Progress

It has been a busy week here, School is off for spring break and we have been enjoying some nicer weather, there was even time to fly kites!  I have been working on TONS of crafty stuff, but I can’t seem to actually finish anything and what is finished I can’t share, yet.owls finished peek This is finished, the painted owls have been successfully cut and sewn and they ended up exactly like I pictured.  I opted to not outline them on the recommendation of comments here and on twitter, see I did use some of that pink shirt.SYTYC peek Here is my top secret project (yeah, I know super blurry, but I had to cropped it super small).  I’m really excited about this one and I will have a tutorial for this with a downloadable design.  I have another top secret project in the works that involves a bucket, but I haven’t had time to start that one yet.cupcake charms 1 Polymer clay cupcake charms, I have been all over town looking for micro beads so I can make some of these with sprinkles.cupcake pins 1 I also have been making decorative pins with polymer clay.  I made a mold to make the bottoms of the cupcakes, super easy and super quick!  I need to make another batch and take some more photos so I can put together a tutorial.  These are part of a new project that I will hopefully be launching soon.owlie felt 1Wool crochet, now I just need to felt this one and sew it all together, I’m not sure how this one is going to work out.

VHS crochet 1I have dismantled an old VHS tape and am working on a small sample project too.  As you can see, my big pink belly has started to creep into my photo shoots, I normally edit it out, but I thought I would leave it in this time.  I am at the beginning of month nine (give or take two weeks) and things are starting to get interesting around here.  I have two little people asking almost every day if the baby is still in my tummy, I’m frantically trying to finish every craft project I’ve wanted to do right now!, I’m trying to do some home improvements/repairs, and I want to landscape my yard…there is a really long list of things that I wanted to have done before the baby gets here, it’s really pretty wild, I don’t know what it is about being pregnant that makes it seem like there won’t be time to do at least some of this stuff after the baby gets here.  And the big issue is that we haven’t decided on a name.

Today we are just going to lounge around at home, I think I might wear my jammies all day and maybe I can finish one more project (or maybe I’ll start another one ;-D )  Ohh, and I’m taking name suggestions and also looking for guest bloggers to post Mid-April-ish, (whenever I have the baby), let me know if you’re interested!

10.14.2009

Nightmare Before Christmas Fan Art

I have recently made two separate Nightmare Before Christmas projects.  First was the set of polymer clay ornament, featuring the many looks of Jack Skellington.  Here they are before baking.

NBC ornaments before bakingI printed out my inspiration, divided my clay into 12 equally sized balls and started shaping.  I decided to add wire loops before baking, so I wouldn’t have to drill and glue them in later.  I used chain nosed pliers to make loops and then left about an inch long tail that I wrapped around a paint brush, it looked like a corkscrew with a loop on the end.  And then I just screwed them into the soft clay, believe me, these loops aren’t coming out!

I baked them according to the package directions, base coated them with white spray paint, and then painted them with acrylic craft paint.  I finished them by dipping them into triple thick glaze and letting them hang dry.  I had to wipe the drips on them for a few minutes, but it was worth it for the super shiny finish.

NBC ornaments finishedI also made a bottle cap charm bracelet using images from the movie.  I did a google image search and then picked out several images to use.  The key to getting the image the perfect size is using a 1” hole punch.  I then glued the images inside the bottle caps and coated the tops with diamond glaze.  The diamond glaze gives a resin like finish without the chemicals and toxic smell, but it is not as durable as resin.

I was even lucky enough to find some Tim Burton styled focal beads.  It is definitely a chunky bracelet, but that what I love about charm bracelets.

NBC bottlecap charm bracelel

I need some more Diamond Glaze now, looks like I’ll have to head to Ben Franklins, the only store in town that carries it!  Halloween is fast approaching, get to crafting!

10.02.2009

Mantipi Specimen with Tutorial

I have always thought that specimen jars are cool, creepy, but still cool and after seeing Drew Olbrich’s Thing in a jar I knew I had to make my own.thing in a jar 7

You will need:

Sculpty clay

aluminum foil

acrylic paint

rubber cement

food coloring or cola

a jar

I used aluminum foil to make a basic shape, this helps to cut down on the amount of clay you’ll need and the cooking time to cure your “thing”.

thing in a jar 1I used original Sculpty clay, I was planning on painting the final piece, so why pay more for colored clay?  It is also easier to work with because it is softer.  I covered the foil form with a 1/4” thick layer.

thing in a jar 2  I decided to add another tentacle and bulk up the middle section with a fin.  You can make your “thing” as simple or as complicated as you want.  An organ shaped blob would be just as interesting as an alien fetus.  I worked on my sculpture for a couple of hours.  The suction cups on the tentacles took a fair amount of time.

thing in a jar 3Once I had everything like I wanted it I went back and smoothed out all of the finger prints and then baked it according to the package directions (for me that was at 275 for 45 minutes)  The back fin got a little well done, but it was easily covered with paint.

I painted a base coat of pear green on everything.  Once it was all dry I went over the entire sculpture with a dingy green, wiping it off with a paper towel to give the skin a molted look.

thing in a jar 4 Now it’s time to add the extra creepy part.  Coat the entire sculpture with 3 to 5 layers of rubber cement, rubbing it away on different sections to make it look like peeling skin.  This is a messy, sticky task, I just slathered the rubber cement on and it naturally starting peeling where I touched.thing in a jar 5

Now it’s time to put it in the jar, I made mine too large for any jar I had on hand and I had to take the mantipi with me to Hobby Lobby to find its new home.  thing in a jar 6

Use cola or food coloring to tint the water to accentuate the creep factor.  I think I need some sort of aged specimen tag for the jar, I’ll have to get to work on that!  I would love to see pictures of any “things” you guys make, send me some links :) and Happy Halloween!!!

7.29.2009

Fancy Play Food Tutorial (the Easy Way)

My daughter recently received a doll house for her birthday.  It is a homemade one and doesn’t have a lot of accessories, so I decided we needed some play food.  There are a lot of really talented people making miniature food with polymer clay, but I don’t have time to hand sculpt fancy concoctions and I definitely don’t want to spend a lot of money buying something that can be easily lost or broken.

Materials:

  • Scrap polymer clay
  • acrylic paint, like apple barrel or folk art brands
  • acrylic sealer, I would use a spray
  • baby powder or cornstarch to use as a mold release
  • Play-doh sweet creations set (my daughter received this for Christmas, Play-doh has a lot of different sets and there are a variety of different shaped molds so check your sets, ask your friends and keep an eye out at yard sales, these molds work great for polymer clay).   The green and the red ones on the left are some that I found in our collection.play food supplies
Start by conditioning your clay, it need to be warm and soft to produce a good shape.  You can condition it by hand kneading or you can run it through the pasta machine a few times.

Use a brush to apply baby powder or corn starch to the inside of your molds.  Roll the clay into small balls and then firmly press a ball into the mold.  I use my thumb to really get it in there good.  There will be excess clay around the outside edge of the mold and this is what I use to pull the clay out. 

After removing the clay from the mold the bottoms can be rough.  I used my tissue blade to slice the excess clay off.  The piece can be easily sculpted and reshaped, remember this is just play food don’t make yourself crazy making it “perfect”.  Here they are ready for the oven.play food before Bake according to the package directions, mine were supposed to be baked at 275 for 30 to 40 minutes, but I must have bumped the temperature dial on my toaster oven because they came out looking like this.

play food afterI guess it’s good I used scrap clay and was planning to paint them anyway :).

Paint your creations to make them look like real food and then seal with acrylic sealer.play food aboveI was able to whip these up in an couple of days (during nap time and such) and my daughter was delighted with them.  An older child would be able to help you make/paint the shapes, but it was a bit beyond my three year old abilities.  ***Always supervise small children with this play food as it can be a choking hazard.***

7.26.2009

Overcooked?

I'm working on a new polymer clay tutorial. I hope this is not an indication of how my week is going to go.Over cooked

4.29.2009

More Mokume Gane in a New and Exciting Color

I think I need some sort of post title generator, I have the most boring titles. 

On Monday night I decided to make some midnight blue mokume gane.  mokume gane pendants 4I still need to drill or add bails to the squares, but I’ll leave them as cabochons for now.mokume gane pendants 2I had been waiting to get some smaller bails for these hearts, I really like the red one.

large dk blue donut3 This donut is my favorite from this batch, it is 2 inches across and so pretty I am thinking about putting a large bail on instead of wrapping it with the cord.  This photo does not do it justice, the layering is so difficult to capture with a camera!

Don’t forget that if you would like to make you own there is a photo tutorial here on my blog.  If you would rather have me make them for you, some of the pieces shown here are available in my etsy store, I also accept custom orders.

4.22.2009

Fertility Goddess Shrine

I have been working on my entry for Christy’s Craft Challenge for a few weeks and I am finally finished. The first thing I did with my packet was to take the cloths pins apart. I was hoping to use the spring wire too, but it proved to difficult to bend and when I drew blood that was the end of it. After trying several different configurations I noticed that placing them backward resembled a goddess figure.

I used polymer clay to accent that and then began twisting strings from the burlap around knitting needles to make curly hair. Cereal boxes became the shrine box. I cut one inch strips and glued them together in a stack that I molded around a can and let dry. Once dry they retained the curve. I covered the inside of the box with the felt and painted the outside green. I embellished the edge by adding seed beads and vintage flower beads. I also added burlap to the outer arch for some texture. craft challenge 7The punched circles became mini works of art for the background of the shrine and rhinestones were added for that extra sparkle. The other cloths pin was cut to make little feet for the bottom of the shrine.craft challenge 6

I would have to say that my favorite part is the Goddess figure. I had a great time with this Challenge and I’m sure I will try it again. The prize for next month is a basket of stuff from the Lincoln Handmade Team, so order your packet now and maybe you’ll win some of our awesome stuff!!!

***BTW semifinals voting goes until April 24th at 5:00 pm go here to cast your vote.***

4.14.2009

Balinese Filigree Donut Pendant

I had so much fun making a filigree donut for my swap partner in the bargain hunter swap that I decided to make another one.  I planned ahead for this one by covering a base when I made the violet mokume gane.

balinese filigree before baking

Having a base of clay to work on made the process go a little faster, it also made the pendant a little thicker.balinese filigree after baking

I like how it looks when all the snakes are applied, but it really starts to pop when the texture is added.balinese filigree finishedBaking the clay makes it a little darker.  I don’t usually do any sanding on filigree, just a good buffing with the dremel to give it a nice satin finish.  All it needs now is a gold bail and it’s ready to go!

4.04.2009

Mokume Gane Votive Holder

I've been thinking about what else I can put mokume gane clay on. Pretty much anything oven safe will work. I thought a glass votive holder would be interesting.
I used a heavy, thick glass holder to make sure the sanding process would be easy. It is really pretty when lit, it gives off a soft violet glow and you can see the flecks of gold leaf on the inside. This is my new favorite mokume gane covered item, but I still really like the donut pendants. I think I'm going to make a couple more of these and I also want to try some more tins. I just need to find the perfect shape!

2.28.2009

Purple Filigree Donut and Other Pendants

I spent last night sanding and buffing the pendants I showed you yesterday.I love how this balinese filigree donut turned out and I am already planning to make more, I just need to decide what colors to use. I normally just loop cord through these and add some clasps, but for this one I'll be gluing a silver bail to the back, I didn't want any of the filigree to be covered by cording.
Here's a better shot of the bullseye and marbled sets. I was thinking of putting the heart and the rectangles together into one necklace, but I think they will look better separately.
I used my new embossing sheets to make the pink ones. I really like the effect of the lacy pattern and the pearl clay really accents the pattern, but the design seems kind of large for these pieces, it would probably look nicer on a tin (Maybe it's just me). This was a fun little project that kept me busy for a day and it was nice to try some new techniques, I even managed to sand up a couple of new pieces for my etsy store.

2.27.2009

Polymer Clay Play

Today I worked on polymer clay pendants for a friend. I made one balinese filligree donut (which is my favorite), a bullseye set, a lacy embossed set, and some extra marbled pieces. I used three colors purple, fuchsia, and pink pearl.
Please excuse the picture quality, an overcast day with flurescent lighting doesn't make the best photos ;) I still have to bake and sand them, but that's the easy part. Once they're finished I'll get the light box out to photograph them properly.

2.12.2009

New Style of Pendants

I added a some new pendants to my shop today. Some of them were mokume gane and these, they are made from bullseye canes that are stacked, sliced and formed into sheets that I cut into pendants.

I love the pink white and brown color combo and I think these look really modern.This green one reminds me of some sort of animal skin in a kaleidoscope. I also have some smaller ones that I wrapped in black that I think I will make into stitch markers for myself :).

9.01.2008

Polymer Clay Pendants Galore!

I have a serious back log of pendants to sand! I have been trying to get 6 to 12 sanded a day to catch up. Here's what I've done so far.

These are all mokume gane all nicely sanded and buffed, just waiting to be drilled. I am saving these for the fall craft shows I will be attending.

These are made from slices of automatically wrapped canes (bullseye canes). I really like the "retro" feel of these.

Here are the backs, I just used the leftover clay to make marbled sheets for the backs to make the pendants double sided.

And this is my masterpiece, a Balinese filigree ornament. I really enjoy this technique, although it is very time consuming. My crafting ADD kicks in and I just have to fill every gap! I have already started another ornament and I have several more pendants waiting to be baked.

I love polymer clay.