Showing posts with label halloween. Show all posts

10.24.2011

Halloween Gummy Kits

I am always in the Halloween isles of every store I go to and when I spotted these gummy brain and heart kits I knew that I wanted to give them a try.gummy kit 1I am glad I did, they were super easy, only use the microwave, and were ready very fast. All of that added up to a super kid friendly Halloween activity and the molds are reusable!gummy kit 2I sprayed the molds with cooking spray and the gummies popped right out. The only thing that I didn’t really like about these kits were the flavors, they weren’t exactly great, but they were edible and now I can make these gummies from Not So Idle Hands and reuse the molds. We’ve made home made gummies before and they really are good and easy. I guess the only thing I have to add is that home made gummies have more of a Jell-O flavor and not a gummy bear taste.
I had a short, unexpected blog vacation last week (did you miss me?), we have been enjoying fall so much and a lot of our time has been spent outside that I haven’t really been working on anything new craft wise. What I am currently working on is building stock for craft show season and you guys have seen these projects before. I have two weeks until my first show and I will be working on some new displays, I can’t wait to share them with you, if you want to see some of my inspiration check out my display pin board.

10.11.2011

Thrifty Haunted Church

I love finding housewares to alter at the thrift store and when I saw this little light up church I knew that a good paint job would make it into a great Halloween decoration. I love how it’s labeled a church {(snort)}, because I really couldn’t tell (made in China).mini church beforeI painted it all black and then added some navy blue, burgundy, vintage gold, and dark green to high light some of the details. I also used some dimensional magic on the stain glass window panels to make them shiny like glass.mini church after  I think I need to add some glitter, everything is better with glitter, but otherwise I’m done and I have a one of a kind gothic decoration.

10.03.2011

Inexpensive Mini Witch Hat Fascinator

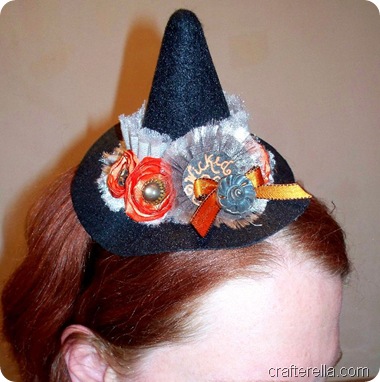
I have been drooling over all of the stunning mini witch hats I’ve been seeing on etsy. I would LOVE to buy one, but it’s hard for me to justify spending a lot on something that I’m going to wear for an hour or two while the kids trick or treat. Today I’m going to share how I made my own inexpensive version (please note, the hats I am inspired by are a bit more advanced than this version).mini witch hat 3To make this project super easy you’ll need a base hat, I found mine in Hobby Lobby. mini witch hat 1 Check over by the safety eyes and dolls supplies, it’s a hat meant for a doll, Cost $2.99 (less if you use a coupon).
Supplies:
  • Doll sized felt witch hat
  • polyester satin, scrap
  • vintage buttons
  • a variety of other fabrics, scraps
  • water color paper and watercolor paint
  • a Sakura glaze pen
  • hot glue gun and glue sticks
  • head band or elastic cord
  • coordinating ribbon
I made a variety of embellishments for my hat, I wanted a rich, layered look. mini witch hat 2 I made three fabric flowers (like these) from orange polyester satin, using vintage buttons for their centers. I used some metallic platinum colored fabric to make a gathered band, hand stitching it to gather it up.  I made a orange watercolor back ground, once it was dry I drew a design on it using the Sakura glaze pen and when that was dry, I washed over the whole thing with black watercolor for the center of a gather fabric rosette. I also picked a couple extra buttons to use.mini witch hat 5 Then I started hot gluing everything to the felt hat. The platinum band was glued first. I added a ribbon over the gathering stitches and the rosette with the paper center to cover the seams. The three fabric flowers were tucked in next to that and finally I added a ribbon bow and the extra buttons.mini witch hat 4 To finish I stitched the finished had to a head band. I really had fun making this project, I might have to make one or two more, they’re great for decorating too!
Linking with Terrorific Tuesday!

9.30.2011

Sugar Skull Lights Tutorial

Every year it seems like the selection at Halloween gets a little more cutesy and cheap looking.  This years motto seems to be cover it with glitter and call it good, well that’s not good enough for me! I should note that sugar skulls are a Day of the Dead decoration, but here at my house the Halloween and Day of the Dead decorations over lap.sugar skull lights 4You will need:
  • Inexpensive skull lights – I found mine in the “Dollar Spot” in Target, although they cost $2.50
  • Puffy paint in a selection of colors, I used regular, pearl, and glitter
  • 1 yd. of fabric, mine is black with multicolored dots
Helpful extras – Q-tips, paper towels, and an empty egg carton.sugar skull lights 1 Start by taking the skull covers off of the lights, the ones I had just pulled off.sugar skull lights 2Using puffy paint, decorate each skull. I kept it pretty simple, outlining the lips, adding eye shadow/eye lashes, rouge, and hair. If you make a mistake use a Q-tip to clean up the line or wipe the paint off with a paper towel and start over. I only decorated the fronts, the back side will be hidden by the fabric fringe. I set them in an egg carton and allowed them to dry a few hours.sugar skull lights 3While the paint was drying I cut my fabric. My fabric was 44” wide, I folded it into quarters and cut one inch wide strips with my ruler and rotary cutter from selvage to selvage. I cut each 1” wide strip into forth's, making each strip about 11” long (so I left the strips folded and cut the folds).
Next I used a larks head knot to attach the strips to the cord of lights. I used 12 strips between each light, for a nice full garland.sugar skull lightsOnce the skulls are dry put them back on the lights and your ready to hang up your new lights! There are a lot of different ways to vary this project, for example:
  • make the fabric strips shorter and tie them on for a fluffier garland
  • make all the skulls the same
  • use food coloring tinted Mod Podge to color the skulls before adding the designs
  • use a variety of scrap fabrics for a shabby chic look
  • use ribbon or yarn to decorate the garland instead of fabric
If you make one of these garlands share a link with us, I’d love to see what you come up with!

7.29.2011

It’s Finally Finished!

The brand new Instant Cemetery Set 2 is finished!!!
Instant cemetery 2011I am so excited to have it all done and listed in my store, but I also miss working on it.  I guess I should start another one.
Have a super crafty weekend!

7.11.2011

Weirdness and an ATC Download

As you know I’ve been working on some new stuff for the Halloween season and I’ve been having so much fun I decide to share one of the images as a free download.
  
Click on the link and you will be able to download and then print the four images (two mirrored pairs), I would love to see what you do with them, share your links in the comments.
Now for the weird, I don’t know if you’ve noticed, but suddenly it seems like I have a lot more going on.  I redesigned the blog, there are a lot of new things being listed in my online shops, I have been working on some new designs, and my blog posting has been more random.  Things are weird here normally and you never know what we’re going to be doing, but it has been amplified by my husband losing his job a few weeks ago.  I feel like I am scrambling to pull things together and come up with a plan (don’t worry, I have come up with a plan).  I am also enjoying having him home, we have been doing a lot more family activities and having a lot of spontaneous fun, it’s like he’s on vacation!  Unfortunately that hasn’t left a lot of time for the random crafting and blogging that I normally do.  I am hoping to be back on a regular routine in a few weeks, please try to ignore the random chaos for the time being, there is a lot of creating going on, but I don’t want to annoy you with every little new design I finish, you’ll see them soon enough!
Another random question, Do any of you collect smashed pennies?  My kids love collecting them, but we’ve gotten all the ones we can find locally (seven different designs).  I was wondering if anyone in a different area would like to swap pennies?  Comment here or email me if you’re interested.

7.08.2011

Halloween in July

I know more traditionally it’s Christmas in July, but not at my house, now is prime Halloween planning time.  I have been scouting around for some new Halloween Decor and accessories, it’s hard to sort through all the cutesy crap, but here are a few of my favorites.
House of Dewberry Pumpkin Dead Spider's Mini Witch's cabinet
satanica mini witch hat StormTheCastle's Spider pendant
As I mentions on the Facebook Page I have also been working on designs for a new cemetery set.  Here is a sneak peek of the one I’m working on now.instant cemetery progress 2011I still need to add some text, but it’s almost finished.  This inspiration for this drawing was the fence picture.  I have a collection of tombstone pictures that I use as a starting point for all of my drawings.  Once the drawing is finished I scan it into the computer and do some editing and resizing and then it will be ready to go.  I am 1/3 done with the new set, if everything goes well I should have them all done by next weekend. 
Have a super crafty weekend!

7.06.2011

The Bandanna Dress

I loved the bandanna pants so much that when I saw the 15 minute dress tutorial on Trey and Lucy I had to try it. bandanna dress blackAll you need to know is if you sew and know a little girl you should make at least one of these!  bandanna dress purple They ARE quick, I made three in an hour while also carrying on two separate conversations on twitter and doing some light cleaning.  These are for a friend, I made one for Little Miss too, it has skulls on it, but she refused to model it.  I can’t believe we have already started arguing about what she should wear, I can’t wait until she’s a teenager!
I also spent yesterday editing some cemetery photos.  I going to put them in my store for the Halloween season.  cemetery photo collage I just can’t decide if I should make them into tags, postcards, or prints.  I would love to get your opinion, leave your thoughts in the comments.

11.01.2010

Sugar Skull Masks

For those of you that don’t know, Halloween is my wedding anniversary.  wedding pix When we got married, five years ago, we were dressed as skeletons(loved my hot pink veil).  This year, at the last minute I realized that I had skeleton costumes in everyone’s sizes.  The kids still wanted to be “characters” my brilliant idea was to make them “character” sugar skull masks.sugar skull family Little Sir got a clone trooper sugar skull and Little Miss was a Hello Kitty sugar skull.  I made more traditional ones for Robert and I and Little Man went bare (maybe I’ll make one and we can display all five).  This was a great, easy way to personalize plain costumes and avoid applying messy make-up.  They are made with glitter felt and puffy fabric paint, I whipped them up Saturday night.sugar skull family masks It will also be a wonderful memory of the five of us on our five year anniversary.

10.26.2010

Terrorific Tuesday - Week 4

TT Week 4 2010

Vanessa shows us how to make a Cute Felt Pumpkin in just a few minutes!

Get creative with Eileen Hull with her Pop Up Bat card. Super festive!

Glory makes a beautiful Autumn Wreath to hang on your door or wall.

Erika shares with us her cute Halloween bandana that her dog Sebastian loves wearing!

Cheryl Ball wows us with an adorable Jack-o-lantern Pin perfect for the season!

Sew a sweet Pumpkin Placement with Phyllis Dobbs!

Crafty Chica gets her glow on with this Sci Fi Senorita Head that is totally spooky!

Crafterella offers up some downloadable custom labels that are super spooky and fun!

Make a spooky Undead Terrorarium with Silvia Chenault.

Whip up some cute and quirky Moss Monsters with Missy at Marvelously Messy!

Kate Pullen offers up a fun Pumpkin Favor Box perfect to hand out at Halloween parties!

Get into the fall spirit with this Pretty Fabric Flower from Ann Butler.

Pattiewack crafts up some Mummy Barbies perfect for a haunting Halloween display!

Alexa a.k.a. Swelldesigner makes a bold Orange and black Mary Jane candy wreath, perfect for hanging or eating!

10.25.2010

Spooky Bottle Labels

I love spooky bottles, I save interesting jars and bottle all year long.  A friend of mine (thanks Lisa) has been saving her iron supplement bottles, they are brown glass and very creepy looking.  I’ve been wanting to make some new labels for these all year (you can download last years spice labels here).  I drew up four different labels, if you would like to use mine you can download them here (my labels are for personal use only).bottle labels, color I printed my labels out on regular paper and then tinted them with watercolor.  I just wanted to add a little bit of interest.  I used dull colors.  bottle labels, walnut ink I also added a wash of walnut ink to age the paper a bit.  Use whatever aging technique you like.  I thought about sanding the label a bit or even staining the edges more with a stamp pad.  While they were drying I soaked my bottle in warm water to remove the original label.  I added some black paint to the lid to tone down the shiny gold color too.bottle labels, finished I used matte Mod Podge to apply the label to the bottle and embellished the top of the bottle with torn muslin, string, hem tape, and seam binding.  I also melted some bronze and silver crayons in a candle flame to hold some seam tape in place across the top of the bottle.

I’d love to see what you guys come up with, leave me a link to your projects using my labels.

10.20.2010

New Halloween Dress (Sienna Dress)

I found these fun orange shirts on one of my last Goodwill shopping trips and decided to whip up a new Halloween dress for Little Miss.  I used the Sienna pattern from Lilblueboo again (see the other dresses I’ve made from this pattern here and here and here).sienna dress halloween 2 I made the size 5 this time, so she could wear this next year too.  I may need to add some length or maybe a new skirt to the top next year, but right now the length is perfect and it goes with the legwarmers I made.

I really wish this pattern came in my size!

10.19.2010

Terrorific Tuesday Week 3

terrorific tuesday 2010 week 3

Use a 2-liter bottle to make a super cute Halloween cupcake dome with Pattiewack!

Glory shows you how to make Creepy Spider Biscuits with spider Halloween stencils and edible color spray!

Make a funky and functional Plaid Skull&Crossbones Skirt with Excell Crafts!

Vanessa and Erin team up to make Awesome Halloween Cookies in a Jar Crafts complete with free easy to download sticker and label printables!

Cheryl Ball shares her beautiful Embroidery Floss Acorns - the perfect fall accent.

Korinne whips up a spectacular Vintage Style Halloween Wreath on her Crafterella blog.

Make Glow in the Dark Jewelry Using Polymer Clay and Rubber Stamps with Kate at the Rubberstamping About.com page!

Learn how to make festive Pom Pom Pumpkins on the Marvelously Messy blog!

Paint a super easy Pumpkin Pin with Ann Butler to accent your fall wardrobe!

Be a hit at the costume contest with this Corpse Bride Costume by the Crafty Chica!

Alexa Westerfield a.k.a. Swelldesigner shows you how to make a Snooki Painted Pumpkin inspired by the popular Jersey Shore Guidette!

Eileen Hull shares a Cute Halloween Bookmark project that will melt your Halloween heart!

Sebastian is faster than a speeding bullet in his Superman Costume featured on the Sew DoggyStyle blog!

Phyllis Dobbs wows us with this festive Spider Apron perfect for Halloween baking!

Silvia shows you how to make a No-Sew Fuzzy Monster Cuff - the perfect craft project for all ages!

That's it for this week! If you are interested in playing in my fun Terrorific Tuesday roundup, e-mail Alexa at swelldesigner (at) gmail (dot) com and she'll send you the details!

10.18.2010

Vintage Styled Halloween Wreath

I was inspired by this tulle and embroidery hoop wreath at My Modish Mood.  I ended up with an great vintage styled wreath and I’m going to share how I made mine so you can make one too!halloween wreath 5I followed her instructions using a 12” hoop and black netting instead of tulle (cutting strips 3” wide and 26” long).  I folded the strips in half and pulled the cut ends through the loop to attach it to my hoop.  The wider strips gave my wreath a eerie, tattered look.halloween wreath 1 Using scrap cardboard I cut a ring, the outside measured 14” and the inside measured 9”, and painted it black.halloween wreath 2 I cut some pages from an old, inexpensive book and rolled them into cone shapes, securing them with a staple.  I hot glued the cones to the back of my cardboard circle.halloween wreath 3 I made a paste of Mod Podge and orange glitter and applied that to the outer half of my cardboard circle.  The Mod Podge keeps the glitter from flaking off.  It doesn’t look that impressive wet, but once it dried (and it took forever to dry) it was awesome, sparkly, but not over the top!

Using my sewing machine I zigzagged over some string to gather some crepe paper streamers into ruffles.  Zigzagging over string gives perfectly even gathers, it does slightly tear the crepe paper, but once it’s gathered up it is invisible.  The ruffles we then hot glued to the inner and outer edges of the cardboard circle.  I also hot glued my cardboard circle to my tulle hoop.  Be really generous with the hot glue, you want it to hold together well.halloween wreath 4 I aged some white cardstock with walnut ink.  I used the dialtone font in the largest size(72) and printed it at 200% to spell out Happy Halloween.  It came out the perfect size to be punched out with my 1 1/2” circle punch.  I strung the letters onto gingham printed ribbon and attached that to the wreath.halloween wreath 6 Finally I used orange tulle, grosgrain ribbon, paper and buttons to make some flowers/frills for the bottom of the wreath.

Let me know if you make one, I’d love to see how it comes out.

10.12.2010

Terrorific Tuesday - Week 2

terrorific tuesday 2010 week 2

Silvia Chenault turns a toy bat into an instant neckpiece (but will it bite your neck?)

Phyllis Dobbs shows us how to recycle a t-shirt into a really cool Halloween trick-or-treat bag!

Kate Pullen brews up adorable Paper Cone Witches!

Messy Missy makes a super spooky wreath with Duct tape!

Avalon Potter goes glam with her Halloween Masquerade Ball mask!

Patty Cappelluti goes bat crazy making this spooky bat door decoration!

Crafterella is a ghoul gone wild in her Ghoul Scout Costume. Download the custom patches she made for her costume!

Alexa Westerfield a.k.a. Swelldesigner upcycles a Starbucks bottle into a swell Halloween vase!

Cheryl Ball delights us with yummy candy corn cupcakes!

Pattiewack upcycles an apple tray into a festive cupcake carrier. So inexpensive and easy!

Ann Butler crafts up a boo-tiful holder for your ATCs complete with a black cat!

Glory whips up a super fun and healthy pumpkin-inspired muffin meal for her kids. Love it!

Crafty Chica makes the perfect mask to celebrate Dia de los Muertos.

Maya in the Moment has some face painting fun with her little cousin and of course, hilarity ensues!

Eileen Hull has a ghostly good time creating this cute diecut necklace!

That's it for this week! If you are interested in playing in the fun Terrorific Tuesday roundup, e-mail Alexa at swelldesigner (at) gmail (dot) com and she'll send you the details!

10.08.2010

Ghoul Scout Costume

I made this costume in 2007 and I decided to dig out the photos and the original badges to share with everyone today.  The great thing about this costume is that you really only need to make the sash, everything else can be from you closet.ghoul scout costumeI used a long, skinny rectangle of fabric and made it into a sash by draping it over my shoulder adjusting the fabric to hang nice.  Pinned, seamed and finished the edges.  If you wanted to cut down on all that I would recommend felt (off the bolt, not the squares) it’s easy to find, easy to work with and forgiving to sew or maybe you could safety pin it, the sewing police usually aren’t writing tickets on Halloween.10-21-2007 09;14;03PMDownload your copy of my Ghoul Scout Badges(personal use only, please).  I printed my badges onto iron on t-shirt transfer fabric (don’t forget to reverse the image when you print) and ironed it on to some muslin.  I hand sewed my badges to the sash because I’m crazy like that, but fabric glue would be A LOT easier.  If you want the look of stitching add faux stitches around the edges with a sharpie marker.

Once the sash is finished the details of the costume are up to you.  I made pompom sock garters, a felt coffin bag, and the black and red pleated skirt, but really anything would good. 

I’d love to see what you guys come up with and let me know if you’d like a tutorial for the felt coffin bag or sock garters.  Have a super crafty weekend!