Showing posts with label accessories. Show all posts

10.03.2011

Inexpensive Mini Witch Hat Fascinator

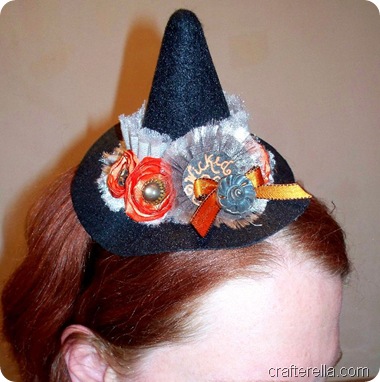
I have been drooling over all of the stunning mini witch hats I’ve been seeing on etsy. I would LOVE to buy one, but it’s hard for me to justify spending a lot on something that I’m going to wear for an hour or two while the kids trick or treat. Today I’m going to share how I made my own inexpensive version (please note, the hats I am inspired by are a bit more advanced than this version).mini witch hat 3To make this project super easy you’ll need a base hat, I found mine in Hobby Lobby. mini witch hat 1 Check over by the safety eyes and dolls supplies, it’s a hat meant for a doll, Cost $2.99 (less if you use a coupon).
Supplies:
  • Doll sized felt witch hat
  • polyester satin, scrap
  • vintage buttons
  • a variety of other fabrics, scraps
  • water color paper and watercolor paint
  • a Sakura glaze pen
  • hot glue gun and glue sticks
  • head band or elastic cord
  • coordinating ribbon
I made a variety of embellishments for my hat, I wanted a rich, layered look. mini witch hat 2 I made three fabric flowers (like these) from orange polyester satin, using vintage buttons for their centers. I used some metallic platinum colored fabric to make a gathered band, hand stitching it to gather it up.  I made a orange watercolor back ground, once it was dry I drew a design on it using the Sakura glaze pen and when that was dry, I washed over the whole thing with black watercolor for the center of a gather fabric rosette. I also picked a couple extra buttons to use.mini witch hat 5 Then I started hot gluing everything to the felt hat. The platinum band was glued first. I added a ribbon over the gathering stitches and the rosette with the paper center to cover the seams. The three fabric flowers were tucked in next to that and finally I added a ribbon bow and the extra buttons.mini witch hat 4 To finish I stitched the finished had to a head band. I really had fun making this project, I might have to make one or two more, they’re great for decorating too!
Linking with Terrorific Tuesday!

6.13.2011

The 80’s Called and Said Make Barrettes

Too bad the 80’s didn’t check the stores first to see where I could find the special barrettes.  For the record I went to W-mart, Dollar General, Hobby Lobby, Walgreens, Russ’s Market (grocery store) and Ben Franklin’s, the only place that had this particular style was Ben Franklin’s.  woven ribbon barrettesI followed this tutorial from Wrights ribbon, nice and straight forward.  I have two tips to make it go a little faster:  first use darning needles on the ends of your ribbons to make the weaving through easier and second, on step 3 arrange the ribbon across the bar before you pull it through the center, this helps keep it nice and flat.  I also tried gluing the ribbons together, I wouldn’t recommend that, it was a sticky mess and really didn’t make it any easier.
This project was a hit with Little Miss and with all the “hair bling” I’ve been seeing I’m sure these will fit right in.  I think I might need to add some beads to the ends of the ribbon (that’s why I’ve left them longer).  I also think that shaped beads for holidays would be super cute, like red, white and blue stars for the 4th of July.  What do you think? 

3.30.2011

New Hair Clips for a New Hair Do

I finally got a hair cut, I had been waiting, trying to hold out until I could go to a salon, but I just couldn’t make it any longer, I caved and got a $10 hair cut.  I like it, it’s pretty short, but still cute and to make it even more fun I colored it a dark red.  Now I really need some cute hair accessories.  All of my stuff screams teenage girl (from the ‘90s), little butterflies, plastic bows, weird little claw clips, hair springs(?!?), and even a banana clip!  Luckily I found this great flower clip tutorial on Yards and Yards and I had everything on hand already.flower hair pins 1 I tried several different types of fabrics: knit, lining, satin, metallic, and tulle and got good results from them all.  I wish I could figure out a way to use cotton, but it’s the melted edge that I love so much.  I love how Anna made the backs for these flowers, I can’t wait to put them on everything!flower hair pins 3 The fabric with the metallic thread is my favorite (the rose colored one, bottom right and the yellow and white one, center left), I got it from my friend Kelly and there are a rainbow of colors.  I LOVE these, I MUST make more in more colors!
The only thing different about my flowers is my largest circle is only 2 1/2” across.  That’s as large as my circle template went and I didn’t want to search through the house to find some bigger circles to trace.  These were really quick and easy to make, about an hour and a half from “oooh, I want to make those” to “wow, these flowers look awesome in my hair”.  I’m thinking they would make great last minute gifts.
No action shots this morning, I've been up with the baby since 4:30 and trust me, I'm not looking too cute.  I'll post some photos on Facebook later today, after I take a little nap.

2.24.2011

Knitted Flat Bottom Pouch

It seems like I don’t craft a lot for my husband and earlier this week I noticed that his collection of dice, that he uses for playing Magic the Gathering, was being stored in a large, ripped, Ziploc bag.  I picked up the nearest ball of yarn (caron simply soft in black) and started knitting him a flat bottomed dice pouch.dice pouch

I started by casting on 20 stitches using US size 5 needles and then I continued in stockinette stitch (knit the right side, and purl the wrong side) for 22 rows.  I didn’t cast off at this point and started picking up stitches along the sides.  Using double pointed needles, I picked up 20 stitches on each of the three remaining sides, which gave me a total of 80 stitches on my needles.  I began knitting in the round, after about 10 rounds I was able to get the stitches onto a 12” circular needle, which is easier for me to knit with.  Continue knitting in the round until the bag measures 4” from the bottom edge, where we picked up the stitches.  The next row, *knit 6, knit 2 together, and yarn over* repeat from * 9 more times to the end of the row.  Knit 4 more rows and bind off.  I made a twisted cord for my lace and laced it through the holes made by the knit 2 together, yarn over row.dice pouch 2The reason I chose to make a flat bottomed pouch is so that he could leave it open while he was playing and easily get the dice he needs.

This project was a success, he really likes it and I’m sure he’ll get a lot of use out of it.  Let me know if I need to clarify the pattern instructions, it’s hard for me to write out what I did in my head.

1.28.2011

Pattern Weights: Adapting What's on Hand

Now that I am a more experienced seamstress I have decided that I need some pattern weights. What really happened is I saw this pattern weight tutorial and decided that they were cute and I needed some. But hold on a minute, I don’t have any hex-nuts (I DO have some washers) and I think I would rather use paper, so here’s my take on pattern weights:

Your will need large washers, I used a variety of similar sizes, they are very inexpensive and you can buy them individually at Ace Hardware stores, some fun scrapbooking papers (these papers are left over from my holiday photo ornaments), glossy Mod Podge, scissors, an exacto knife, and a pencil.pattern weights 1 Trace around the washers on the back of the scrapbook paper and carefully cut out each circle. Make sure to cut inside the lines. I used an exacto knife to cut out the centers for a smoother look.pattern weights 2 Coat one side of you washer with Mod Podge and apply your paper circle. Smooth the circle down with your fingers, getting out all the lumps, bump, and bubbles. Brush a coat of Mod Podge on top of the paper and allow it to dry.pattern weights 3 Use the exacto knife to trim any excess paper from the edges and inside circle of the washer. Apply paper to the back of the washer in the same way and trim when dry. Once I had everything all trimmed up I added another coat of Mod Podge to completely seal the edges. Once everything is dry your spiffy new pattern weights are finished!pattern weights 4I need to make a holder, a wooden base with a dowel? I’ll have to think on it a bit. I’m off to get out some fabric and a pattern and start cutting, have a super crafty weekend!

7.02.2010

Quick, Hide Your Hooters

I never wanted one of these things with Little Miss, we had such a hard time breast feeding (nipple confusion, long story) the last thing I wanted to do was wrestle with another piece of equipment.  However this time around it seems like a really good idea, especially this tutorial from  Southern Institute for Domestic Arts and Crafts (found via luvinthemommyhood).  I have never noticed, so maybe all hooter hiders work this way, but the pocket for the nursing pad and the boning at the top so I can see what I’m doing under there are pure genius!hooter hider This was super easy to do.  I used the fabric I have been using for all of Little Mans stuff and not a heavy upholstery fabric like the tutorial recommended.  Do yourself a favor and use the heavier fabric or the boning at the top won’t hold the floppy fabric out as well (it is still workable and it matches everything else).  I used a scrap of flannel for the corner instead of terry cloth, I was more interested in a pocket than a towel for milky mouths (although I think the flannel will work for that too).  I’m really excited to use this, I know it will be easier than trying to hold a blanket and a squirming, hungry baby and trying to get everything out and in position without flashing the whole world.

Have a happy Forth of July and have a super crafty weekend!

5.18.2010

Cupcake Purse Samples

Everyone needs a cupcake purse, right?  After seeing crocheted cupcake purses on Ravelry I just had to make my own.  I started out with the basic pattern (this pattern is for a cradle purse, I just skipped all the interior elements and made a plain purse) and added an extra fuchsia frill around the middle.  cupcake purse 1 I really like how the bottom part looks, the front and back post double crochet really mimics a knitted look, but is sooooo much faster.  The bottom did seem a little wimpy though and once it’s filled with girly stuff it doesn’t stand up as nice, hmmmm, I guess I’ll make another one and add some more frills, oh and beads too!cupcake purse 2 I made two bottoms for this one and added plastic canvas in between the layers to make a nice sturdy bottom that would stand up and help the cupcake keep its shapes.  I added pony beads to my yarn before I started to crochet and then crocheted them into the “frosting” at regular intervals.  I also did more single crochet through the back loop only to allow me to add extra frills around the center and at the top.  This is exactly what I going for, now who needs a cupcake purse?

9.23.2009

Fabulous Felt

I think I may have mentioned my love of inexpensive craft felt before, but I’ll say it again, I love this stuff!!!  As I was checking in with some of my favorite blogs this week I saw these adorable felt hair clippies on Treasure for Tots and was dying to give them a try.  FYI, hair clips are on sale this week at Hobby Lobby, I got regular sized ones and extra large one. 

I ended up just experimenting with the larger ones, my embroidery skills are very basic and having a bit more space to work on made it easier.  This is a little, quick project and bonus, I had all the supplies on hand except for the clippies!  Note the squares on my cutting mat are 1” to give you an idea of the size of these things, I think one will be enough hair decoration.

felt clippies

Okay, the clippie on the top center, with the sequined sugar skull may be a bit much, but I got the idea in my head and had to see it through! 

I really like the purple one and it perfectly matches one of Little Miss’s sweaters, so yay!  I have also used felt to cover other things, like bottle cap pin cushions and fabric tape measures, can you tell I was going for a Halloween theme?  I would like to make little sets that include a pin cushion, tape measure, and needle book, it’s on the never ending list.

The real question is what else can I cover with felt and primitive embroidery? any suggestions would be appreciated :)