11.11.2011
The Craft Show Photos
11.02.2011
Craft Show Display Plans
| 1 | 2 | 3 |
| 4 | 5 | 6 |
- The suitcase display: I have a vintage round overnight case that is in excellent condition that will be used to hold my hair flowers and pins.
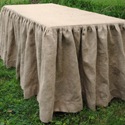
- The burlap table cloth: this one is available on etsy, with a lined top and ruffled cloth topper. I have 12 yards of burlap that is all cut and pressed and ready to be sewn up today during nap time.
- Coordinating hat stands and heads: I love these Mod Podged heads and stands. I will be unifying all my hat displays by using either flat black paint or craft paper decoupage.
- Spool Picture/card holders: I will be using these to hold some of my pricing signs.
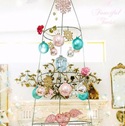
- Tomato cage ornament tree: The simplicity of this idea should really make my ornaments pop. The blog is pure eye candy too, you should really check it out! I was lucky enough to borrow some cages from my Aunt. I’m thinking of wrapping the wires with silver fun fur to mimic tinsel.
- Slinky business card holder: It just looks cool and Target had metal slinkys in their “dollar spot” area.
11.19.2010
Paper Mache Play
I really love paper mache! In elementary school I hated it, but I’m going to assume it is because they didn’t explain the process well and they wanted us to make super bulky newspaper bases and what I ended up with was a damp, lumpy mess that did not look like a unicorn. Today I covered some balloons on Pringles cans to make more craft show displays (these are child head sized) and I also covered some thread cones with Styrofoam ball heads and some wooden peg dolls. I really like the texture that paper mache gives to a finished piece and how well it integrates the separate parts together. I think that they now look like giant game pieces and now I want to make some of those, these are going to be something else.
I used the paper mache recipe from The Big Ass Book of Crafts from Mark Montano, it’s a basic flour paste with a bit of white glue added in. I did one layer last night and it has dried rock hard, I will add at least one more layer to the displays and then some paper clay to smooth it out and add some details to my other pieces. There is a recipe for paper mache mush in the book that would be great for that, but I have some paper clay on hand that I have had forever and I want to use that up.
I would also like to note that I have been doing some cleaning and you’ll notice that my normally cluttered dining room table is clean, we could eat dinner at the table if we wanted, I know, it’s crazy! Now to work on the rest of the house, I finally figured out the psychology of why my house was cluttered (no, I don’t want to share) and I expect to make a lot of progress in the next month.
I should be busy working on these projects all weekend, what will you be working on? Have a super crafty weekend, everyone!
11.08.2010
Holiday Crafts Show Season
I don’t usually do craft shows. The preparations involved are just too much for me and with young children who go everywhere with me it just isn’t something that works for me right now. I do one show, in the town I grew up in. It gives me a chance to see old friends and hang out with my Mom all day. It’s called Frost Frolic and it is always the first Saturday of November, so last Saturday. I have different things that I sell at a craft show that I don’t stock in my online store. I have hats (I’m still using the display stands I made last year) and scarves and my Mom has some potholders and some paper trees made from greeting card. Every year it seems like something different is popular, this year it was scarves. I sold all that I had, even the one I was knitting on during the show!
It was a fun weekend and with only a $20 fee to sell I came out really well. It’s so different than having an online store, I like to be out meeting new people, but it can be disappointing when something that you really think is going to sell well doesn’t get any attention. Does anyone else do local shows and how do you like it?
12.07.2009
Craft Show Display
Last Saturday was the perfect day for a craft show, it was cold, but the sun was shining and there was no snow or ice to make driving difficult. I had a lovely spot near the door and the sun streamed in from a window above and behind my table, which was really nice, however it made my pictures come out awful!
On the left I had my wristlets and record bowls holding bottle cap pendants and recycled notebooks, in the center my pendants and tree of life ornaments and next to that hats and scarves. The box on the right contains recycled crayons and knitted washcloths.
I have my frame propped up with a brick to make the pendants easier to view and it leaves space behind and under the frame to store my cash box and bags.
Here are my home made hat stands, they really work well for displaying hats and then I just lay the extra hats along the sides and scarves around the bases.
This was my last show of the season and it was not really my day for sales, but it is a show hosted by my family and I really enjoy spending the day with them. Next year will be the 20th anniversary of this show and I will be in attendance again, it was a great day full of family and fun and the only show that my kids get to go with me.
I will be using my pendant frame and head displays again, I think they worked out really well and really the only investment was the time it took to make them. The record bowls are also really handy for displaying smaller groups of items and they are also available for sale. I had a really fun season and next year I am hoping to attend more events.
11.17.2009
Craft Show Displays
Last year was my first real experience attending craft shows and basically I just showed up, slapped a piece of fabric on the table and arranged everything flat on the table. Not really that impressive and not the best way to showcase my work. This year I vowed to do better, but I don’t have the budget to spend hundreds of dollars on fancy displays and lets be realistic, handmade crafts deserve to be displayed in a unique way, not like a display at Wal-mart.
I had my set of five “heads” to model my hats, the varying heights really added some interest to my table. I also had several knitted scarves for sale and I wrapped them around the necks of my hat models.
I found this beautiful frame at a thrift store for $1.50 and knew it would be the perfect base for my pendant display. I cut a piece of foam core to the size of the hole and using hot glue covered it with a charcoal gray knit fabric from my stash. I inserted it into the frame and used pins to stick my pendants to it.
I did have to remove the cords from some of the pendants, but I really like the way this looks. I used a brick under the back edge to prop it up and that made the perfect hiding spot to keep my cash box and shopping bags. I also printed out signs that would be helpful for customers to shy to ask or if I was busy with someone else, stating prices and that each pendant came with a satin necklace. I also had a sign mentioning that I take custom orders.
I found this great cardboard organizer on clearance at Ben Franklin’s and just had to have it, once I got it home I realized it would be perfect to display my rainbow crayons and knitted washcloths.
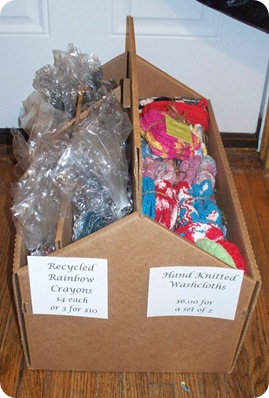
It was great for the washcloths, but the crayons seemed to go unnoticed by a lot of my customers, I may need to come up with another way to display them.
I also sell record bowls and I use them to hold some of my smaller items, like bottle cap charms and recycled notebooks.
Overall I really think that my new displays really made my work appear more professional, I still need to come up a good way to display my tree of life ornaments, but I had no problem selling them this time. I was making them to pass the time and to have something to keep me busy and usually shortly after I finished one it would be sold.
I don’t have a picture of my full display, it seems in the excitement of going to the show I left my camera at home. I have one more show this season and hopefully I will remember my camera next time and if anyone knows a great way to showcase my tree of life ornaments let me know!
11.06.2009
Paper Mache Wrap Up
I coated my paper mache with some light weight joint compound, which probably wasn’t the best idea. The moisture leached into the paper mache and weakened it, but I’m still using them.
They kind of look like I frosted them. It took and entire day for them to dry and this morning I sanded them smooth. I used black gesso to paint/prime them. I will need to go back and do some touching up and finish the bottoms, but I wanted to share this today.
I really like how these turned out, I wish I had more time to work on them, but I need them to be ready for tomorrow to display my hats.
I had wanted to paint faces on them, but now I’m glad I just went with plain black, my table cloth is also black and I think that it will really make my hats pop!
It’s time for me to start loading up the car, have a great weekend everyone!
11.05.2009
Current Events and Paper Mache
It has been a long week and unfortunately it started off on a sad note. Pookie’s (my cats) health started rapidly declining this weekend and on Monday I said my final goodbye. She was my companion for over fifteen years.
Here she is, on the right, with my other cat Kiki in their recycled sweater bed.
I have also been preparing for the 19th. Annual Frost Frolic Holiday Market in exciting Fairbury, Nebraska, my home town. Working on some new ideas on how to display my work, (more on that next week) and finishing up some last minute projects.
Here is what I just started working on last night.
Here is my base, balloons and cardboard tubes. I then broke out the paper mache and went to work.
I didn’t finish the sixth one, I just ran out of steam, besides odd numbers of things look more visually pleasing, right? They have dried nicely and are pretty stiff. I think I’m going to give them a coat of spackle to smooth them out and maybe after my Lincoln Handmade Team meeting tonight I can start painting them. Can you guess what they are going to be?