Showing posts with label decoration. Show all posts

1.09.2012

Less Pinning, More Doing

I love pinterest, but honestly it is a time sucker. I could waste the day away and while I am getting a lot of ideas and inspiration I’m not making anything.
This weekend I tried to do a little more making. Ribbon bookmarks.
bookmarksA lotion bottle cell phone charging caddy.
lotion bottle charging caddyAnd, my most favorite, giant buttons from domed cheese boards!
giant buttons finishedIf you look closely, you’ll see that the paint isn’t even dry. Believe me, this picture does NOT do them justice and they’ll look even better once I add the string and get them hung up! I am on the hunt for more domed cheese boards, I NEED a large collection of these for the craft room walls.
You may have seen this one on the Facebook page: I also started cutting out and sorting letters, eyes, lips, and textures for visual journaling, I’m calling it a ransom note kit.
ransome note tool boxI have a huge board of journaling ideas pinned, now to start doing. It will be nice to have this ready to go.
I will be marking the pins I have done with a * at the beginning of the text. I want to make sure that I am really doing and not just wishing the hours away.
Have you been making things from your pinterest boards? I'd love to hear about it, share some links in the comments :)

10.11.2011

Thrifty Haunted Church

I love finding housewares to alter at the thrift store and when I saw this little light up church I knew that a good paint job would make it into a great Halloween decoration. I love how it’s labeled a church {(snort)}, because I really couldn’t tell (made in China).mini church beforeI painted it all black and then added some navy blue, burgundy, vintage gold, and dark green to high light some of the details. I also used some dimensional magic on the stain glass window panels to make them shiny like glass.mini church after  I think I need to add some glitter, everything is better with glitter, but otherwise I’m done and I have a one of a kind gothic decoration.

8.01.2011

It’s Hot

Yeah, I know it’s August, but really it seems like it’s hotter than usual.  I have been working on this project all weekend, but I can only stand to be outside about 30 minutes and then I have to come in and cool off.  I’m glad I don’t HAVE to be out in this weather, I don’t do well with hot (but who does?).  Anyway, one down…bowling ball ladybug

5.27.2011

Return of the Giant Silverware

Alrighty, I am back to working on the giant silverware again.  When we last saw the giant silverware I was attempting to smooth out the handles using Bondo.  The Bondo was stinky and a little expensive and I was having to build it up in layers.  Lumpy, bumpy layers that were going to need TONS of sanding.giant fork take 3 beforeRound 3 – This time I will be using homemade paper mache clay.  I had thought of paper mache in the beginning, but thought that strips of newspaper would be lumpy and I didn’t think I could count on store bought clay to get the results I wanted.giant fork take 3 during 1I just globbed it on, this is about two rolls worth of clay.  It was really easy to find the supplies and mix up, and I can think of a lot of great ways to use this stuff.giant fork take 3 during 2Using a palette knife and water I shaped and smoothed the clay.  This is where I started getting excited, it really looks like this might work.  It has taken forever to dry (a week and a half).  I am excited to start sanding, priming and painting, but first I need to finish the handles on the rest of the spoons and forks.
I think I am finally on the right track, I would really love to get these finished and hung soon, I think the only hold up will be drying time.  I can’t wait to get more stuff finished for my kitchen.
Have a wonderful, crafty holiday weekend!  I’ll see you guys next Wednesday!

4.13.2011

Easter String Egg Tutorial

My Mother would make these delicate string eggs for decorations when I was little.  She used powdered laundry starch.  I hunted high and low for powdered starch and there was none to be found however I did find an inexpensive substitutestring eggs 4Start by mixing 1 1/2c. cornstarch with 1 c. cold water in a saucepan and heat, stirring constantly with a whisk.  Really, keep stirring it will only take a few minutes and it goes from liquid to solid almost instantly.  Using a whisk will keep the mixture from getting lumpy.  Once the mixture thickens and becomes shiny you will want to whisk in some more water to thin it to the consistency of white glue.  I had to add quite a bit a water at this point, if it is too thick your project will be one big, sticky mess and all the spaces between you string will be filled with starch.  Allow to cool slightly, I used cold water to thin my mixture and that cooled it down quickly.
While it cools collect the other supplies you’ll need:
yarn, string, and/or thread
balloons
a variety of embellishments
filler (Easter grass, eggs, chocolate bunnies, etc.)
Blow the balloons up to the size you would like your finished basket to be.  I made mine large so I could fit some plastic eggs in them.  Smaller, water balloons also make really cute decorations, they look great grouped in a basket together.
I used crochet thread for my eggs.  I liked to use various weights and complimentary colors.  Most of the eggs I made have a plain color, a fancy metallic, and a variegated color thread.  Since I am using thrifted thread there are different weight, brands and textures.  The easiest way to saturate you thread with the cornstarch mixture is to wrap it into balls or onto spools.  I also left some on their original cardboard rolls, but that made the wrapping process really messy, the paste flies everywhere as the thread unwinds.  If you just add loose thread to the mixture it gets all knotted up (ask me how I know).
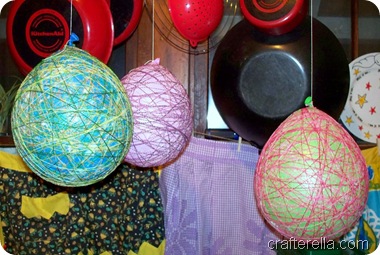
I added my thread to the saucepan full of cooked cornstarch and started wrapping it around my balloons.  Your hand removes the excess paste while you wrap, make sure to wipe it back into the pan often.  It’s kind of tricky at first, take you time and try to cover all areas of the balloons.  This is a messy project, I had paste everywhere by the time it was all done.  You’ll need to use a lot of string to wrap your balloons.  If it’s too lacy the finished egg won’t hole its shape.  The purple one in the picture below does not have enough string, after popping the balloon it was really obvious.  Sometimes you can inflate a new balloon inside and wrap it with more thread, I was able to save this one :).string eggs 1Once your balloons are wrapped they will need to dry overnight.  I hung mine from my pot rack (a shower rod works good too).  They are ready when they are dry to the touch and feel stiff.  string eggs 2 Pop the balloon and cut a hole it the side of the egg.  You can also just leave them as is and display them or cut them into a basket shape.  It’s hard to see in the photo, but the opening has already been cut.  I traced around a lid to get a perfect circle.  The thread cuts easily with regular scissors.string eggs 3I made stands for my eggs using a strip of cardstock taped into a ring shape.  Decorate and embellish you eggs and stands using hot glue.  I always like to add some sort of embellishment or trim around the cut edge.  I used gathered fabric on these two.  I also like to use rick rack, ribbon, or eyelet or lace gathered trim.  I have three more to decorate and that yellow one needs a little more decoration, I’m thinking a crocheted flower.
If you make any, let me know, I’d love to see how they come out!
This tutorial is included in the Fave Crafts Blog hop.

4.08.2011

Granny Triangle Crochet Bunting

I am sooooooo addicted to Pinterest, I could spend hours and hours just looking at everything.  I happened across this granny triangle bunting and fell in love, how great would that be on my porch?!?  I found these instructions for making the granny triangle and started crocheting on Wednesday.  I didn’t do the final row of picot stitches.

I used acrylic yarn because it’s going to be outside in the elements and acrylic yarn is almost indestructible.  My triangles needed to be blocked, acrylic yarn is blocked with steam, um the steam doesn’t work on my iron.  I know I’ll just spray a press cloth and put it on top of the yarn and iron, sending steam through the triangles.  FYI, to get steam your iron is going to be hot enough to melt the yarn.granny triangle bunting blockingGood news, they only melted a little and they look a lot better.  Really the only way to tell they’re melted is to look closely.  I chained all my triangles together and was kind of meh about the bunting.  I’ve been working on tassels this afternoon.  They really aren’t as time consuming as they sound, I was doing other things too, like entertaining a fussy baby.granny triangle bunting finished Sewing the tassels on really made a big difference for me.  I am really loving how this bunting came out, I might have to make some more.  It looks nice over the window, really dresses up the blinds and adds some fun color to a blah room (no, we still haven’t painted).  I want to make rainbow ones next.

Have a super crafty weekend!

11.24.2010

Kokeshi Doll Tree Toppers

I have been finishing up some of my paper mache projects from last week.  My hat models have receive their second coat of paper mache and now are awaiting finishing and I added some paper mache clay details to some of the other pieces.paper mache kokeshi toppers 1I lightly sanded them to remove some of the larger bumps, primed them with gesso, and then started painting.  paper mache kokeshi toppers 2 I really love the metallic sequin black paint from Folk Art that I used to paint their hair, it is super shiny. paper mache kokeshi toppers 3Some kimonos and fancy painted flowers finish them off.  The lighting in here is terrible (sorry), but I promise, they are super adorable.  Now I need to decide which one I like the best and have a “professional” photo shoot to really show them off.

Have a Happy Thanksgiving!

7.23.2010

But It Was On Sale

Last weekend I found a Sizzix Sidekick die cutting machine on clearance for $9.00 and although I don’t really need a die cutting machine the deal was too good to pass up. (BTW mine is red, image from sizzix.com).

image

I also got some flower dies (?) to cut with and decided to really put this little machine to the test. For my first project I cut aluminum can into cute little flowers. Soda cans are easy to cut with regular scissors and I just cut them into small squares and ran them through the Sidekick!die cut soda cans 1It cut them beautifully and even bevels the edges so they aren’t razor sharp anymore. I snipped the petals a little and bent them forward to make these more dimensional. I think I might try embossing the next one.die cut soda cans 2The dies seem fine, I cut paper and card stock after and they still worked great, now I just need some more shapes I have so many ideas. We’re going to have to start drinking more colorful soda!

Have a super crafty weekend!

11.17.2009

Craft Show Displays

Last year was my first real experience attending craft shows and basically I just showed up, slapped a piece of fabric on the table and arranged everything flat on the table. Not really that impressive and not the best way to showcase my work. This year I vowed to do better, but I don’t have the budget to spend hundreds of dollars on fancy displays and lets be realistic, handmade crafts deserve to be displayed in a unique way, not like a display at Wal-mart.

I had my set of five “heads” to model my hats, the varying heights really added some interest to my table. I also had several knitted scarves for sale and I wrapped them around the necks of my hat models.

I found this beautiful frame at a thrift store for $1.50 and knew it would be the perfect base for my pendant display. I cut a piece of foam core to the size of the hole and using hot glue covered it with a charcoal gray knit fabric from my stash. I inserted it into the frame and used pins to stick my pendants to it.

craft show display - pendants I did have to remove the cords from some of the pendants, but I really like the way this looks. I used a brick under the back edge to prop it up and that made the perfect hiding spot to keep my cash box and shopping bags. I also printed out signs that would be helpful for customers to shy to ask or if I was busy with someone else, stating prices and that each pendant came with a satin necklace. I also had a sign mentioning that I take custom orders.

I found this great cardboard organizer on clearance at Ben Franklin’s and just had to have it, once I got it home I realized it would be perfect to display my rainbow crayons and knitted washcloths.

craft show display - organizer box

It was great for the washcloths, but the crayons seemed to go unnoticed by a lot of my customers, I may need to come up with another way to display them.

I also sell record bowls and I use them to hold some of my smaller items, like bottle cap charms and recycled notebooks.

Overall I really think that my new displays really made my work appear more professional, I still need to come up a good way to display my tree of life ornaments, but I had no problem selling them this time. I was making them to pass the time and to have something to keep me busy and usually shortly after I finished one it would be sold.

I don’t have a picture of my full display, it seems in the excitement of going to the show I left my camera at home. I have one more show this season and hopefully I will remember my camera next time and if anyone knows a great way to showcase my tree of life ornaments let me know!

10.16.2009

How to Make a Spooky Halloween Spice Rack

Here’s another Halloween decoration to add to your dusty cobweb covered display.spooky spice rack 1

Here’s what you’ll need:

A vintage wooden spice rack with jars, I keep and eye out for these year round, ones from the 1970’s are everywhere here, there are also some available on ebay, but the shipping gets pricey.

Black craft paint and brush

Matte Mod Podge

Hot glue gun

Coffee filters

Twine

If you want to make your own labels you’ll also need:

water colors, paper, coarse salt and brushes

Ink and Ink pen/quill

Halloween stamps and ink pad

Or print my labels (for personal use only) This is my first try for making a PDF to share with everyone, the sizing may be a bit off, leave a comment or email me if you have any problems with these files:


To start, dust/clean off spice rack. I bought three different ones this season and they were all covered in dust. Remove labels from jars if there are any. Some of my jars were stained from various spices, I left them dirty because it went with the look. I also chose to mix and match my spice bottles for a more eclectic look. Hobby Lobby is a good source for interesting glass jars if you would like to add in something different.

Paint the spice rack black and allow to dry.

Now lets talk about jar labels. I wanted something old and moldy looking, I also wanted the labels to be hand written. I used water colors to make the backgrounds. I brushed water over the entire page I was working on and then added black in random spots. The damp paper makes the colors leach. I also used coarse salt to get the molded effect. I also randomly splattered paint all over the finished piece. Crumpling the damp paper also gives an aged effect.

I allowed the paper to dry and then I lasered copied the originals, adjusting the contrast to get a darker finish. I cut the copies into label sized pieces and started stamping different images on to them. When I was finished stamping, using my ink and quill I hand wrote all the label names.spooky spice rack 2Once the labels were dry I used Matte Mod Podge to glue them to the surface, try to only cover the glass where the label fits. The Mod Podge makes the jars appear cloudy, which is actually an interesting look.spooky spice rack 3

I used the hot glue gun to affix coffee filters over the plastic lids, tearing them to size. I used new one, but you could also use tea, ink pads, or watercolors to distress the filter first. Then I applied twine around the edges to finish the look. Don’t forget to add spooky ingredients to your jars!

This spice rack is for my swap partner, so I didn’t finish decorating it. I would cover it with cobwebs and use spanish moss to fill the drawers and some of the shelves. I would also add some spiders and bugs and display this with the drawers open an full of other ghoulish stuff.

I’d love to see pictures of what you guys come up with and Happy Halloween!!!

10.09.2009

Dollar Tree Decorated Skull Lights Tutorial

I made these super fun decorated skull lights using supplies from the Dollar Tree, so for about $8.00 I have a set of one of a kind skull lights.skull lights 5

I was excited to find these skull lights at the Dollar Tree for, you guessed it, a dollar!

skull lights 1They are battery powered and have flashing red and yellow LED lights inside them, I should have bought a dozen!!!  They also had purple and orange, I’m sure those would work too.

Here’s what you’ll need:

Skull lights from the Dollar Tree

white spray paint

black acrylic craft paint and fine brush

sharpie markers, fine tip and regular

acrylic sealer (optional)

Start by spraying your skulls white, these were kind of transparent and they looked cheap, adding the with paint made them look nicer and allowed the lights to still be seen flashing.

skull lights 2I then re-colored the eye sockets, nasal cavity, and mouth using the black acrylic paint and fine brush.  It took about three coats to get a nice flat black finish.

Next I used the fine tipped sharpie marker to draw designs onto the skulls.  It was a little tricky, these skulls are very angular and there is not a lot of flat surface for elaborate designs, so keep it simple and use geometric shapes.  After I had the outline drawn I went back with the regular tipped sharpie and filled in some of the areas.  The good news is if you mess up or don’t like the design you can always repaint it white!skull lights 3

Once you have finished your designs you can seal the skulls with a light spray of acrylic sealant, I did not, but I don’t expect these to get a lot of wear or to be handled a lot.  As you can see, you can get a variety of different looks, my favorite is the one on the far right.

This project was inspired by this project from the Crafty Chica.  Sadly I have not been able to find them in the last couple of years.  This year target did have some similar ones, but they were to cartoonish and silly for my tastes.

10.02.2009

Mantipi Specimen with Tutorial

I have always thought that specimen jars are cool, creepy, but still cool and after seeing Drew Olbrich’s Thing in a jar I knew I had to make my own.thing in a jar 7

You will need:

Sculpty clay

aluminum foil

acrylic paint

rubber cement

food coloring or cola

a jar

I used aluminum foil to make a basic shape, this helps to cut down on the amount of clay you’ll need and the cooking time to cure your “thing”.

thing in a jar 1I used original Sculpty clay, I was planning on painting the final piece, so why pay more for colored clay?  It is also easier to work with because it is softer.  I covered the foil form with a 1/4” thick layer.

thing in a jar 2  I decided to add another tentacle and bulk up the middle section with a fin.  You can make your “thing” as simple or as complicated as you want.  An organ shaped blob would be just as interesting as an alien fetus.  I worked on my sculpture for a couple of hours.  The suction cups on the tentacles took a fair amount of time.

thing in a jar 3Once I had everything like I wanted it I went back and smoothed out all of the finger prints and then baked it according to the package directions (for me that was at 275 for 45 minutes)  The back fin got a little well done, but it was easily covered with paint.

I painted a base coat of pear green on everything.  Once it was all dry I went over the entire sculpture with a dingy green, wiping it off with a paper towel to give the skin a molted look.

thing in a jar 4 Now it’s time to add the extra creepy part.  Coat the entire sculpture with 3 to 5 layers of rubber cement, rubbing it away on different sections to make it look like peeling skin.  This is a messy, sticky task, I just slathered the rubber cement on and it naturally starting peeling where I touched.thing in a jar 5

Now it’s time to put it in the jar, I made mine too large for any jar I had on hand and I had to take the mantipi with me to Hobby Lobby to find its new home.  thing in a jar 6

Use cola or food coloring to tint the water to accentuate the creep factor.  I think I need some sort of aged specimen tag for the jar, I’ll have to get to work on that!  I would love to see pictures of any “things” you guys make, send me some links :) and Happy Halloween!!!

8.24.2009

The Letter of the Day is K

You may remember a while back when I made decoupaged storage jars like Alexa from The Swell Life.  The first time I followed her instructions using random letters and numbers I cut from various magazines.  When I finished I wondered how it would look if I only used one color.  For my second try I used only red numbers and letters.  After finishing the red jar I wondered how using just one letter would look, can you see where I’m going with this?

I have to confess that I cheated and printed out all my letters.  K is a difficult letter to find and I wanted to use some of the fancy fonts I got from dafont.com (Thanks Lisa).  I picked a large variety of fonts and sizes.  I cut everything out and sorted them out by size.letter jar Ks I start by applying the large letters and filling in with the smaller ones.  Once I used up most of these I cut out my smaller letters, some of them were tiny.  I used them to fill in any tiny gaps or to break up space.letter jar k I really like how it turned out.  This is definitely a great project with many options and uses, I’m sure I’ll be making more of these…oooooh how about a theme like Halloween or roses or eyes, just when I thought I was done exploring the options of this project I get another idea!

8.14.2009

Thrifting at the Goodwill

Yesterday I stopped at the Goodwill that near my house, I hadn’t been there before, it’s a smaller store, but it really nice and everything is sorted/arranged very well.  It must have been my lucky day, I found all sorts of treasures!

The one is my favorite, this beautiful cut paper (???) picture, I snatched it up the moment I saw it.thrifted pic

It is really hard to photograph, the glass gives crazy reflections!  Here’s a better detail shot.thrifted pic detailI got all other sorts of stuff, clothes to recon, a purse, some shoes, and some extra special stuff for the 13 Days of Halloween Swap.  There was also some great chairs from the 70’s that were in great shape(I bet they spent their lives covered in plastic), I may have to go back for those.

Here’s a preview of what I’ll be working on next week.  All this stuff is getting repainted.DOD AngelsI also have a big weekend ahead of me, it’s time for Little Miss to get here own room and I need to paint everything, including the ceiling.  The kids are spending the night at my Parents house, so hopefully I will accomplish a lot, see you next week! 

8.10.2009

I’m Going to Call Him Steve

No reason, he just looks like a Steve.shrunken head bag embelished The details I added were some black stitching and some color.  The pattern recommended felting, I currently do not have any felting equipment and I didn’t want to buy any, so I used sharpie markers to color in the details.shrunken head bag embelished detailHe also has wood bead eyes and bone teeth.   I think he turned out pretty gruesome.  The really great thing is that you can use him as a purse or stuff him a bit and you have a great decoration!

4.28.2009

How to Make Punched Tin Lanterns

We spend a lot of time outside once it finally gets warm and I am always looking for ideas to decorate outdoors.  I love making punched tin lanterns, they are easy to make, economical, and really pretty.

To get started you will need:

a variety of tin cans, washed out and labels removed, a hammer, a towel, different sized nails, screw drivers, metal punches, a marker, and spray paint/acrylic paint.tin can lantern 1Fill the cans with water and freeze overnight, the ice will support the can while the metal is punched.  Don’t fill the cans completely full.  I’m sure you know that water expands when it freezes, I forgot this simple fact and froze several cans into my freezer the first time I made these.tin can lantern 2Using a marker I traced a design on to my can.  You can also freehand you design or make a paper template from the label of the can.  It is best to keep it simple, swirls and geometric shapes look great, I’ve even seen jack-o-lantern faces for Halloween and they were super cute.tin can lantern 3Use your hammer and a nail, screwdriver, or metal punch to punch holes in you can.  Laying the can on a folded towel muffles the sound, keeps the can from rolling and soaks up melting ice.  Work from the bottom to the top because once you start punching near the top the ice will start to break and the can will dent more.  The bottom of this can bowed out a bit, but once I had removed the ice I just hammered it back in.tin can lantern 4I like to punch a few holes in the bottom, so if these are left out in the rain the water can drain.  I also like to weight them down with a little gravel or river rocks, I hate chasing after candles holders and lawn furniture when a storm blows in!tin can lantern 5Let the ice melt and thoroughly dry you cans to prepare for painting.  I like to paint my cans with flat black spray paint, but the color is up to you, I’ve seen some painted in a rainbow of colors and swirls and they were stunning (acrylic paints would be better for a rainbow effect, you would also want to seal them for extra protection).tin can lantern 6On the smaller can (on the left) the ice softened faster and the punches I made with the phillips screwdriver are more diamond shaped.  For a more pronounced X shape use a hard frozen can.

I hope everyone has a great time making punched tin can lanterns, let me know if you have any questions.  Make sure to share links to photos of your own lanterns in the comments, I’d love to see what everyone comes up with. 

***Disclaimer*** please use common sense when burning candles, blah, blah, blah don’t leave unattended, yada, yada, yada.  The candle holders may get very hot, use caution, oh and if they are left sitting in the same spot all summer they may leave a rust ring.