Showing posts with label project. Show all posts

4.28.2010

Wishful Wednesday

As I sit here with my puffy, pregnant feet up I can’t help but daydream about all the new projects that I want to start once I have my energy back and today I’m going to share some projects from my wish list.  I’m not even going to discuss the 20 projects that I already have started that need to be finished.finished collageFrom left to right and top to bottom:

Pom pom wreath, 90 Minute Shirt, A Pettiskirt,

Jazzy Ironing Board Cover, Card Table Tent, Button Cookies,

Reusable “paper” towels, Shaggy Bag, Fabric Journals (Video part 1 of 4)

So, I’m going to need some dies for a big kick, some nylon chiffon, a card table, and a snap press and probably some other stuff.  What’s on your to do list?

3.25.2010

Progress, Lots of Progress

It has been a busy week here, School is off for spring break and we have been enjoying some nicer weather, there was even time to fly kites!  I have been working on TONS of crafty stuff, but I can’t seem to actually finish anything and what is finished I can’t share, yet.owls finished peek This is finished, the painted owls have been successfully cut and sewn and they ended up exactly like I pictured.  I opted to not outline them on the recommendation of comments here and on twitter, see I did use some of that pink shirt.SYTYC peek Here is my top secret project (yeah, I know super blurry, but I had to cropped it super small).  I’m really excited about this one and I will have a tutorial for this with a downloadable design.  I have another top secret project in the works that involves a bucket, but I haven’t had time to start that one yet.cupcake charms 1 Polymer clay cupcake charms, I have been all over town looking for micro beads so I can make some of these with sprinkles.cupcake pins 1 I also have been making decorative pins with polymer clay.  I made a mold to make the bottoms of the cupcakes, super easy and super quick!  I need to make another batch and take some more photos so I can put together a tutorial.  These are part of a new project that I will hopefully be launching soon.owlie felt 1Wool crochet, now I just need to felt this one and sew it all together, I’m not sure how this one is going to work out.

VHS crochet 1I have dismantled an old VHS tape and am working on a small sample project too.  As you can see, my big pink belly has started to creep into my photo shoots, I normally edit it out, but I thought I would leave it in this time.  I am at the beginning of month nine (give or take two weeks) and things are starting to get interesting around here.  I have two little people asking almost every day if the baby is still in my tummy, I’m frantically trying to finish every craft project I’ve wanted to do right now!, I’m trying to do some home improvements/repairs, and I want to landscape my yard…there is a really long list of things that I wanted to have done before the baby gets here, it’s really pretty wild, I don’t know what it is about being pregnant that makes it seem like there won’t be time to do at least some of this stuff after the baby gets here.  And the big issue is that we haven’t decided on a name.

Today we are just going to lounge around at home, I think I might wear my jammies all day and maybe I can finish one more project (or maybe I’ll start another one ;-D )  Ohh, and I’m taking name suggestions and also looking for guest bloggers to post Mid-April-ish, (whenever I have the baby), let me know if you’re interested!

3.16.2010

Lessons of the Day

1.  50% cotton and 50% polyester shirts do not discharge well with bleach, always check the label, assume nothing!lessons 2 (not even close to the look I was going for and the photo looks better than the actual fabric)

2.  Bleach pens get old and don’t work as well as a fresh pen.

3.  Make a sample, it saves time in the long run.

4.  Messy fingers are bad, watch what you’re touching or you’re going to have to come up with some creative ways to make it look like you did that on purpose.lessons 1 (sigh, maybe some appliqué will work)

5.  Iron freezer paper on the back of fabric that you are painting to keep the paint from seeping through the fabric.

6.  Make a copy of you design, that way if you make a mistake you have a back up copy and won’t have to start from scratch.

7.  Be flexible, sometimes you plan needs to change to accomplish the look you are going for.

8.  If you must spray bleach water do it outside or you will be sorry, trust me, I know.

9.  White vinegar neutralizes bleach, keep it handy to stop bleaching action, rinse fabric thoroughly and launder the bleached fabric.

10. A day where you learn something, but don’t necessarily accomplish anything is not a wasted day.

All of these lessons came up today, hopefully tomorrow I will have a completed project to share.

1.27.2010

Pop Tab Purse Prototype - Completed

I have finished my pop tab purse prototype (ahem, I know I said a week, note to self be more vague about time on blog).

pop tab prototype 4 I really like how the red fabric looks showing through the holes in the tabs!

pop tab prototype 3I added a zippered pocket on the inside, just a little something I really like in a purse. I also like the round zipper pull. I found this zipper in my stash of reclaimed zippers, I don’t know if I will be able to find something similar that is in the budget for this piece, but I can always adapt a zipper pull.

I would say my satisfaction level is about 85%, not bad for the first try of this style. What I learned putting in the linings: the inner lining would be easier to add before sewing the ends on, I’m not sure that the ends need to have pop tabs (they just make the bag hard to turn and the side seams of the lining shows through), need to crochet the top of the bag a bit taller so I can sew the zipper in using the sewing machine instead of by hand, and I need to add a strap or handle to the bag. Now I need to make a “real” one, I’ll take plenty of photos along the way, maybe I’ll even make a tutorial (some day ;-D).

There is also an interesting post on craftster about pop tab purses with hexagons that I’m looking at, I may have to give it a try, I really like how the strap looks where it attaches to the bag.

11.05.2009

Current Events and Paper Mache

It has been a long week and unfortunately it started off on a sad note.  Pookie’s (my cats) health started rapidly declining this weekend and on Monday I said my final goodbye.  She was my companion for over fifteen years.

Pookie and Kiki in the sweater bed Here she is, on the right, with my other cat Kiki in their recycled sweater bed.

I have also been preparing for the 19th. Annual Frost Frolic Holiday Market in exciting Fairbury, Nebraska, my home town.  Working on some new ideas on how to display my work, (more on that next week) and finishing up some last minute projects.

Here is what I just started working on last night.

paper mache 1Here is my base, balloons and cardboard tubes.  I then broke out the paper mache and went to work.

Paper mache 2  I didn’t finish the sixth one, I just ran out of steam, besides odd numbers of things look more visually pleasing, right?  They have dried nicely and are pretty stiff.  I think I’m going to give them a coat of spackle to smooth them out and maybe after my Lincoln Handmade Team meeting tonight I can start painting them.  Can you guess what they are going to be?

8.24.2009

The Letter of the Day is K

You may remember a while back when I made decoupaged storage jars like Alexa from The Swell Life.  The first time I followed her instructions using random letters and numbers I cut from various magazines.  When I finished I wondered how it would look if I only used one color.  For my second try I used only red numbers and letters.  After finishing the red jar I wondered how using just one letter would look, can you see where I’m going with this?

I have to confess that I cheated and printed out all my letters.  K is a difficult letter to find and I wanted to use some of the fancy fonts I got from dafont.com (Thanks Lisa).  I picked a large variety of fonts and sizes.  I cut everything out and sorted them out by size.letter jar Ks I start by applying the large letters and filling in with the smaller ones.  Once I used up most of these I cut out my smaller letters, some of them were tiny.  I used them to fill in any tiny gaps or to break up space.letter jar k I really like how it turned out.  This is definitely a great project with many options and uses, I’m sure I’ll be making more of these…oooooh how about a theme like Halloween or roses or eyes, just when I thought I was done exploring the options of this project I get another idea!

6.30.2009

Watercolor Portraits

I found this tutorial on Craftster and thought that the possibilities were endless. This is my first attempt and I have to say it was really easy.watercolor portraits This is a super gift idea, I made these to coordinate with my Mother’s dining room.

Here’s what I learned:

* Masking fluid is similar to rubber cement, so you could substitute if you can’t get masking fluid.

* I bought a masking kit at Hobby Lobby that included masking fluid, an applicator, and a removing tool (rubber cement pick up square) for $15.99(-40% off coupon).

* Using tracing paper to trace the white spaces is a bad idea, the lines won’t come off (do this project during the day and hold it up to a window like to tutorial suggests!)

* Don’t make yourself crazy trying to get it perfect, it will be fine if it’s not.

* Allow plenty of time for your masking fluid to dry.

This project went really fast and I’m sure that it will be a super gift. The great thing is it’s super easy, so go get your supplies and make your own!

6.23.2009

I Love Mod Podge

Is there anything that can’t be made better with mod podge?  I found these decoupage storage jars on The Swell Life and just had to make my own!letter jar 1 I like how hers turned out, she had better letters.  I also think that I’m going to have to “take one for the team” and force myself to eat some marshmallow fluff, I like that shape of that jar!  I have a giant stack of magazines so I think I should just start saving random letters and then in a couple of months I’ll be able to cover a vase, I have a spare that I found for a dollar at a yard sale.  I was also thinking that using just one color of letters might be cool too!, all red would be awesome. 

6.22.2009

I am Such a Copycat!

My friend Christy(christynelson dot net) made a stationery box for a friends' wedding and hey, I’m going to a wedding this weekend, so I copied her ‘cause she’s awesome!stationery box closed

Here it is all closed up and looking like a super cute little gift.stationery box openWhen you open it up the is a large pocket in the back and two smaller pockets in the front.  There is also a pocket for stamps and a lined notebook.  I have made a few cards, but I still need to make some tags for the pocket on the left and add a pen holder under the little notebook.  Christy used these instructions and I also found this youtube video that demos this project (this is a link for part one, there is also a part two).

I really like that I could use the colors the bride chose for her wedding and I think she is going to like it because she also enjoys scrapbooking.  She’ll probably laugh at my cards, turns out I’m not the best card maker.  My excuse is that I didn’t have enough embellishments, so everything seems kind of plain.

I spent this weekend fixing up the exterior of our house a bit, just a bit of tidying and some touch up painting.house collage

On the left side are the pictures that I took before the old tenant moved out and on the right are how it looks now.  My favorite part is that the two satellite dishes are gone, and all the junk too!

6.12.2009

Paint Chip Matchbook Notepads

As I was browsing OnePrettyThing I found these super cute notepads from paint chips and I just had to whip up my own.

paint chip match book notebooks

The tutorial is on Craft Leftovers and I really like the idea of using paint chips, so cute and colorful.  My “chips” only had four sample colors so I had to eyeball where to score them, but they turned out fine.  I did use the brad to secure the paper, but I doubt that I will actually refill these when I use all the paper (but I promise to recycle them).  The next batch will be stapled, I think I’ll make some using those wider paint chips…do you think I’ll get busted taking paint chips from every store I go to? 

Would it be something like, “Ma’am, you’ve been here several times shoving paint samples in you purse like crazy, but you’ve never bought any paint, I’m going to have to ask you to return those samples or buy some paint.” 

Me, “I thought these were free and I’m going to paint eventually I just need to make absolutely sure I have the right color.”

“Ma’am exactly what color are you looking for, you seem to have about one of every sample we carry, perhaps if you could pick a color I could help you narrow it down.”

Me, “The lighting here is just so much different I have to have a selection of everything, the colors really change when I get home.”

Or maybe I would just buy a gallon out of guilt for repurposing paint chips…I’ll tweet if I get detained (follow me just in case) or am banned from any stores.

6.11.2009

Project Wish List

If your like me you have some sort of collection of projects to do.  I have stacks of print outs, book marks and wists, so today I thought I would share some of the projects that I would like to tackle.  BTW if you beat me to them let me know how they come out.  This is a very small sample of all the projects waiting to be completed.project wists collage

From left to right, top to bottom:

Skull Isle Pouch, Clothespin Dolls, Ric Rac Flowers

Indian Mirror Embroidery, Roll-up Kitchen Play Mat, Make Your Own Shower Cap

Make Your Own Underwear, Jewelry Organizer, Sewing Machine Apron

If you’re in the market for some fresh ideas visit craftster or oneprettything, I’m sure you’ll find something to add to your must craft list too!

6.05.2009

Homemade Water Colors – Success!!!

It took a couple of days for the paints to dry and some of them were still a little wet. The colors are a little softer than store bought paints and the ones that were still damp were easier to paint with. I would say that adding a full tablespoon of water and then letting them set for 24 hours would make them the perfect consistency. I would also advise adding a couple drops of water to completely dried paint before starting a painting session. watercolor tutorial color samples My kids were super excited to paint with these since they found them sitting out drying. They didn’t have any problems using this paint and it does dry faster than store bought colors, there is also a baking soda residue that is left when the paint is applied thickly. I like this new texture, it’s kind of like suede.watercolor tutorial action This project was definitely a success! The kids were delighted to have specially made paints and when they get a little bit older they will be able to help make their own paints.

I have several other crafty art supply recipes to try out this summer so stay tuned!

5.21.2009

How to Arrange Furniture on Paper

Have you every wanted to rearrange you furniture, but were afraid to waste all that time moving your furniture to hate the arrangement or have things not fit right?  Here is my simple and inexpensive solution:  arrange your furniture on graph paper.  All you need is graph paper, pencil/pen, and a tape measure.graph paper floor planMeasure you room and graph it onto the paper, on my example 2 squares equal one foot.  Don’t forget to mark the windows and doors.  I also like to mark electrical outlet, cable outlets and phone jacks.

Now you’ll need to measure and graph your furniture using the same scale as you room drawing, for this example: 2 squares equals one foot.  Cut that furniture out and start arranging! 

I have got a bit of a problem, my furniture is to big for my space.  New furniture is not in the budget and I have to get this stuff to fit.  I have three different options:
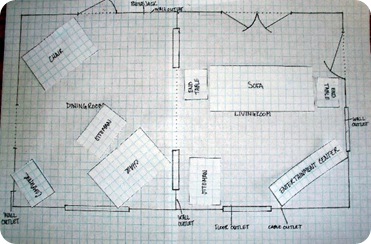
graph paper floor plan 1Option 1 – Sofa floating in the middle of living room and not really room for end tables.

graph paper floor plan 2  Option 2 – Flipping living room and dining room.  There are no outlets or cable outlets where I have put the entertainment center and I would have to run cords!  Living room is basically just leftover furniture storage.

graph paper floor plan 3 Option 3 – Entertainment center blocks half of French doors and one built in, plus cords would have to be run as there are, once again, no outlets.

The long term solution is to move the entertainment center and sofa to the basement, where we are planning to have a family room and buy new, smaller furniture for upstairs.  I am not ready to do that yet and I would like to have our TV on the main floor for now, what do you think would be the best way to arrange everything?  I don’t have to use all of the furniture, but we need to have places to sit.

5.20.2009

18 and Life

So, my mom and I are talking and she tells me that since we bought a house she’s going to bring some of my things from high school that she has been storing.  She mentions “that picture of that lady with the words” and some other stuff.

Hmmmmmmm…that lady with the words?…

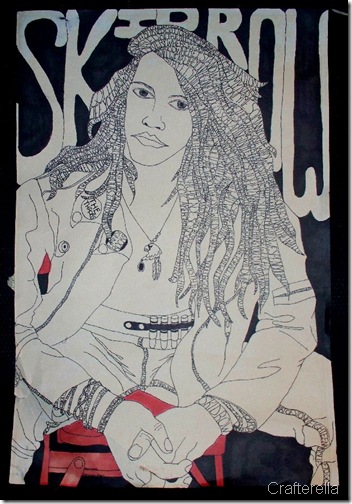
I would like to present Sebastian Bach from Skid Row (if you need a refresher, Skid Row wiki entry)18andlife This was a high school art project that somehow has survived for over 15 years, it is a little rumpled at the bottom and the edges have masking tape residue on them, that’s pretty good for some drawing paper and sharpie markers.  I spent some time looking for the original picture, I know I probably got it from Metal Edge, but I gave up after about 30 pages.

18andlife detail Yes, those are the words from all the songs on their self titled album.  There were some other interesting pieces in the collection that she brought me and I will be sharing more “finds” in the near future.  So, what was you favorite band in the late 80’s, early 90’s?

5.11.2009

Christy’s Craft Challenge for May

Last month I was awarded a free month of the Craft Challenge, my packet arrived one week ago and the brain storming began.craft challenge may packetThe packet contained a 12” x 12” floral print paper, five blue fabric squares, four flower buttons, two artificial flowers with leaves, and two pieces of green floral wire.

I added clear contact paper, mixed plastic beads, ribbon ends, a 12” x 12” paisley print paper, and thread.  Here is a sneak peek:craft challenge may 1It’s turning out exactly like I planned, anyone want to guess what I’m making?

5.07.2009

Suminagashi (Marbling Paper with Ink and Water)

I was so excited about my recycled paper factory that I decided to use is again. This time I used the tray that holds the paper pulp and water mixture to make suminagashi. I just filled the tray with water and after a little experimenting with pigments that I had on hand I was making marbled paper.suminagashi 1I had some walnut ink on hand, but the effect was too light. I found that watercolors worked perfect. India ink also works well, I just didn’t have any handy. I did experiment with several colors, I decided that I like the high contrast of the black.suminagashi 2This technique is super easy, just load one brush will water color and touch it to the surface of the water, then touch the surface of the water with a clean, wet brush in the center of the color to make the rings. The color can be swirled with a brush, blown with a straw, or left how it dropped. The paper is then laid onto the surface of the water and the print is made! I used basic printer paper, but almost any type of paper will work as long as it doesn’t have a glossy surface. Basically this is mono-printing on water. Rinse off excess pigment and hang to dry.suminagashi 3A resist can be made by painting shapes on the paper with plain water before making the print. I was able to get some interesting results, I like the effect, but the shapes aren’t perfect.

suminagashi 4

This was a fun and quick technique that gives great results without investing a lot in materials and yields some unique papers for other projects.

I also wanted to share pictures of the finished paper.paper recycling factory 6

I love how they turned out and since I stuck them on the counter to dry one side is super smooth and the other side has that traditional handmade paper texture. Expect to see more handmade paper and other crafts made with the paper recycling factory soon!

5.04.2009

I Made Some Cereal Box Journals

Whenever I’m in the mood to try something new I visit OnePrettyThing, there is always something new to try.  Last week I found this tutorial for making cereal box journals.  It’s crafty, useful, green, and inexpensive.  I used several different boxes, not just cereal boxes, so my books vary in size a little bit.  cereal box booksFor the inside I used printer paper (100% recycled) and lined paper from old notebooks.  I spent the afternoon cutting the boxes and papers to size (I made 20 of these, I imagine that making a couple would be pretty quick).  I have to say that rounding the corners is what really gives this project a finished look.  I decided to use my boxes with the printing on the outside.   I also used thread from old projects in my machine, it was a great way to use up those off colors of thread from old projects filling up my bobbins.cereal box books 2My books have 16 pages, just like the tutorial, but I think I may be able to get 20 pages in the next batch.  My sewing machine didn’t have any problem sewing through everything, although I did wear safety glasses incase I broke a needle.  I know I will be making more of these and with the decorating possibilities I will have to leave the plain side of the boxes out next time.cereal box books  scrapsI saved all of the paper scraps and they will be including in another recycling project later this week.

4.20.2009

Project Lisa is Finished

I finished all of the projects for Lisa and delivered them to her at the Lnkhandmade team craft night earlier tonight.  I repaired the zipper in this dress and added a tulle ruffle to the bottom.  I also made this wrap to go with it.
project lisa finished I really like how the outfit for her daughter turned out.  The summerlin dress in a shinier yarn with a crepe backed satin skirt and a matching shrug with a matching satin tie.

project lisa finished 2I am worried that it might be to long, but I also think it will look a lot different on an actual child instead of a hanger.  It can be shortened, so I’m not worried.

I need to wrap up my entry for Christy’s craft challenge and find a place to keep all the awesome fabric I got at the meeting tonight.

12.18.2008

Candy Cane Cozy

While wondering around the internet I found this adorable pattern for a candy cane cozy on zakka life blog, (it is a great blog and there are a lot of inspiring projects, check it out). I am also anti-candy cane and right now, as I type, two little children are begging for candy canes that I bought to fill up my own cozies.
I love the idea of keeping track of the candy canes on the tree and this is a very quick project. I used some leftover cotton and crocheted a chain for it to hang on instead of a ribbon. Mine still needs some sort of embellishment on the end (maybe a pom pom), but they will look great on my packages this year!

6.07.2008

Yard Sale Finds

I am so addicted to yard sales and thrift stores, I can hardly wait for Saturdays! Today was an excellent day for bargain hunting.

I found a vintage Skyway suitcase in decent shape for $2.00, an adorable picnic basket for $1.00, a large brandy glass with the world ugliest candle wreath(which is already in the trash) for $.25, and an embroidery hoop for $.25.I also found a bag of 18 pillowcases for $2.50 and a stack of 7 round tin trays for $.50. I have big plans for most of my finds today. The suitcase will be gutted, all that stinky old fabric will be removed and replaced. I will also paint the outside, probably a soft blue or pink and then I will paint or maybe decoupage something on the side and it will become a dress up case for my daughter. The brandy glass will be used for a plant it's just perfect for keeping my kitties from munching on the foliage, but allowing in light and air. The embroidery hoop will be used to make a screen printing frame and the trays will be painted, decoupaged and sealed and used for holiday treats. The pillowcases will be made into pillowcase dresses for my daughter, a couple of summery tops, and maybe a couple of reusable grocery bags. The picnic basket will most likely be left as is, I just have to make some place mat/silverware holders and cloth napkins and we will be all set to have a family picnic! So many projects, so little time, if only I had a maid, a nanny, and a personal assistant!