Showing posts with label jewelry. Show all posts

1.14.2011

Styrofoam Jewelry Tutorial

I know that the image that styrofoam brings to mind and jewelry in that medium doesn’t sound very attractive, but really this is a fun recycling project that you can do with your older children.  I remember doing this with my Mom and when I noticed these pink and black trays waiting to be recycled I was reminded of this simple project.styrofoam necklace 6 You will need styrofoam meat trays, scissors, a hole punch, a needle, thread, some coordinating beads, a pendant (optional) and some jewelry findings if you want to add a clasp to your finished pieces.styrofoam necklace 1 Start by cutting the curved edges off the meat trays.  You’ll want to have a nice flat piece of styrofoam.  Using the hole punch, punch holes all around the edge of your tray.  Save the dots and cut off the punched part of the tray and punch around the edge again.  You will need a large collection of dots to make your necklace/bracelet.styrofoam necklace 2 Select some matching beads, I used some large seed beads and thread you needle.  I like to use fishing line for this project, it has a little stretch and doesn’t knot or tangle when you’re using it.  styrofoam necklace 4 Start stringing your dots, I like to use a repeating pattern, but randomness works too.  Add a few beads in with the holes for some sparkle.  The styrofoam is really light weight and the beads help the necklace hang better, adding a pendant is great too.  Knot the ends together (or use bead caps with jump rings and clasps) and there you have a new necklace or bracelet.  These are great fun to make and go great with paper beads, home made shrinky dinks, and plastic bottle beads.styrofoam necklace 5 I know this tutorial seems a bit rushed, but today is a no school day (and the start of a four day weekend) and my little helper was getting impatient to go and do other things.

Have a super crafty weekend, see you next week!

1.25.2010

Cocktail Ring for a Voodoo Queen

We all know that Voodoo Queens get invited to a lot of cocktail parties and now they can have a stunning ring that conveniently keeps their pins handy and sharp for poking dolls.  Next in the design sketchbook:  Voodoo doll bracelets and purses.bottlecap pincushion ring 1Okay, seriously, last Friday I had a pincushion ring featured in my favorites.  It was really cute and it reminded me of when I first showed my friends the bottle cap pincushions I was making, someone (I don’t remember who, Kelly, Christy, ???) suggested I make them into rings and I finally have.

An adjustable ring base, a bottle cap, E6000 glue, felt, embroidery floss, rick rack, and stuffing is all you need to make one of your own.  bottlecap pincushion ring 2I started by sanding the bottom of my bottle cap lightly to help the glue stick.  Then I traced around the bottom of the bottle cap on felt and cut it out.  In the center of that felt circle I cut a little slit and slipped the pad part of the ring base through the hole, just like a button.  I put a dab of glue on the pad and stuck it to the cap.  I left the felt unglued so I could sew it easier.

Then finished cutting out and sewing the pincushion (see this picture tutorial).  I think that the embellishing is what really makes these little things, I like to add rick rack around the base of mine.  Quick tip: rick rack is polyester, to stop it from fraying where it’s cut use a lighter to lightly singe the raw edge, this melts the fibers together and keeps them from unraveling.bottlecap pincushion ring 3I love how it turned out, so cute and handy.  I’ve really been loving this red and turquoise color combo lately, I hope you guys aren’t getting sick of it.  I plan on making a few more of these, but I want to order some nicer adjustable ring bases.  The one I used is okay, but there are better ones available online.

10.14.2009

Nightmare Before Christmas Fan Art

I have recently made two separate Nightmare Before Christmas projects.  First was the set of polymer clay ornament, featuring the many looks of Jack Skellington.  Here they are before baking.
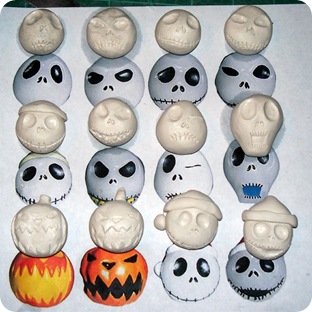
NBC ornaments before bakingI printed out my inspiration, divided my clay into 12 equally sized balls and started shaping.  I decided to add wire loops before baking, so I wouldn’t have to drill and glue them in later.  I used chain nosed pliers to make loops and then left about an inch long tail that I wrapped around a paint brush, it looked like a corkscrew with a loop on the end.  And then I just screwed them into the soft clay, believe me, these loops aren’t coming out!

I baked them according to the package directions, base coated them with white spray paint, and then painted them with acrylic craft paint.  I finished them by dipping them into triple thick glaze and letting them hang dry.  I had to wipe the drips on them for a few minutes, but it was worth it for the super shiny finish.

NBC ornaments finishedI also made a bottle cap charm bracelet using images from the movie.  I did a google image search and then picked out several images to use.  The key to getting the image the perfect size is using a 1” hole punch.  I then glued the images inside the bottle caps and coated the tops with diamond glaze.  The diamond glaze gives a resin like finish without the chemicals and toxic smell, but it is not as durable as resin.

I was even lucky enough to find some Tim Burton styled focal beads.  It is definitely a chunky bracelet, but that what I love about charm bracelets.

NBC bottlecap charm bracelel

I need some more Diamond Glaze now, looks like I’ll have to head to Ben Franklins, the only store in town that carries it!  Halloween is fast approaching, get to crafting!