 This is Little Miss’s new closet, can you believe how cute it turned out?!? I’ll add more details and photos later, I was just so excited to share :)


Showing posts with label recycling. Show all posts
Showing posts with label recycling. Show all posts
8.17.2012
From Trashed to Fabulous
I rescued this dresser from the curb last Friday and have been busy working on is all week. I have a super busy day today, but I wanted to share the before and after photo.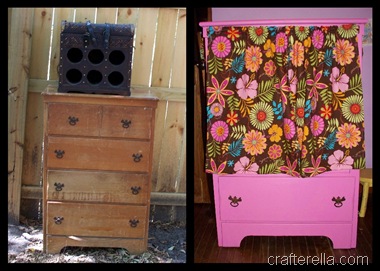 This is Little Miss’s new closet, can you believe how cute it turned out?!? I’ll add more details and photos later, I was just so excited to share :)


4.18.2012
Pasta Jar Lanterns
I love the look of Moroccan lanterns, but I have yet to find any in my price range and they aren’t really the sort of thing you see at a yard sale in Nebraska. When I saw these lanterns on DesignSponge I envisioned a backyard filled with them! I had plenty of jars on hand (yay, recycling!) and I decided to try some different paints. I picked gold and black puffy paint and I also got some liquid leading. For the glass tint I used stuff I had from a kit in iridescent purple, PermEnamel in rooster red, and PermEnamel Shimmers in blue ice. My tips for this project are:
This was the test, seriously I want a large collection of these for my back yard. I have a large selection of different sized jars and now I need to get some more of the shimmers glass paint and some sponge brushes. I am anxious to see if the paint will peel off the jars after being out in the elements.
I’m curious, do you use candles outside a lot or is it more of something that is just for show? What kind of out door decorations do you have in your yards?
 I had plenty of jars on hand (yay, recycling!) and I decided to try some different paints. I picked gold and black puffy paint and I also got some liquid leading. For the glass tint I used stuff I had from a kit in iridescent purple, PermEnamel in rooster red, and PermEnamel Shimmers in blue ice. My tips for this project are:
- Be generous with the puffy paint, the jars that have a thick coat of paint look the best.
- You can use a sharpie to evenly divide your jar and make guide lines to follow (any mistakes or lines that show can be cleaned up with rubbing alcohol and a Q-tip).
- Use a sponge brush to apply the glass paint on the inside of the jars and don’t use too much, it will run and look bad (see the blue jar).
- If the color on the inside isn’t dark enough or is uneven another coat of glass paint will help.
- any brand names embossed in the glass can be easily hidden with the puffy, plan your pattern accordingly.

This was the test, seriously I want a large collection of these for my back yard. I have a large selection of different sized jars and now I need to get some more of the shimmers glass paint and some sponge brushes. I am anxious to see if the paint will peel off the jars after being out in the elements.
I’m curious, do you use candles outside a lot or is it more of something that is just for show? What kind of out door decorations do you have in your yards?
3.11.2011
Kids Pajama Pants for a Dollar
A few weeks ago I noticed that Little Miss and Little Sir were outgrowing most of their pajamas, I also found some pictures of them wearing the same pj’s from about two years ago (I buy big and they wear them until they’re too small). New pj’s are pricey, covered in annoying characters, and usually polyester – uncomfortable! I needed to make them so new ones and this is a great opportunity to simplify my laundry routine too: a random selection of pants paired with undershirts, no more matching up sets.
When my local Goodwill has $.99 day I am always on the lookout for adult lounge pants, there is usually a good selection at my neighborhood store in size small and medium, I have been stocking up for a while. (I wash everything I thrift the minute I get home, I want to make sure everything is nice and clean.) 

I stitched up the legs and then the crotch seam and all I had to do was make the casting for the elastic and I was finished.
These go together really quick, especially once you get the hang of the pattern. I need to get the other pairs cut and sewn, I wonder which pair they’ll like the best. Have a super crafty weekend!!!
1.14.2011
Styrofoam Jewelry Tutorial
I know that the image that styrofoam brings to mind and jewelry in that medium doesn’t sound very attractive, but really this is a fun recycling project that you can do with your older children. I remember doing this with my Mom and when I noticed these pink and black trays waiting to be recycled I was reminded of this simple project.


Have a super crafty weekend, see you next week!
12.27.2010
Holiday Photo Ornaments
I have been giving my Mom a new ornament every year with a holiday picture of the kids, but with three kids it’s getting hard to fit them all on one tiny little store bought ornament. I can’t believe it never occurred to me that making the ornaments would be even better, duh, I’ll blame it on the crazy holiday season.
When I came across the Juice top photo ornaments on The Crafting Chicks I made a mental note to make them for next year. After taking this years holiday photos on the 23rd. I decided that I needed to make those ornaments for my Mom this year. I went to the craft store on Christmas Eve and I drank 6 quarts of juice and I have to say it was worth it!

12.20.2010
Greeting Card Ornaments
I know that I’m not the only one who saves every card that has ever been sent to me. Cards are expensive and really pretty, but hidden away in a box no one has the chance to enjoy them. Go get you box of cards, I’ll wait.
You’ll need:
a greeting card, something round (I used a glass, a fancy circle cutter would be awesome), glue, a small diameter hole punch, crochet thread, and a small crochet hook.

Decide what part of the picture on the card you want to use. I decided to use the tree and the Merry Christmas text. You can also use the words from the inside or other paper for the back. This particular card was from the place we bought our gutters and the inside text wasn’t ornament worthy. I used a glass for my template, but anything you can trace around will work, and don’t feel obligated to used something round, ovals and other shapes would be great too.


I love how easy and inexpensive this project is! I really need to dig into my stash of cards. These are easy to mail and they also make great package decorations.
10.22.2010
Mushroom Canisters In Progress
In July I scored this awesome vintage mushroom canister set for $10. The set was a little beat up, but still really cute. We had a set of mushroom canisters when I was a kid and they really bring back happy memories. 


I’m going to use acrylic paint to touch up the white areas where the original glaze is completely gone and maybe add some touches of turquoise. Then I’ll finish it all with a coat of sealer. Luckily the original glaze is multi-colored and I think the touch up should blend well. BTW, I’m not using these for flour and sugar, they are for decoration and kitchen clutter storage. I wouldn’t use them for unwrapped food storage after all that painting and sealing.
I think they’re going to turn out really fun, now I just need to get back to that giant spoon and fork! Have a super crafty weekend!!!
7.23.2010
But It Was On Sale
Last weekend I found a Sizzix Sidekick die cutting machine on clearance for $9.00 and although I don’t really need a die cutting machine the deal was too good to pass up. (BTW mine is red, image from sizzix.com).

I also got some flower dies (?) to cut with and decided to really put this little machine to the test. For my first project I cut aluminum can into cute little flowers. Soda cans are easy to cut with regular scissors and I just cut them into small squares and ran them through the Sidekick!

Have a super crafty weekend!
6.23.2010
Are You Going to Throw that Out?
I think that is my catch phrase. I say that a lot, just try to throw something away when I’m around. My friend Lisa (oobbles) even saves her trash for me, she has really good trash. I will also circle the block to pick up something off the curb and I can’t walk by a trash can or dumpster without peeking in.
Plastic caps, lids, and cups have really captured my attention lately. I really enjoy making bottle cap pincushions, I like that the pins won’t poke through the bottom. Then I had a thought: why just use soda caps?, any size would work, right? 

I think that the medium sized ones are my favorite, what size of pincushion is the best?
6.18.2010
Eco Chic Grocery Shopper
It started off with a plarn tote and was followed by a MEAT bag and now the set is finally complete, reusable produce bags!
Have a super crafty weekend!
5.24.2010
Reusable Gift Bags

I found this fun retro TV fabric in my
I don’t really think that the 7 year old that received this was very impressed, but I think his Mother liked it. The great thing is that it can be reused in so many ways: gift wrap, toy storage, project storage, overnight bag, lunch bag, etc. and I know that is isn’t going to be toxic or end up in the landfill. I guess I should start making some for Christmas, I just need to figure out some standard sizes to start with and then I can always make specialty sizes later.
4.21.2010
More Sienna Dresses
I know that I have already shared some of these, but I really enjoy making them. I have had these cut out since our LNKHandmade team meeting on the 3rd. I guess my favorite part is shopping for the shirts, it’s a shopping challenge to find interesting shirts that can be reassembled in to adorable dresses.
The minute I saw this shirt I had to have it, unfortunately it wouldn’t fit anyone, but add some hearts and tie dye and it really makes a fun little dress. Little Miss says she only likes the hearts.


4.06.2010
The Easter Dress…
…that didn’t get worn. I know what you’re thinking, it wasn’t finished, but it was. I used the button shirt to toddler dress tutorial from craftster. BTW, it was really easy to do and it really made a cute dress. I had bought the perfect shirt (from the Goodwill), so cute with pink and blue plaid, and it was going to be great. I made my dress and ended up adding elastic to the top front to make it fit a little better, but other than that everything fit perfect and it was really quick to make.
The reason she didn’t wear it was that I didn’t like how the colors looked on her. I know, that seems a little silly, but I really am picky about what the kids wear. It’s okay, but it would have been a lot cuter on her if it was a brighter color or had a bolder pattern. It might even look better this summer after we’ve had a little sun. I thought about dying it, but I sewed it with polyester thread, so that would stay white, and I wasn’t sure what color to use anyway. I’m still thinking about solutions. I really like the style of the dress, the little ruffle straps are my favorite. I would also look great with a petticoat under it.
I do recommend the tutorial, it was very easy and the results were great, just make sure to pick the right shirt!
3.11.2010
Another Lilblueboo Pattern
After enjoying the Sienna Dress pattern so much I decided to try the Lil Leggings pattern and, once again, I was not disappointed! Nice straight forward instructions and a great selection of tips to make different styles. The pattern recommends a knit fabric with 75% stretch, I used a less stretchy fabric and upsized the pattern a bit. The result are some cute leggings to match Little Miss’s new Sienna Dress.
You should recognize all of the fabrics, they are from my thrifting adventure last week. I know it may seem a little out of season for a Catrina, but she will be wearing this all spring and summer, what can I say, we’re a year round skeleton family.
Little Miss really likes these dresses and when she finds out that I’m making her a new one she hovers around waiting for it to be ready to try on. It’s exciting for me that she really wants to wear the little dresses I’m making. I think I may just have to buy all of the Lilblueboo patterns, there are so easy and stylish. We get a lot of compliments and people are amazed that these are handmade. If you have a little girl to sew for I can’t recommend these patterns enough. Make sure to stop by The Lil Blue Boo blog as well for some great tutorials for embellishing you fabrics for a more custom look.
I have some other great girly tutorials to try, but I just can’t stop making these knit dresses, I wish the pattern came in adult sizes. I have been eyeing the Halter/Tie back dress pattern for this summer.
3.09.2010
Pythons
The first Thursday of the month is when we have our Lincoln Handmade Etsy team (facebook fan page) meetings. They’re a lot of fun, full of crafty gossip, eating, knitting, crocheting, and other craftastic fun. This month the team gave me a baby gift: a thrifted t-shirt and a Hobby Lobby gift card. We had a good laugh about the shirt and this is what I turned it into.

Thanks Lincoln Handmade Team for the awesome shirt and gift card, I’ll giggle a little every time the little man wears it!
3.08.2010
The Plarn Adventure
As I was cleaning my dining room/craft table I came across the plarn I had made last month. I immediately felt the urge to finish the already started bag. I think I was just looking for a reason to stop cleaning, but my theory was crochet the bag and then I won’t have to find somewhere to store the plarn balls. I just sort of made this up as I went along, so no pattern to share, however if you’re looking for plarn inspiration check out RecycledCindy’s blog, she has a lot of great ideas and free patterns.

I want to try VCR tape next, although I hear that it’s a little harder to work with,(it sticks to the hook).
3.04.2010
Thrifty Thursday – Goodwill Treasures
I had a great weekend of thrift shopping, if you remember it was $.99 day at the Goodwill last Friday and Saturday.
I found a great selection of striped shirts, a few tie dyes, and some plain colors for matching. I also found a great orange dragon shirt and an interesting gaming shirt, it had Yoda and Darth Vader, so I had to get it.


3.03.2010
The Simple Things: An Easy Storage Container
There is a mitten monster on the loose here and apparently he only eats little girl mittens, I think that this year we have lost at least three. I imagine that the reason he is not around in the summer is because he’s wearing six pairs of sunglasses that have all magically disappeared. I would like to note that I have been wearing the same sunglasses for the last five years and just recently bought myself a new pair, but I still have my old ones as a spare.
I have found that in order to keep my sanity everything needs to have a “place” to go. In our new house a lot of things need designated spots to go and once everyone is aware of what spot everything goes we should be able to find what we’re looking for without organizing a search party.
In my desperation for quickly leaving the house I came up with these handy and simple containers to store mittens and sunglasses and other stuff, there will be no more hunting. If mittens and sunglasses aren’t in the container we won’t be wearing them today!

3.01.2010
More Curtains
The curtains for Little Miss made her room look so much nicer that I thought it was time to fix the curtains in Little Sir’s room.

I made these curtains a few houses ago and while they are holding up fabulously they are a tad bit short for the windows in our new house. It doesn’t seem like that big of a deal, but they let in a lot of light and at night they allow our neighbors to see right into my son’s room.
I added some more denim to the bottom, lined them with muslin, mounted them on boards, and added ties like Little Miss’s curtains, so we could open them up during the day.

I know that stripes are a little wonky, but in my defense, when I originally made these curtains they were for windows on different walls, so I didn’t worry about matching up the stripes. I need to add a dowel to the bottoms for weight and roll them slightly to make them look better. Letting them hang for a few days will help too!
These curtains were so easy and inexpensive to make. I used jeans that I had been given (my whole family saves their old jeans for making bone crusher quilts) and just tore the legs into stripes, I also had the muslin for the lining on hand (thanks Christy Nelson), but an old sheet would have worked just as well. (The only reason I backed them was so that from the outside the windows look white.) The back of the legs were wider that the fronts so the stripe width vary. I arranged them into a graduated color pattern, I’m sure they would have also been great in a random pattern too. I stitched them all together leaving the seams on the outside and then snipped the seams about every quarter inch and ran them through the washing machine to fray them. Make sure that when you dry the curtains that you empty your dryers lint trap often! The only stuff I had to purchase for these curtains were boards to mount them on and the orange fabric for the ties, which I have also used to make a swaddling blanket and still have plenty left over for some other projects, so I spent about $10 total and most of that was because I wanted fancy batik cotton fabric (and I didn’t want to seam the ties).
I’m really enjoying the difference custom curtains make I may have to get started on the ones for my craft room. We’ll see what next Monday brings!
2.10.2010
Little Man Shirt
I noticed that the Sienna Dress pattern (from Lilblueboo) was pretty unisex and I decided to make Little Sir a shirt with it. I had the perfect polo shirts to use, orange with stripes, we love orange! I used the tapered sleeve and made the body of the shirt slightly boxier and shorter. 
Subscribe to:
Posts (Atom)