I loved making all these ornaments and the kids liked helping a little too. I have a ton of packages to wrap and a special surprise planned for this week, it’s going to be a busy week!!!
12.19.2011
Keepsake Ornaments
I loved making all these ornaments and the kids liked helping a little too. I have a ton of packages to wrap and a special surprise planned for this week, it’s going to be a busy week!!!
12.16.2011
One Week of Pre-Christmas Crafting Left
12.14.2011
Glitter Ornaments (and 1 Wreath) with Friends
FYI there is a rainbow of glitter all over my house!
1.17.2011
Conversation Heart Ornaments
Nothing says Valentine’s Day to me like conversation hearts. I remember sorting through them and reading each one. Where I work they have a Christmas tree that they leave up year round and they are always looking for new ornaments to decorate it, so I decide to make some conversation heart ornaments using basic salt dough.
Basic Salt Dough Recipe:
1 c. salt
2 c. flour
3/4 – 1 c. warm water
Mix salt, flour, and water together until a large ball forms. Knead on a lightly floured surface. The better you knead the dough the nicer the dough. Roll out 1/4” – 1/2” thick and cut shapes with cookie cutters. Place on parchment covered baking sheet and bake 3 – 4 hours at 200 F. I have a collection of different alphabet stamps and I used a set of those to make the words. Make sure to really press the stamp into the dough, I found that it was hard to get a good letter impression without printing the edge of my stamps too.
If you look closely you can see the imprints on the hearts on the right hand side.
The salt dough dries really well in the oven and the final texture really reminds me of the real conversation hearts. Once they were dry I painted them. I think that if I made them again I would tint the dough and then I would just have to paint the letter, plus they would have been a softer pastel color like the real hearts. I need to seal these really well to preserve them and then string them on ribbon and they’ll be ready for the tree. These would also be cute with a hole on each side and hung as a banner. This was a really fun, simple project that I think I will revisit again, maybe next year we’ll make monogram ornaments for all the teachers.
12.27.2010
Holiday Photo Ornaments
I have been giving my Mom a new ornament every year with a holiday picture of the kids, but with three kids it’s getting hard to fit them all on one tiny little store bought ornament. I can’t believe it never occurred to me that making the ornaments would be even better, duh, I’ll blame it on the crazy holiday season.
When I came across the Juice top photo ornaments on The Crafting Chicks I made a mental note to make them for next year. After taking this years holiday photos on the 23rd. I decided that I needed to make those ornaments for my Mom this year. I went to the craft store on Christmas Eve and I drank 6 quarts of juice and I have to say it was worth it!I love them sooooooo much, I have to drink some more juice so I can make my own set. We do drink a lot of juice here, but not the kind with the metal lids.
12.20.2010
Greeting Card Ornaments
I know that I’m not the only one who saves every card that has ever been sent to me. Cards are expensive and really pretty, but hidden away in a box no one has the chance to enjoy them. Go get you box of cards, I’ll wait.
You’ll need:
a greeting card, something round (I used a glass, a fancy circle cutter would be awesome), glue, a small diameter hole punch, crochet thread, and a small crochet hook.
Decide what part of the picture on the card you want to use. I decided to use the tree and the Merry Christmas text. You can also use the words from the inside or other paper for the back. This particular card was from the place we bought our gutters and the inside text wasn’t ornament worthy. I used a glass for my template, but anything you can trace around will work, and don’t feel obligated to used something round, ovals and other shapes would be great too.Cut out your shapes and glue them together, wrong sides in. It isn’t essential, but it keeps the two pieces from sliding around while you’re working with them. This is also a great time to neaten you edges if they don’t match up.
Use a small sized hole punch to evenly punch holes around the edge. I just eyeballed it and tried to make it fairly even.
Start crocheting! I did three single crochet stitches (sc) into each hole in the first round, slip stitch into first stitch. The second round I sc into every stitch, slip stitch to join the begining of the round, and for the third round I chained 5, *skipped one stitch, double crochet in the next stitch, chain two*, repeat from * all the way around and slip stitch to forth chain. Then I chained about 25 and slip stitched into the first stitch again to make the hanging loop. If you have any questions about this pattern just ask, I’m still working on my pattern writing skills. I added a ribbon bow to finish it.
Here’s mine with the ones my Mom made, she makes scallops around the edge of hers. This would be a great way to try out some new edging stitches.
I love how easy and inexpensive this project is! I really need to dig into my stash of cards. These are easy to mail and they also make great package decorations.
12.17.2010
Felt Peppermint Ornament
I found this great tutorial on Pink Suede Shoes for a felt peppermint ornament and fell in love! So simple, but so fun. I thought it would be a great little something to give all the teachers, assistants, bus drivers, etc. for the holidays.
The one on the bottom right was made using the full sized pattern. I wanted to stretch my glitter felt a little farther, so for the others I reduced the pattern to 65%. I also saved my cut out triangle pieces and made reverse peppermints (twice as many ornaments!!!). I used rick rack for the hangers and finished all the edges with a zigzag. Hand sewing would have be great, but I’m getting a little pressed for time. When stitching the edges I stitched until there was a few inches to go, shoved some stuffing in the opening and kept sewing.
I found this tutorial via Chickabug and there was also a link to the most fabulous two color felt pinecones. I was so excited about them, I was even undeterred when I had to give my name, email, and address and opt out of four different newsletters to get the free template because those pinecones were going to be so awesome. I don’t know where I went wrong, I think the directions were a bit vague or maybe I missed something. It’s from the Family Circle magazine, maybe the actual magazine has better instructions (anyone have a copy? let me know). Mine is sad, and it looks better in the pictures than real life and this is also after I fixed it (as in stopped following the directions and used some glue). Way too much cutting and time invested for such a piece of crap. I would not recommend it and I have to say I am not likely to try one of their free patterns again. However, the tip about ironing freezer paper to you felt to make it easier to trace you pattern on was genius, it’s so hard to trace a nice line on felt, I’ll definitely use that one again.
I have some more felt ornaments to work on this weekend, I’ll share those next week. Have a super crafty weekend!
10.14.2009
Nightmare Before Christmas Fan Art
I have recently made two separate Nightmare Before Christmas projects. First was the set of polymer clay ornament, featuring the many looks of Jack Skellington. Here they are before baking.
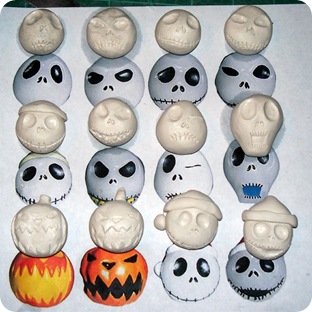
I printed out my inspiration, divided my clay into 12 equally sized balls and started shaping. I decided to add wire loops before baking, so I wouldn’t have to drill and glue them in later. I used chain nosed pliers to make loops and then left about an inch long tail that I wrapped around a paint brush, it looked like a corkscrew with a loop on the end. And then I just screwed them into the soft clay, believe me, these loops aren’t coming out!
I baked them according to the package directions, base coated them with white spray paint, and then painted them with acrylic craft paint. I finished them by dipping them into triple thick glaze and letting them hang dry. I had to wipe the drips on them for a few minutes, but it was worth it for the super shiny finish.
I also made a bottle cap charm bracelet using images from the movie. I did a google image search and then picked out several images to use. The key to getting the image the perfect size is using a 1” hole punch. I then glued the images inside the bottle caps and coated the tops with diamond glaze. The diamond glaze gives a resin like finish without the chemicals and toxic smell, but it is not as durable as resin.
I was even lucky enough to find some Tim Burton styled focal beads. It is definitely a chunky bracelet, but that what I love about charm bracelets.
I need some more Diamond Glaze now, looks like I’ll have to head to Ben Franklins, the only store in town that carries it! Halloween is fast approaching, get to crafting!3.12.2009
New Tree of Life Ornaments
I love the asymmetrical square ones, but I am almost out of square bases(I don't think I will be able to find more of this clearance item).
This one is truly one of a kind, the deep aqua beads are from my gigantic stash of beads and I have no idea where they came from, so I can't buy more.Being a craft supply hoarder can be difficult, finding just what you need in your stash is awesome until you realize you've had it for at least five years and you can't buy more, but it does make some definite one of a kind items. I guess there will aways be new discoveries and hopefully it helps my work evolve, so the lesson is: if you like it make sure to get it now, supplies are limited!
12.28.2008
Christmas Pajamas
This year I decided that instead of spending $20 plus per outfit for my children for a Christmas outfit that would maybe be worn a couple of times and for pictures was a complete waste. I thought Christmas pajamas would be cute and practical, (they do wear pajamas daily). I used Simplicity pattern #9853 view c to make these one piece jammies. I was looking for fleece fabric in blue with some snowflakes, but when I saw this candy cane striped fabric I knew that it was perfect! I made them a size to big, so they could wear them for a couple of years. I like how they turned out and the pattern was fairly easy to sew. I did not like the instructions for installing the zipper and I will do that differently when I make this pattern again.
Every year I make Christmas picture ornaments for the grandparents. I like to find a different kind each year and this year they will be heart shaped (if you want to make your own I found my ornament frames here). I normally have these made up and give them for Christmas gifts, but this year I am behind and so everyone will be getting a post Christmas gift ornament.
12.22.2008
Poison Tree

I guess Christmas is getting pretty close, I should probably make those pajamas next...
12.16.2008
I'm Back!
My tree of life ornaments have been doing well on etsy and that has been keeping my busy with trips to the post office and for more supplies and it has been great!


I am also making several other gifts (salt dough ornaments, holiday pajamas, a special tree of life ornament, and possibly some aprons) and I'll be sharing those soon!
10.14.2008
Beaded Tree of Life Ornament

I really like how it turned out, the two different colors of glass pearls really give it more interest and depth. I will definitely be making more of these, maybe I could use up some of my gigantic bead stash or maybe I could buy some new pretties to play with.
9.01.2008
Polymer Clay Pendants Galore!

These are all mokume gane all nicely sanded and buffed, just waiting to be drilled. I am saving these for the fall craft shows I will be attending.
These are made from slices of automatically wrapped canes (bullseye canes). I really like the "retro" feel of these.
Here are the backs, I just used the leftover clay to make marbled sheets for the backs to make the pendants double sided.
And this is my masterpiece, a Balinese filigree ornament. I really enjoy this technique, although it is very time consuming. My crafting ADD kicks in and I just have to fill every gap! I have already started another ornament and I have several more pendants waiting to be baked.
I love polymer clay.


