Showing posts with label biggest DIY. Show all posts

6.11.2012

Summer Update

We have been having so much fun, I can’t believe that this is my first blog post of June, time is racing by! Our big news is we had some work done on our house and they are finished! I really think you need to see the before and after side by side (to get a better look open this picture up full sized). House progression And this isn’t really the after, it’s the construction is finished, but we still need to paint, hang some trellis, put the new(old) storm door on, and generally cute it up a bit more.
The front looks great, but that’s not the best part:house progression - fence gateYep, that’s a brand new gate and a brand new privacy fence. I have wanted a fence since we moved in and now I have it! We are outside all of the time now, we have plans for a garden and a fire pit and who knows what else (we have a really large back yard). bike washToday we’ve had a bike wash, later we’re going to go for a ride and work in the front yard some more. How is you summer going? It is speeding by like ours?

3.16.2011

Andy Warhol Inspired Art for $3.88

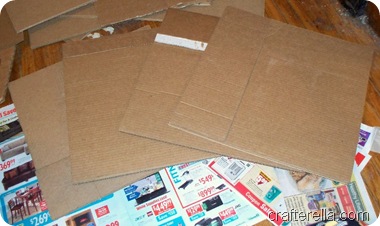
I have had this idea floating around in my head for a while, but buying canvases was a little out of my budget.  When I saw the toilet boxes I knew they would be perfect.  I started by cutting the cardboard into 16” squares, my boxes were double layered so 2 squares equaled four layers of cardboard.toilet box 1aAfter all of my squares were cut I glued each set of two together and weighted them down overnight.toilet box 1b The next day I used paper mache paste to add strips of newspaper onto the cardboard squares,  horizontally on one side and after that dried, vertically on the other side.  Once they were mostly dry I layered them between plastic wrap, so they wouldn’t stick and weighted them to get them nice and flat.toilet box 1c I painted gesso on the fronts and sides and then it was time to do some sketching.toilet box 1dI used a photo of a trooper helmet (Star Wars) and was inspired by the style of Andy Warhol.  I used two shades of turquoise and two shades of orange acrylic craft paint to fill in my design.toilet box 1ePicture hangers will be hot glued to the backs for hanging, they are really light weight.  The only supply I bought was the paint, for $.97 each, the grand total for this project was $3.88, plus my time.  I have been working on this project exclusively since Saturday.  These will be perfect Little Sir’s wall, I wanted something fun and colorful that would last for a few years.  I have to get his room painted next, we’ll be using a light aqua with one orange accent wall.  He wanted all orange, but I thought it might be a bit much.
Not too bad for a toilet box, I have one more project to try with the remaining box, cardboard may be my new favorite medium!

6.01.2010

Status Report

First, how was everyone’s long weekend?  Did you work on some special or exciting projects?  I did, kind of.  Not fun and exciting crafty projects, but around the house stuff.

I have been in the mood to clean for the last week, I know, weird huh? and when that happens I just go with it.  I have accomplished a lot, but not the awesome before and after shot of progress that I want to share (I think this is my first post EVER without a picture).  I cleaned the laundry area and actually caught up with the laundry(I know, crazy, I even ran out of hangers), I got it all folded and put away too.  The big achievement was sorting through all the outgrown clothing:  two totes to resell, one tote to donate, one small pile to save, and one very small pile to throw out.

We also got some really awesome shelves for our basement, (they can hold 2000 pounds a shelf) and totes to fill them.  I really want to get rid of every cardboard box in the basement.  I expect to be working on that project for quite a while.

There has been some furniture rearranging in my bedroom.  The crib that we used for Little Sir and Little Miss was one of the cribs that has been recalled (twice).  I was able to return it and with the refund purchased a new crib for Little Man.  I cleaned everything up there and basically flipped the furniture around.

I have been doing a little crafting, but I’m going to go with the cleaning until the urge leaves (it never lasts long).  I do have some really great quilts that I received from my Mother to share with you, I have so bottle cap pincushion “blanks” made up, and I am working on a new crochet design, more on that later this week.

7.13.2009

What I did this Weekend

Last week we had an appointment with the Lincoln Action group, they provide weatherization and during the inspection we discovered black mold in one of our basement walls. Well you know that has to be fixed. Luckily in was contained in a small wall, so this weekend we took the wall down. I cordoned off the area with plastic put on my mask and started ripping it down. My Father was here to help and Marma(my Mother) kept the kids busy. big DIY basement bathMost of the mold was growing on the back of the drywall and there is no way to get it off, so out it went! The mold was caused by moisture in the wall from an old leak that had already been repaired. big DIY basement bath2I sprayed the interior of the wall down with a mold killing spray, we have a dehumidifier running full blast, and in a few weeks when we’re sure the mold is dead and everything is nice and dry we’ll put the wall back up. We will be replacing one of the studs in the bathroom wall, installing an access door for the plumbing, and putting recessed shelving into the family room wall. And that swimming pool blue paint will get painted over too!

I have also been working on my Crafty Chica bag. I have finished the appliqués. Kelly (refibered) gave me a mini lesson on reverse appliqué at our Lincoln Handmade Team meeting last week. I have started the painting. I’m using regular acrylic craft paint mixed with textile medium, it’s taking a lot of coats to get good coverage, but it worth it.chica bag progress 1This is the back, I’m going to have to get a shot of these outside so the glitter vinyl is more noticeable! chica bag progress 2 Here is the front, I’ve finished the white areas and am building up the yellow and red areas.

Once the painting is finished I will be embellishing this further with dimensional paint, glitter paint, rhinestones and maybe some sequins. I also have something super special planned for the inside, so check back. The contest has been extended to the 24th., so there is still time for you to give it a shot! (See the Flickr gallery here.)

6.22.2009

I am Such a Copycat!

My friend Christy(christynelson dot net) made a stationery box for a friends' wedding and hey, I’m going to a wedding this weekend, so I copied her ‘cause she’s awesome!stationery box closed

Here it is all closed up and looking like a super cute little gift.stationery box openWhen you open it up the is a large pocket in the back and two smaller pockets in the front.  There is also a pocket for stamps and a lined notebook.  I have made a few cards, but I still need to make some tags for the pocket on the left and add a pen holder under the little notebook.  Christy used these instructions and I also found this youtube video that demos this project (this is a link for part one, there is also a part two).

I really like that I could use the colors the bride chose for her wedding and I think she is going to like it because she also enjoys scrapbooking.  She’ll probably laugh at my cards, turns out I’m not the best card maker.  My excuse is that I didn’t have enough embellishments, so everything seems kind of plain.

I spent this weekend fixing up the exterior of our house a bit, just a bit of tidying and some touch up painting.house collage

On the left side are the pictures that I took before the old tenant moved out and on the right are how it looks now.  My favorite part is that the two satellite dishes are gone, and all the junk too!

6.02.2009

Graffiti

Our new house was formerly a rental house and so there have been a lot of fun discoveries made since we closed. For example, a large hole in the kitchen wall was patched with packing tape and then painted, there are miles and miles of wires (cable and phone) that go nowhere, the toilet has been installed at an odd angle, but my personal favorite is the graffiti.sharpie boobs before

This particular drawing is in my bathroom behind the door, a delightfully primitive large breasted woman done in black sharpie marker. The reason I mention this is that I have discovered a way to lessen the appearance of sharpie marker, so I don’t have to apply 10 coats of primer and I thought I should share. The secret is rubbing alcohol and a cotton ball.sharpie boobs after

Here is the after shot, now I know that you can still see the boobies, but they are definitely less noticeable. Once the wall dries and the ring around the edge fades it will be a lot better. I think that on a semi gloss paint the marker would have been completely removed. I’m not exactly sure what kind of paint this is, it is matte and when I wash the walls (and yes they really need to be washed!!!) it comes off, not completely, but noticeably. The entire interior is painted with this stuff and every room needs to be primed (with kilz) and painted, walls and ceilings. We are going to start painting soon, but the bathroom will be one of the last rooms we do (we would really like to redo the entire bathroom (or as I put it: rip out everything and start over)).

Oh, and the other thing I learned last week: foaming oven cleaner is great for removing cat urine from cement floors, we got a little crazy and just started trying different cleaning products.

And after all of this I am still really excited that we bought this house and I can’t wait to get everything done.

5.18.2009

The Big DIY

I mentioned a few weeks ago that I was going to start working on the biggest DIY ever and today I would like to share a bit more about that.  A week ago we closed on our first house.  The house has been a rental house for years and the last tenant and her five children did a lot of damage to the home.  The majority of the problems are cosmetic, a bit of hard work and elbow grease and we should have a very nice house!wood flooor corner before

So, what have I been up to this weekend you ask, scrubbing floors, I think I have scrubbed all the floors at least five times.  The corner of floor pictured above has some sort of gooey crud on it, I spent a couple of hours scrubbing and scraping and ended up with a fairly clean corner of floor.wood flooor corner after

Almost the entire first floor has hardwood floors that all need to be refinished, but we just spent all of our money buying the house!  I discovered Rejuvenate Floor Reviver and it works fabulously!!!, if your floors are worn and no longer shinny this stuff is for you!  I also tried Orange Glo and while it did improve the surface of the floor, the Rejuvenate made a bigger impact and it can be used on many different types of floors.  diningroom damaged wallI have also been working on the walls, there are a lot of dents, dings, and some larger holes in the plaster (on the left beside the doorway the black marks, yes those are bicycle tracks!).  Patching plaster walls is interesting, but easy enough for a beginner, a nice lady at Home Depot helped me find everything I needed.  I am now getting excited about painting.panoramic livingroom

This is a panoramic shot of our living room and it shows why this house is so great, there are miles of beautiful wood work and somehow it has never been painted.  Those French doors lead to my future craft room, where I will be making curtains and slipcovers and other fun household stuff plus all the other crafty stuff I like to make.

Now I just need to decide what colors to paint everything!