Showing posts with label tote. Show all posts

3.08.2010

The Plarn Adventure

As I was cleaning my dining room/craft table I came across the plarn I had made last month.  I immediately felt the urge to finish the already started bag.  I think I was just looking for a reason to stop cleaning, but my theory was crochet the bag and then I won’t have to find somewhere to store the plarn balls.  I just sort of made this up as I went along, so no pattern to share, however if you’re looking for plarn inspiration check out RecycledCindy’s blog, she has a lot of great ideas and free patterns.plarn toteThis bag worked up quickly thanks to the large hook and I used up all of my plarn!  It seemed like it took me longer to cut the plarn than to crochet it, but the cutting is the boring part.  I made stripes to make it a little interesting, I wish I had more colors to choose from.  plarn tote detail It turned out a great size for grocery shopping and the red stripe will coordinate with my “meat” bags.  Plarn was easy for me to work with and I will be making more of these bags, it seems like there is always plenty of plastic bags around even though I normally bring my own bags or at least ask for paper.

I want to try VCR tape next, although I hear that it’s a little harder to work with,(it sticks to the hook).

8.17.2009

The Crafty Chica Bag Challenge Results

The results are in, I am one of the runners up! (read the full article from Craft here).  What did I win you ask?  A Crafty Chica bobblehead and a gift card to MakerShed!

Crafty Chica bobblehead! by Amy Cluck of Peptogirl Industries.

Image from Amy Cluck of Peptogirl Industries photo stream on Flickr http://www.flickr.com/photos/peptogirl/3579765791/

It was really exciting to be a part of the contest, of course I wish I would have won, but I was recognized for my efforts, so yay!!!  The winner was my favorite (besides my own bag).  I love the dimension of the ruffle and the ball fringe!

El Sol Del Valle/ The Valley Sun by

Image from dntblvedahype 's photo stream on Flickr

http://www.flickr.com/photos/wisdm1979/3750938269/

Congratulations to all the other winners and thanks to all my friends for all your support.

7.15.2009

Freezer Paper Stencils, Mini Tutorial

I am still embellishing my Crafty Chica bag and I decided that the lining needed a little something. I didn’t want to hand paint something that is only going to peek out when I’m digging around in the bag, so the answer was freezer paper stencil. I love this technique and it is sooooooooo easy!

Get a big roll of freezer paper from the store, mine cost about $9.00 at a “big box” store. (I know it seems pricey, but it is worth it and it was also a really large roll.) There are images everywhere that can be used for stenciling, for my bag I googled “nautical star stencil”. I cut my freezer paper to match the shape of my bag and then traced the star images where I wanted them, make sure you trace them on the matte side of the paper. Since my design was simple it only took about 10 minutes to cut everything out with an exacto knife. Using an iron fuse the freezer paper to you fabric, it’s easy, just place the shiny side down and press with you iron until the paper sticks to your fabric. Make sure your cut edges are stuck down good!
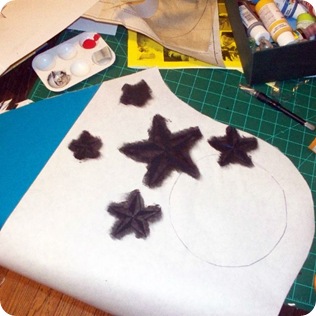
chica bag star stencil 1 I like to use a cosmetic sponge to stencil with. Dab it into you fabric and pounce it on to the fabric in an up and down motion. Don’t rub it around, just up and down. You can always go over an area again, so don’t slop the paint on, I can’t say this enough, just dab! Remember to put scrap paper under you fabric incase the paint soaks through.

Wait a few minutes for your paint to dry and then carefully peel off the freezer paper.chica bag star stencil 2This was what I was going for, but it still needed something, I know, glitter!chica bag star stencil 4 I used red dimensional glitter fabric paint to accent the lines of the stars and once the bag is finished and the edges are wrapped in red binding it will really pop.

I need to finish some outlining and cut out the pockets and bottom and then I will finally be ready to sew!

7.14.2009

More of The Chica Bag

I worked on my Crafty Chica bag all day yesterday.  Layering the paint to get solid bright colors over that turquoise fabric took forever, but once I was finished with that I couldn’t wait to start embellishing!  I even went outside to take a “well lit, non blurry” photo for you to see.chica bag progress 6 I am still finishing the lettering and the buttons on the banner.  I also have to finish the lettering on the back piece, I might even have time to work on the lining.  Then I will be able to stitch it all together.  I’m sure by the end of the week everyone will be sick of seeing this bag, but I can’t help it, I’m obsessed.  See the other entries on Flickr.

7.13.2009

What I did this Weekend

Last week we had an appointment with the Lincoln Action group, they provide weatherization and during the inspection we discovered black mold in one of our basement walls. Well you know that has to be fixed. Luckily in was contained in a small wall, so this weekend we took the wall down. I cordoned off the area with plastic put on my mask and started ripping it down. My Father was here to help and Marma(my Mother) kept the kids busy. big DIY basement bathMost of the mold was growing on the back of the drywall and there is no way to get it off, so out it went! The mold was caused by moisture in the wall from an old leak that had already been repaired. big DIY basement bath2I sprayed the interior of the wall down with a mold killing spray, we have a dehumidifier running full blast, and in a few weeks when we’re sure the mold is dead and everything is nice and dry we’ll put the wall back up. We will be replacing one of the studs in the bathroom wall, installing an access door for the plumbing, and putting recessed shelving into the family room wall. And that swimming pool blue paint will get painted over too!

I have also been working on my Crafty Chica bag. I have finished the appliqués. Kelly (refibered) gave me a mini lesson on reverse appliqué at our Lincoln Handmade Team meeting last week. I have started the painting. I’m using regular acrylic craft paint mixed with textile medium, it’s taking a lot of coats to get good coverage, but it worth it.chica bag progress 1This is the back, I’m going to have to get a shot of these outside so the glitter vinyl is more noticeable! chica bag progress 2 Here is the front, I’ve finished the white areas and am building up the yellow and red areas.

Once the painting is finished I will be embellishing this further with dimensional paint, glitter paint, rhinestones and maybe some sequins. I also have something super special planned for the inside, so check back. The contest has been extended to the 24th., so there is still time for you to give it a shot! (See the Flickr gallery here.)

7.06.2009

More Bag Sketches

After considering the advice I received from Christy and Ashley I decided to redesign the front.  I pared it down a little bit (I was sad to get rid of the sparrows), so I could make the banner and skull larger.chica bag front 2I think I almost have it.  The skull needs to come down a bit and I might try to squeeze some scissors in there too!

I think the other design had too much going on and since it was smaller it would have been harder to embellish and there will be some serious embellishing!

Let me know what you guys think!

7.03.2009

Sketches for the Crafty Chica Challenge

I am working on the painted design for my beach bag for the Crafty Chica Challenge.  I have the bag pattern all ready to go, but first I need to paint the design.  I want to use the “tattoo flash” style that I used for my back patch, but I wanted a new design.chica bag, front

This is what I have for the front, but I think it needs something else/more/different.  I like the top and the bottom, but I need to work on the middle.  I can’t decide if I should add more stuff, start over on the middle portion, or revert back to the design for the back patch.chica bag, back I like the back, maybe the front is just too busy.  I need some advice, what should I do with the design for the front and how does the shape of the bag look?  Leave me a comment and help me decide!

5.09.2008

A Swap for Knitters - Received

I absolutely adore the package I received from auntiem! Everything is just perfect.This is the full package there is a knitting bag with day of the dead fabric, yay!, size 15 needles, size 2 DPNs, The Knitters Bible, 8 skull stitch markers and holder, 8 knitted hair rollers from my wists, wrist warmers and the pattern, 6 finger cots and holder, 2 skeins of caron feathers yarn, 1 skein of denim tweed yarn, and the rest of the skein used to make the wrist warmers, some sheep magnets, and a pattern to make socks. Here's some detail shots...

The set of rollers are orange!!! and they match the ones that I have been making perfectly(pattern). The finger cots are so cool, I just started knitting a wool purse and they are saving my fingers and the stitch markers are also being used in that project. The wrist warmers are so cute I almost wish it was winter again, almost.

I love getting stuff in the mail. I have found that as a crafter I am always making stuff for my friends and family and often times I don't keep anything for myself so getting crafted stuff from my swap partners is always special.

5.05.2008

Reusable shopping bag

I made two of these bags for my friend Lisa to use as a totes, one for her and one for her daughter.
I love this bag it is made just like those plastic bags that you get at the store only is fabric! They are lined and can even have a pocket to fold up into! The detailed picture tutorial can be found here.
I also made this one for the reusable shopping bag contest on craftster.
This is the front. I made the drawing with a regular black crayon and the leaves are rubbings. Once you are finished drawing, iron with a pressing cloth to set the crayon. This bag is machine washable, but no dryer!!!
Here's the back, you can see the pocket for holding the folded bag.

And here's the bag all folded up. I need to make more of these, they are really sturdy(they can carry 3 2-liter bottles). The tutorial also includes instructions for making button holes so the bags can be placed on the bag holders at the stores. This is a great way to cut down on plastic bag use and the design options are limitless!