Showing posts with label fabric painting. Show all posts

5.23.2011

Screen Printing Round 2 – Contact Paper

I had so much fun with my first try at screen printing I wanted to give it another try.  I found this tutorial for using contact paper from Lilblueboo and couldn’t wait to try it.
It was very easy, the most time difficult part was cutting out the design.  Sticking with a simple design is really the way to go, but I think that is true for all screen printing.  I was very excited to have my own custom, one of a kind fabric. screen printing contact paper 2 I used a bone folder to burnish my contact paper to my fabric screen from the inside.  I made several prints from each screen and they all came out wonderfully.  When I washed the screens some of the smaller pieces from inside the stars came off, but the large one is still intact and could be reprinted.  I really thought this was a great project.screen printing contact paper 1It is perfect for a small scale printing and I think it would be great for kids (with adult help/supervision of the cutting).  I was able to make numerous copies of my designs, the design edges are crisp, and I can remove the old design and reuse the screen again, win!
Check back later this week to see what I made with this fabric.

3.31.2010

Now Testing Mod Podge Silk Screen

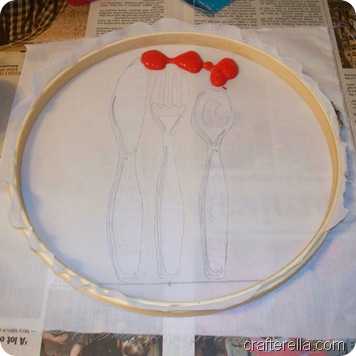
I said Monday I had been dreaming of Mod Podge and this was the project that I had been doing over and over in my mind while I slept.  The best tutorial I have found for using Mod Podge to silk screen is here, she also talks about how to make your design on the computer.silverware design 1 I based my design on my silverware, after I finished the drawing I colored the design in to make sure I was going to like how it printed.  I made some modifications to the highlights when I traced it on to the fabric.   I traced the shape of the hoop on to the paper so I wouldn’t make my design too big.  I probably should have left more space at the top and bottom for the screening process.
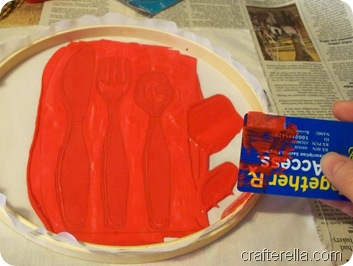
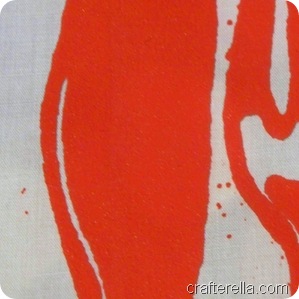
Painting the Mod Podge on was easy, I used a fine brush for the details and then filled in the big areas with a larger brush and I let it dry overnight.  I only used one layer of Podge (more about that later).silverware design 2 I put some ink on the screen, I splurged and bought Speedball fabric screen printing ink, I really want this to look professional and I was afraid that acrylic paint with textile medium wouldn’t give a smooth even look.  I think that I used to much ink, next round I will use less.  I drew a line and a center mark along the bottom of my design, I will use this to make printing the finished design easier.  I want them evenly spaced and in a straight line.silverware design 3 I used an old plastic card to “squeegee” my ink through my screen.  I was happy with how it worked, but I think that I need to have something as wide as my design.  Next time I will be using cardboard.silverware design 4 Not to bad, I can see some things that I want to fix on the original screen, but that is exactly why I did this test.  I am going to go back and widen the highlight and reshape the one on the fork a bit.  I also will be going over the background with another coat of Podge.  Using less ink will also make the finished print sharper.silverware design 5 Those little red dots are where I didn’t get the fabric properly coated.  Next time I will do two layers of Podge to start off with, it really isn’t that bad, I’m just picky like that.
I am really excited about the results and this is a really frugal way to do some screen printing.  Embroidery hoops are easy to come by on yard sales and even if you purchase a one new it is less than $2.00.  I used drapery fabric, it’s easy to find in the remnant bin and inexpensive too.  The big expense was that screen printing ink, $8.99 at Hobby Lobby, no I did not shop around, I’m sure it could be found a bit cheaper, and don’t forget you 40% off coupon.  I will be trying this technique with acrylic paint and textile medium eventually and we’ll see how comparable the results are.silverware design 6I washed the screen up right away and the ink came out easily.  I’ll make the corrections once it’s dry and make up a couple more samples and then I should be good to go for the real project: new kitchen curtains!!!
What do you guys think?  Will this design be cute in my kitchen?  I’m going for a kitschy-retro-whimsical look.

3.25.2010

Progress, Lots of Progress

It has been a busy week here, School is off for spring break and we have been enjoying some nicer weather, there was even time to fly kites!  I have been working on TONS of crafty stuff, but I can’t seem to actually finish anything and what is finished I can’t share, yet.owls finished peek This is finished, the painted owls have been successfully cut and sewn and they ended up exactly like I pictured.  I opted to not outline them on the recommendation of comments here and on twitter, see I did use some of that pink shirt.SYTYC peek Here is my top secret project (yeah, I know super blurry, but I had to cropped it super small).  I’m really excited about this one and I will have a tutorial for this with a downloadable design.  I have another top secret project in the works that involves a bucket, but I haven’t had time to start that one yet.cupcake charms 1 Polymer clay cupcake charms, I have been all over town looking for micro beads so I can make some of these with sprinkles.cupcake pins 1 I also have been making decorative pins with polymer clay.  I made a mold to make the bottoms of the cupcakes, super easy and super quick!  I need to make another batch and take some more photos so I can put together a tutorial.  These are part of a new project that I will hopefully be launching soon.owlie felt 1Wool crochet, now I just need to felt this one and sew it all together, I’m not sure how this one is going to work out.

VHS crochet 1I have dismantled an old VHS tape and am working on a small sample project too.  As you can see, my big pink belly has started to creep into my photo shoots, I normally edit it out, but I thought I would leave it in this time.  I am at the beginning of month nine (give or take two weeks) and things are starting to get interesting around here.  I have two little people asking almost every day if the baby is still in my tummy, I’m frantically trying to finish every craft project I’ve wanted to do right now!, I’m trying to do some home improvements/repairs, and I want to landscape my yard…there is a really long list of things that I wanted to have done before the baby gets here, it’s really pretty wild, I don’t know what it is about being pregnant that makes it seem like there won’t be time to do at least some of this stuff after the baby gets here.  And the big issue is that we haven’t decided on a name.

Today we are just going to lounge around at home, I think I might wear my jammies all day and maybe I can finish one more project (or maybe I’ll start another one ;-D )  Ohh, and I’m taking name suggestions and also looking for guest bloggers to post Mid-April-ish, (whenever I have the baby), let me know if you’re interested!

3.19.2010

Fancy Painted Owls a Tutorial

Painting fabric can be a challenge, but it is really rewarding to make a custom design.  Today I will share the technique that I use and some helpful tips, for this project you will need:

Fabric (I used a t-shirt for this project)

  • acrylic paint
  • textile medium
  • dimensional fabric paint
  • brushes
  • freezer paper
  • Exacto knife
  • iron
  • cosmetic sponge (I buy packs of these at the Dollar Tree, they come in handy for a lot of projects)
  • a design (use free clip art, coloring book images, or you own designs)

For this project I used a purple shirt, to make sure that my colors showed up well and that I didn’t have to paint layers and layers of paint I started off with a stencil of the outline of my design.  I traced it onto freezer paper and cut it out with an exacto knife.  I fused the freezer paper to the shirt using an iron.  I also fused another piece of freezer paper to the back of my shirt to keep the paint from bleeding through.  Using a cosmetic sponge  I applied white acrylic paint mixed with textile medium to my design shapes.  I did two layers, will make a nice base so that my paint colors show up well, if you use a white or other light colored shirt this step isn’t necessary.  At this point I removed my freezer paper, but I recommend that you leave yours on.  If you smudge or splatter paint the freezer paper will protect the rest of your shirt.Painted owlies tute 1A note about paint: I like to use regular acrylic craft paint because I have a lot of different colors on hand, if you prefer you can use fabric paint instead of mixing in a textile medium.  Mixing textile medium with the paint makes it permanent on fabric, follow the directions on your textile medium to get the proportions correct (mine was 2 parts paint to 1 part medium).

After the white base coat was dry I used a pencil to lightly trace my design onto the shapes.  I mix up one color at a time and paint my fabric like a paint by number, doing all of one color before starting on the next.  I still needed two coats of paint on some colors (the pink, yellow, and white), but the darker colors only needed one coat.  Apply the paint in thin even coats, if you glob it on it will make the fabric super stiff and it may crack and peel with wear.Painted owlies 1For this design I painted flat areas of color because I’m going to add texture and interest with dimensional paint.  After the acrylic paint has dried, I waited about an hour, I started adding the details with dimensional paint.  I like the tone on tone effect, so using different textures I layered on the dimensional paint.  Dimensional paint is really fun and inexpensive and a great way to add some interest and bling, you’ll notice that some of mine has glitter or pearlescent additives.  I also like to use it to add embellishments like rhinestones and wiggle eyes, although I didn’t add any of those to this project.

I add two colors at a time and allow to dry thoroughly before starting the next colors.  I don’t want the lines to bleed together and I don’t want to risk smearing the colors.Painted owlies tute 2Tip: test the paint on scrap paper or your hand (like me) to keep it from globbing out on your fabric.  The tips on these paints are easily clogged, especially the glitter ones, and nothing is more upsetting than a big glob of paint in the middle of your project.  If you do accidently get a blob of paint try to carefully remove it or reshape it with a brush, if you are doing tone on tone it will be almost invisible.Painted owlies tute 3Allow everything to dry and heat set according to package directions, usually iron on the back using a press cloth.  I also like to wash my fabric once before wearing or gifting, but that is more of a personal thing.  I have to wait a week before I can wash this fabric (yeah, that what my textile medium says).  Now you all finished, you can wear this shirt or, like me, cut it up and make something new!Painted owlies tute 4As you know, I have been working on these painted owls almost all week and it seems as if this project just didn’t want to get done!  I think it’s almost ready to be cut up and sewn, but I would love some feedback, should I leave it as is or should I outline the owls in black or maybe turquoise?

Have a super crafty weekend and I’ll see you next week!

3.17.2010

Quick Peek

I wanted to share a quick peek of the project I started yesterday.  I have switched to a purple shirt (don’t worry I’ll be using at least part of the pink shirt to finish this project).Painted owlies 1 I’ll have more to share about this project tomorrow, but today I’m fighting a killer sinus headache or someone snuck in here last night and punched me in the face while I was sleeping.  I’m sure I’ll be back to normal and painting tomorrow.

Happy St. Patrick’s day!

7.15.2009

Freezer Paper Stencils, Mini Tutorial

I am still embellishing my Crafty Chica bag and I decided that the lining needed a little something. I didn’t want to hand paint something that is only going to peek out when I’m digging around in the bag, so the answer was freezer paper stencil. I love this technique and it is sooooooooo easy!

Get a big roll of freezer paper from the store, mine cost about $9.00 at a “big box” store. (I know it seems pricey, but it is worth it and it was also a really large roll.) There are images everywhere that can be used for stenciling, for my bag I googled “nautical star stencil”. I cut my freezer paper to match the shape of my bag and then traced the star images where I wanted them, make sure you trace them on the matte side of the paper. Since my design was simple it only took about 10 minutes to cut everything out with an exacto knife. Using an iron fuse the freezer paper to you fabric, it’s easy, just place the shiny side down and press with you iron until the paper sticks to your fabric. Make sure your cut edges are stuck down good!

chica bag star stencil 1 I like to use a cosmetic sponge to stencil with. Dab it into you fabric and pounce it on to the fabric in an up and down motion. Don’t rub it around, just up and down. You can always go over an area again, so don’t slop the paint on, I can’t say this enough, just dab! Remember to put scrap paper under you fabric incase the paint soaks through.

Wait a few minutes for your paint to dry and then carefully peel off the freezer paper.chica bag star stencil 2This was what I was going for, but it still needed something, I know, glitter!chica bag star stencil 4 I used red dimensional glitter fabric paint to accent the lines of the stars and once the bag is finished and the edges are wrapped in red binding it will really pop.

I need to finish some outlining and cut out the pockets and bottom and then I will finally be ready to sew!

7.14.2009

More of The Chica Bag

I worked on my Crafty Chica bag all day yesterday.  Layering the paint to get solid bright colors over that turquoise fabric took forever, but once I was finished with that I couldn’t wait to start embellishing!  I even went outside to take a “well lit, non blurry” photo for you to see.chica bag progress 6 I am still finishing the lettering and the buttons on the banner.  I also have to finish the lettering on the back piece, I might even have time to work on the lining.  Then I will be able to stitch it all together.  I’m sure by the end of the week everyone will be sick of seeing this bag, but I can’t help it, I’m obsessed.  See the other entries on Flickr.

7.13.2009

What I did this Weekend

Last week we had an appointment with the Lincoln Action group, they provide weatherization and during the inspection we discovered black mold in one of our basement walls. Well you know that has to be fixed. Luckily in was contained in a small wall, so this weekend we took the wall down. I cordoned off the area with plastic put on my mask and started ripping it down. My Father was here to help and Marma(my Mother) kept the kids busy. big DIY basement bathMost of the mold was growing on the back of the drywall and there is no way to get it off, so out it went! The mold was caused by moisture in the wall from an old leak that had already been repaired. big DIY basement bath2I sprayed the interior of the wall down with a mold killing spray, we have a dehumidifier running full blast, and in a few weeks when we’re sure the mold is dead and everything is nice and dry we’ll put the wall back up. We will be replacing one of the studs in the bathroom wall, installing an access door for the plumbing, and putting recessed shelving into the family room wall. And that swimming pool blue paint will get painted over too!

I have also been working on my Crafty Chica bag. I have finished the appliqués. Kelly (refibered) gave me a mini lesson on reverse appliqué at our Lincoln Handmade Team meeting last week. I have started the painting. I’m using regular acrylic craft paint mixed with textile medium, it’s taking a lot of coats to get good coverage, but it worth it.chica bag progress 1This is the back, I’m going to have to get a shot of these outside so the glitter vinyl is more noticeable! chica bag progress 2 Here is the front, I’ve finished the white areas and am building up the yellow and red areas.

Once the painting is finished I will be embellishing this further with dimensional paint, glitter paint, rhinestones and maybe some sequins. I also have something super special planned for the inside, so check back. The contest has been extended to the 24th., so there is still time for you to give it a shot! (See the Flickr gallery here.)

4.15.2008

Finished Back Patch for Crafty Coveralls

I finished my back patch and got is sewn on yesterday. I really like how it turned out although I may have gotten a little carried away with the rhinestones and glitter paint on the mouth.

Once everything dried I carefully cut around the design and ironed some lightweight interfacing on to the back and sewed it on to the coveralls that I bought at my local thrift store. I altered the coveralls by cutting off the sleeves and then dying them with RIT dye in the washing machine. I used one package of purple and one package of red.

I know it looks kind of crooked in the picture, but it really is straight. They are surprisingly comfortable and I think they will make great studio attire that I won't be ashamed to leave the house in.

I'm thinking that the front needs something, like a name patch. I may make one that says "crafty". Anyone have any ideas?

4.09.2008

Back Patch Day 2

I worked on painting my patch a little more today. I just need to finish the bottom banner, add some more high lights/shading and do all the black.
I'm still undecided on the background and I may add a border of either flowers or buttons on the sides. I'm now thinking that I need some sparkle, I have a bedazzler...hmmmmm.

4.08.2008

New Project: Back Patch

I bought an old pair of coveralls from the local thrift store a while back. After cutting off the sleeves and dying them a new purply-red color they are now ready for more embellishment. I sketched out what I wanted, I was going for day of the dead meets vintage tattoo. I tried to incorporate a lot of the tools that I use the most and keep it fairly symmetrical.
I traced the design directly onto some muslin using a sharpie marker. When I am done painting it I will cut it out and apply it to the coveralls like a patch.
As you can see I have just started painting it. I'm just using cheap acrylic paint with a textile medium mixed in. I thought that I had kept it pretty simply, but I think this may take me a while to paint. I am also trying to decide if I will paint the background or leave it the natural color of the fabric.