Showing posts with label clutter. Show all posts

3.26.2012

Dealing with the Visual Clutter of the Craft Room

I love my craft room! there is so much inspiration tacked up on the walls and so many little do-dads stashed everywhere. There is a lot going on in there and I continue to add to the collection, while I LOVE all of that stuff it can be a bit overwhelming.craftroom curtains visual clutterAs you can see, the craft room is right inside of my front door, so everyone who comes over sees my crafty mess first thing. Now I know that my clutter is not shocking to anyone who comes over, but that doesn’t mean that I want them to see it the minute they come in the door. The doors are also not in the best of shape, there are several panes of glass missing, the doorknob is gone and there is some weird burnt/melted looking part on the top right door and there is a “trick” to shut them. New french doors are on the list, but they aren’t a huge priority.craftroom curtains 1 I made some lined fabric panels for the inside of the doors using some of the Project Runway fabric I bought forever ago. It’s sooooooo dramatically different! I like it so much I’m going to make another set of curtains for the dining room side of the doors, I happen to have some more of the lovely fabric I used for the giant dry erase calendar. The added bonus is that I can now go into the craft room, shut the door, and be out of sight, out of mind from the kids.
After shelves, I think covering things with curtains is going to be my favorite way to fix things, oh I might even start covering my shelves with curtains! I can think of a few more things that would be greatly improved by covering them with curtains and I do have a good stash of fabric.

3.22.2012

Command Center, Round 3

I have a confession, I have been having a shoe problem, it seems as if there are shoes everywhere and when it’s time to leave the house, matching shoes are nowhere to be found. We had a shoe rack in our hallway and all it really accomplished was blocking the path with piles of shoes thrown in the general direction of the rack, ugh! Bonus, it was also across from the coat hooks, so add backpacks and jackets to the pile blocking the hall (sorry, no pictures, it was really just too embarrassing).
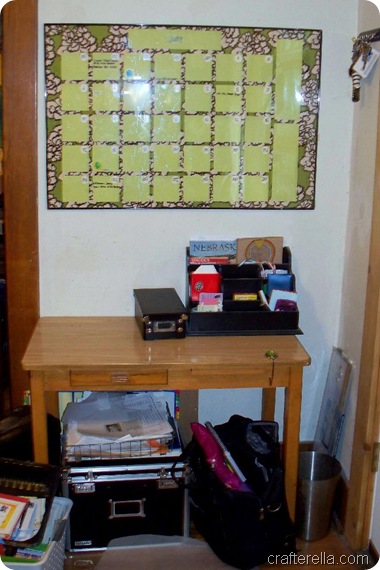
When the Bed, Bath, and Beyond catalog arrived I saw this wonderful cabinet and when I checked to measurements I knew I HAD to have it. My local store was out, but I was able to order it and have it delivered to my door free (honestly, it was much easier that way). There are several different accessories that divide the cubes, I purchased 3 fabric drawers (Little Sir, Little Miss, and Little Man each get a drawer for shoes), 3 shelves and trays (to store mail and misc. stuff), and 5 cross frames(for the adult shoes) to make this the perfect unit for us.command center round 3The cabinet and frames are easy to assemble and everything fit together perfectly. I put it all together and slid it into place. I love how it looks, it is just the perfect size and it looks awesome with the calendar. I haven’t even filled it up yet or organized the organizer (LOL), but I just had to share. I would also add, that for a piece of particle board furniture, it is really a lot nicer and sturdier than I expected.command center evolution And just for fun, here is the evolution of the command center, slowly working its way from cluttered and busy to tidy[er] and functional. 
Up next, my solution for the visual clutter of the craft room…

3.02.2012

Craft Paint Storage

I have a lot of craft paint, and puffy paint, and now even inks. All those little bottles are hard to keep track of and it seems like they are everywhere in the craft room. To help corral everything into one place I bought these revolving storage bins from Harbor Freight Tools ($19.99).Storehouse 94050 12" Revolving Four Tray Bin
Image from Harbor Freight Tools
The two bottom trays each have three dividers, so I can sort my paints out into primary and secondary colors. The top two bins have six dividers each, perfect for puffy paints, inks, and sprays (I have fewer of them and they are in smaller bottles). I can’t wait to get all my paints and inks put away!
Before you rush out to get yours, remember that it comes unassembled. It took me over an hour to put it together and I am pretty experienced assembling stuff. Every divider (there are 18) has 4 bolts, 4 washers, and 4 nuts that have to be put together. Getting all the dividers in was a little tricky, that’s a lot of parts that have to match up!
I also need to do some more tidying in the basement to make room for two giant wooden desks that my Mother rescued for us (they were going to haul them to the dump, who does that?) What are you plans for the weekend?
Have a super crafty weekend!

8.10.2011

More Organizing in Progress

I know that I’ve already talked about cleaning and organizing this week, but this is all I have been working on.  When I get in the de-cluttering mood I have to go with it and so this is what I’ve been working on for days.
In all the clutter there was a lot more organization than you would expect, it’s kind of weird in a way that makes me wonder if I should be seeing a therapist.81011craftroom1The shelves will need to be worked over in the near future, but stuff is somewhat organized and easy to find.  Done is better than perfect and in this case getting things sorted and onto the shelves is much better than spending all night organizing one or two totes.
In the middle of the cleaning I found 4 pairs of knee socks to make leg warmers for Little Miss.
81011craftroom2The sewing area was so neat and tidy it only took me 10 minutes to sew them up.  One less pile to take up space.  That pile and bag on the lower right is recycling, so it will be gone soon.
There is only one problem area left…
81011craftroom3 It’s not as bad as it looks, really, it’s been partially sorted.  I expect to finish this up tonight.  One of the reasons cleaning has gone so well this time is I have a new plan.  Upstairs we had an unused room that has become my photo studio.  I can leave my light box and backgrounds up all the time, making it easier to take product photos.  It is also where I am storing all my finished pieces, my craft show displays, and shipping supplies.  Removing all of that stuff from the craft room really cleared a lot of space.
Next I need to tackle the basement.  My husband has been working really hard to get his stuff in order down there, so it’s already half finished.  My reward will be finding all the fabric that I KNOW is down there, just waited to be sewn.

6.24.2011

Giant Dry Erase Calendar Tutorial

I finished up my calendar and now that I am 100% happy with it I’m going to share how I made it.giant calendar 1The basic supplies:
  • 24” X 36” poster frame, get one with chip board backing (instead of cardboard) Hobby Lobby half price $9.99
  • 2/3 to 1 yard of fabric, I bought a remnant and had extra that I used for the table cover
  • 5 sheets of 12” X 12” scrapbooking paper to coordinate with fabric, plus scrap or 1 sheet for number circles
  • basic craft supplies, white glue, glue brush, scissors, glue dots, ruler, bulldog clips
Some extras:
  • printable window clings
  • Rotary cutter and mat
  • 1” circle punch
I took my frame apart and set the frame pieces and Plexiglas top aside.  I laid the backing on my fabric and cut it to size.giant calendar 2I applied a bead of glue around the edge of the backing board and spread it thinly with a brush and then applied the fabric, stretching it slightly and holding it in place with the bulldog clips while the glue dried.  You don’t want to saturate the fabric with the glue, you just want to tack it down.  Once the glue it dry trim off any excess fabric from the edges.
Cut your scrapbooking paper, you’ll need 35 - 3 1/2” X 3 1/2” squares, 2 – 3 1/2” X 10 1/2” rectangles, and 1 – 2 1/2” X 12”  rectangle.  The easiest way is to use a paper trimmer or rotary cutter, but scissors can be used in a pinch.  I also punched 35 – 1” circles for the dates.giant calendar 3On my first attempt I rounded the corners of the squares, but the second time I did not, it made lining up the grid easier.  I used glue dots to affix the circles to the corners of the squares.  Then I started arranging the squares that I also tacked down with glue dots.   I started in the lower left corner, 2” in from the left side and 1” up from the bottom.  Working across the bottom row, I positioned seven of the squares 1/2” apart.  At the end of this row I added one of the 3 1/2” X 10 1/2” rectangles 1/2” from the final square.  The next row of squares was 1/2” above the first row.  I used a clear ruler to make lining up the rows easier.  I added all five rows this way and also added the other 3 1/2” X 10 1/2” rectangle 1/2” above the first one.  The title rectangle ( 2 1/2” X 12”) was positioned 8 3/4” from the left edge and up 1/2” from the squares.  Lining up all the squares was the most time consuming part of this project.
giant calendar 4 Now you can put your poster frame back together.  Remember to remove the plastic coating on the Plexiglas, mine had a coating on both sides!  The calendar is finished, just start filling in you numbers and appointments OR we can make it a bit fancier.giant calendar 5I opted for fancier.  I used printable window clings to make the months, dates, and some standard things that I would have on my calendar (like Doctor, No School, etc.).  I used a basic word program to type everything out, picked out a fun font (Beyond Wonderland) and printed the clings according to the package instructions.  Everything had to be cut out, but my paper trimmer made that quick.  I stuck all the dates on, the extras are stored on a page protector that I have stuck on the back of my calendar.  I used Velcro fasteners to stick my calendar on the wall, so I can take it down and lay it flat to fill it out for the month. 
The printed clings make the calendar so neat and tidy.  I followed Bonnie’s suggestion on the Facebook page, to hide the clutter, I can’t afford a new piece of furniture right now, but I CAN cover the piece that is there.giant calendar 6 I barely had enough fabric to make the top match the calendar (there is a small stripe of brown at the back, I was about 2” short).  Yes, hiding it is much better.  The same stuff is under there, but it really looks a lot better, thanks Bonnie!  Now I need to organize that organizer :P and work on the matching paper organizer that is going to hang under the key rack (that is why the table and calendar aren’t perfectly centered on the wall).
Have a super crafty weekend! and if you need any clarification on this tutorial just ask.

6.17.2011

Decorating Help, Please

I have been needing to redo my command center again, it looked okay (when it is was clean), but it’s not functioning well.  I’m not using the marker board at all, the cork boards are just collecting crap that needs to go somewhere else, and that basket, I love it, but it collects a lot of random crap.command center messWhat does work is the paper shredder, the filing system and the key hooks.  You’ll notice that the command center seems to be oozing over onto the door too.  It just looks so junky and it’s our front door :(command center middleSo even when I tidy it up a little it still looks tacky.  BTW, I love having a purse hook to hang my purse on, sadly the handles on the turquoise purse are really to long for it to be effective.
Here’s what I know, that basket, the cork boards, and marker board need to go!   I want to get the door cleaned off.  The file box, paper shredder, key hooks and table need to stay.  I need this area to be where we keep our calendar (I want big, but nice to look at), the bills/mail, library books, purse and keys.  Basically a mini office and where I keep the stuff I need when I walk out the door.
Help, I need ideas, links, and pictures.  I also need to be able to keep this very low budget.  Leave suggestions in the comments or post them on the Facebook wall, I know you guys will help me figure this out, Oh and I need it up and running before the kids go back to school!

5.16.2011

Now With More Curtains

I know you’re probably sick of seeing my kitchen, but we’ll be looking at it again today.  When I was making my screen printed curtains I had originally planned to have another set to go below the sink, but I didn’t have enough fabric to print without piecing it.  I am so glad that I decided not to make everything the same.  I have wanted this Michael Miller chevron fabric ever since I saw it online (and now can’t even find a link for it, sorry) and I found it here in Lincoln!!!
This area is a real problem:kitchen curtains more 2This is what you see when you come in my back door, which we use a lot since we have a larger parking area in the back.  You have to come up three steps to get into the kitchen, so you’re eye level with my under sink clutter.  I have my recycling trash cans, plastic bags, and paper bags stored under here, it’s not really that messy, but it doesn’t exactly scream welcome to my home either.
And now:kitchen curtains more1Ah, much better, Welcome to my home, come on in!  I have officially decided that all I need to make my entire house look nicer is shelves and curtains.kitchen curtains more 3Here’s a shot from the other end.  I still need some accessories and to paint the walls, but it’s already soooooo much better (flashback to the mess).  I have a little bit of that chevron fabric left over, I’m thinking some hot pads or towels.  Let me know if you have any great ideas, I have about a half yard left (in pieces).
Thanks for looking at my kitchen again, I’ll try to find something else to talk about for the rest of the week.

5.09.2011

Organized: Clutter Corner

The kitchen is the only area of my house that gets cleaned and de-cluttered daily, however there is one corner that is out of control.clutter corner 1This area is supposed to be for my cookbooks and recipe box.  It is also where I keep our frequently used medicines and reusable tissues.  I have a lot of baking soda for some reason and there is a package of undershirts and a package of underwear in this mix too.  This is really the “I don’t know where to put this so I’ll just shove it here” corner.  The biggest problem is this mess makes it really hard to get to my recipes and plan my meals.
I found this free printable recipe binder cover on Prudent Baby (there are a variety of colors to match any kitchen) and decided to get the clutter corner under control.  Everything got sorted and properly put away and all of my recipe books, cards, magazines, and print outs got hauled to the dining room table to be sorted and stored.  clutter corner 2 I printed out extra cover sheets to make my dividing pages, I added a label over the top of the word RECIPE and I used self adhesive tabs to label all of the category pages.  I used a combination of sheet protectors and photo protector pockets to fill in the book.  It took a while to sort all the scraps of paper out, but it was worth it.
clutter corner 3The recipe books will be filed away in a cupboard, I don’t use them often enough to keep them out, but I do use them enough to want to keep them (for now).  I will be working on the drawers on the left next and hopefully there will be room for me to store my binder away in one of them.  I think the bottom drawer has every kitchen towel I have ever owned in it and I only use the three that match the kitchen, so there might be some room in there.  I also might store the binder with my command center, the recipes for the weekly menu are stored in the menu planning organizer I made, so I don’t need to use the binder in the kitchen daily.  I only need to use it when I plan the menu, which I do in the dining room anyway, hmmm, definitely storing it on the command center (which also need a make over).
I am slowly getting everything the way I want it, now I’ll need to start working on some more decorations for the kitchen.  I have several half finished projects that need to be wrapped up (cough, curtains and giant spoon and fork, cough).

4.22.2011

That New Shelf Smell

I did not know that new shelves had a smell, but these definitely do, and it’s not good smell(it must be the wood shelf inserts).  Thursday in the middle of making my rainbow patchwork I had a brilliant idea, I needed some giant, heavy duty shelves for the craft room.  One of the most annoying things about cleaning up is that I lug several totes of supplies to the basement only to want them back up here in the next week and then the totes sit here in my dining room looking junky and back down stairs they go, it’s endless.  If I had big shelves they could just stay up here in the craft room on the shelves right?  Did I mention that when we cleaned the rest of the house that the craft room got skipped and so stuff (craft stuff) is just stacked up in there? and I don’t want to start hauling it out here where it is clean.
Sometimes when I’m cleaning it feels like I just shift things around, like a slow motion hurricane, so I thought I would document the process of putting a shelf in with some before, during, and after shots (well, not really after, more of a right now, but I’m not done yet).craft room progression shelves right
As you can see, it went from messy, to cleaned spot, to shelves up, to starting to fill the shelves.  I would like to add that I am not responsible for the stickers, stencils and splotchy paint, they were here when we moved in.  The wire shelves are still up there in the last shot, they are just hidden by the pattern boxes and boobzilla.  I have a lot of my stuff sorted already and some of the excess supplies will be stored in the basement (we have even bigger and heavy-dutier (<- yeah I made that up) shelves down there).
I also have new shelves for the upstairs.  There is a room up there with a skylight where I take all of my product photos and those shelves will hold all of my finished projects that are listed in my online shops.  I’ll also be keeping craft show displays, mailing/packaging supplies and random stuff from my day job up there.  It is a weird room that is too small to be good for much, but it’s great for photography and storage.
I think I have some sort of shelf obsession, I have plans to build some for the living room too!
Have a super crafty weekend!

6.01.2010

Status Report

First, how was everyone’s long weekend?  Did you work on some special or exciting projects?  I did, kind of.  Not fun and exciting crafty projects, but around the house stuff.

I have been in the mood to clean for the last week, I know, weird huh? and when that happens I just go with it.  I have accomplished a lot, but not the awesome before and after shot of progress that I want to share (I think this is my first post EVER without a picture).  I cleaned the laundry area and actually caught up with the laundry(I know, crazy, I even ran out of hangers), I got it all folded and put away too.  The big achievement was sorting through all the outgrown clothing:  two totes to resell, one tote to donate, one small pile to save, and one very small pile to throw out.

We also got some really awesome shelves for our basement, (they can hold 2000 pounds a shelf) and totes to fill them.  I really want to get rid of every cardboard box in the basement.  I expect to be working on that project for quite a while.

There has been some furniture rearranging in my bedroom.  The crib that we used for Little Sir and Little Miss was one of the cribs that has been recalled (twice).  I was able to return it and with the refund purchased a new crib for Little Man.  I cleaned everything up there and basically flipped the furniture around.

I have been doing a little crafting, but I’m going to go with the cleaning until the urge leaves (it never lasts long).  I do have some really great quilts that I received from my Mother to share with you, I have so bottle cap pincushion “blanks” made up, and I am working on a new crochet design, more on that later this week.

4.26.2010

Welcome to Week 41 and My Messy Kitchen

I really expected to be holding a baby by now, but I guess he’s not quite ready.  I am officially to the point of making no plans for anything, I can’t even plan dinner.  I have a very long list of things that I want to be doing, but I just can’t/don’t want to do them.  I have worked on a few things, knitting and crochet are still do-able, but pretty much everything else is out.  I miss bending.

Okay, enough whining, I still haven’t finished the Mod Podge screen printing of the fabric for my kitchen curtains, but I have been doing a little work in there.  Prepare to see a mess…don’t judge me, I know I have a hoarding/clutter problem and I am working on it.kitchen before 2This is my kitchen on a bad day, before the pre dinner clean up.  Yes, I have a huge clutter problem.  One of the main problems of this kitchen is lack of storage, I need more cabinets.  This in the only upper cabinet in the kitchen.  There is a small pantry area in the hall and it is very full. kitchen before 1The right side of the kitchen is a lost cause, there are no cabinets or counter space and I am using a bakers rack in an odd position to hold some necessary kitchen stuff and I keep a cutting board on half of my stove to use as a prep area.  Someday we will redo the kitchen, but that is something that isn’t going to happen for a while (think years).kitchen before 3So, um yeah, I was a little embarrassed by the clutter so I tidied up a bit and this is what it usually looks like.  Still not great, but less cluttered.  I really need to take those plastic bags to be recycled or make some plarn with them.kitchen progress 2I decided that I needed some shelves above the sink.  I wanted floating shelves for a nice clean look.  Right now I am ignoring the fact that the walls and ceiling really need to be painted.  I picked these out at the Home Depot and while they look nice they are not sturdy.  I had read the reviews and knew this was an issue, but I thought it was a hardware/installation issue.  I bought special hangers for plaster walls and expected these shelves to be awesome.  Sadly they are not, I’m not sure they are going to stay up (as in they may fall down by themselves in the middle of the night).  I bought three (notice, I even predrilled the holes for the third shelf) and have only put up two, the third may go back, I’m trying to decide if there is a way to make them work.kitchen progress 1I found some great accessories at Target that are perfect for the kitchen, modern and slightly retro, lots of red with pops of turquoise.  I also have been slowly collecting these nice canisters from Bed, Bath, and Beyond, I get them one at a time with a 20% off coupon, they are sooooo nice, but a little pricey.  I wanted to store them on these shelves, but I’m not sure the shelves can hold them.

I think that once I get everything arranged and the new curtains and hand knitted towels out and the pot rack hung (once I find it, it’s in the basement of doom) that it will look nicer.  If anyone has suggestions for the shelves, let me know, I would really like to make them work.  I am also trying to decide how to store my spices without taking up a lot of room, but keeping them handy for use.  I’ll keep updating everyone on baby watch 2010, at this rate I might just wait until May!