The original sketch.

Have a super crafty weekend!


The original sketch.
Have a super crafty weekend!
A few weeks ago I noticed that Little Miss and Little Sir were outgrowing most of their pajamas, I also found some pictures of them wearing the same pj’s from about two years ago (I buy big and they wear them until they’re too small). New pj’s are pricey, covered in annoying characters, and usually polyester – uncomfortable! I needed to make them so new ones and this is a great opportunity to simplify my laundry routine too: a random selection of pants paired with undershirts, no more matching up sets.
When my local Goodwill has $.99 day I am always on the lookout for adult lounge pants, there is usually a good selection at my neighborhood store in size small and medium, I have been stocking up for a while. (I wash everything I thrift the minute I get home, I want to make sure everything is nice and clean.) 

I stitched up the legs and then the crotch seam and all I had to do was make the casting for the elastic and I was finished.
These go together really quick, especially once you get the hang of the pattern. I need to get the other pairs cut and sewn, I wonder which pair they’ll like the best. Have a super crafty weekend!!!
I am in love with the Sienna dress pattern from Lilblueboo, but sadly it only goes up to a size 6. I wanted one in my size, yeah I know, it’s not really age appropriate and it surely won’t be that flattering, but it will be comfy and a lot of fun. 
Have a super crafty weekend.
***edit***
I thought I would add my slightly blurry mirror shot so you guys could see how it fits. 
As you know I am usually working on five to fifty projects at a time, but normally I decide what I will be finishing each week to post here and concentrate on those two or three projects. Unfortunately this week things came up that disrupted my crafty time and I don’t have a finished project for today, so I thought I’d share some of the things I’m working on.


That’s the main focus of my craftiness this week, I am also working on other things and trying to keep on the cleaning/organizing binge I’ve been on. Now I have to go clean the kitchen, someone knocked over an entire can of soda and there is sticky everywhere, I’d really rather be knitting!
Nursing tops can get expensive once you go beyond a simple nursing cami, so this time around I will be trying to make a few different styles. I have made a tank style, but you can opt to use the existing sleeves and have a nursing t-shirt. I was greatly inspired and influenced by this tutorial on sleepingbaby.net.
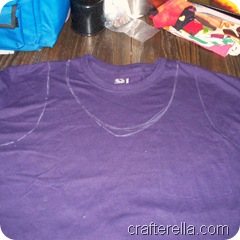
You will need two t-shirts, I bought mine new because I really liked this eggplant color. I removed the pocket and then traced around one of my favorite tanks with chalk.
If you are making a t-shirt styled top you can skip this step. I will be making the t-shirt version of this and I like to reshape the neck and shorten the sleeves to make it look more like a top and less like a tee.
Using the other shirt I cut out a matching overlay for the front. I tried the shirt on and marked when I wanted the overlay to end and then used that as a reference when I cut out the bottom. If you are making a tee consult this tutorial. I left the bottom seam of the shirt so I could use it for my drawstring casing. I also cut out two 1 inch wide strips for my ties.
I sewed the overlay on to the shirt at the shoulder seams. I cut two small slits in the bottom seam on the overlay and threaded a strip through the center to the sides. I pinned the right sides together and sewed the side seams, treating the front and the overlay as one piece and catching the ends of the string in the side seam.
To finish the armholes and neck edges I cut 1 inch wide strips of the left over shirt. I folded them in half the long way and pressed them.
After it was finished I marked where I wanted the nursing openings and cut slits in the bottom layer of the front. The finished tank looks like a tank with a baby doll tie. It’s super easy to untie the bow and lift for nursing access.
It would be easy to make this style from knit fabric too. If you do decide to make the t-shirt option it would be a lot simplier to start with premade shirts.
This shirt is finished, but I keep thinking it needs something else, some sort of embellishment, so I may have to work on that a bit more. If you have any ideas or tutorials for other nursing tops let me know! Have a super crafty weekend!
I know that I have already shared some of these, but I really enjoy making them. I have had these cut out since our LNKHandmade team meeting on the 3rd. I guess my favorite part is shopping for the shirts, it’s a shopping challenge to find interesting shirts that can be reassembled in to adorable dresses.
The minute I saw this shirt I had to have it, unfortunately it wouldn’t fit anyone, but add some hearts and tie dye and it really makes a fun little dress. Little Miss says she only likes the hearts.


…that didn’t get worn. I know what you’re thinking, it wasn’t finished, but it was. I used the button shirt to toddler dress tutorial from craftster. BTW, it was really easy to do and it really made a cute dress. I had bought the perfect shirt (from the Goodwill), so cute with pink and blue plaid, and it was going to be great. I made my dress and ended up adding elastic to the top front to make it fit a little better, but other than that everything fit perfect and it was really quick to make.
The reason she didn’t wear it was that I didn’t like how the colors looked on her. I know, that seems a little silly, but I really am picky about what the kids wear. It’s okay, but it would have been a lot cuter on her if it was a brighter color or had a bolder pattern. It might even look better this summer after we’ve had a little sun. I thought about dying it, but I sewed it with polyester thread, so that would stay white, and I wasn’t sure what color to use anyway. I’m still thinking about solutions. I really like the style of the dress, the little ruffle straps are my favorite. I would also look great with a petticoat under it.
I do recommend the tutorial, it was very easy and the results were great, just make sure to pick the right shirt!
After enjoying the Sienna Dress pattern so much I decided to try the Lil Leggings pattern and, once again, I was not disappointed! Nice straight forward instructions and a great selection of tips to make different styles. The pattern recommends a knit fabric with 75% stretch, I used a less stretchy fabric and upsized the pattern a bit. The result are some cute leggings to match Little Miss’s new Sienna Dress.
You should recognize all of the fabrics, they are from my thrifting adventure last week. I know it may seem a little out of season for a Catrina, but she will be wearing this all spring and summer, what can I say, we’re a year round skeleton family.
Little Miss really likes these dresses and when she finds out that I’m making her a new one she hovers around waiting for it to be ready to try on. It’s exciting for me that she really wants to wear the little dresses I’m making. I think I may just have to buy all of the Lilblueboo patterns, there are so easy and stylish. We get a lot of compliments and people are amazed that these are handmade. If you have a little girl to sew for I can’t recommend these patterns enough. Make sure to stop by The Lil Blue Boo blog as well for some great tutorials for embellishing you fabrics for a more custom look.
I have some other great girly tutorials to try, but I just can’t stop making these knit dresses, I wish the pattern came in adult sizes. I have been eyeing the Halter/Tie back dress pattern for this summer.
The first Thursday of the month is when we have our Lincoln Handmade Etsy team (facebook fan page) meetings. They’re a lot of fun, full of crafty gossip, eating, knitting, crocheting, and other craftastic fun. This month the team gave me a baby gift: a thrifted t-shirt and a Hobby Lobby gift card. We had a good laugh about the shirt and this is what I turned it into.

Thanks Lincoln Handmade Team for the awesome shirt and gift card, I’ll giggle a little every time the little man wears it!
As I was cleaning my dining room/craft table I came across the plarn I had made last month. I immediately felt the urge to finish the already started bag. I think I was just looking for a reason to stop cleaning, but my theory was crochet the bag and then I won’t have to find somewhere to store the plarn balls. I just sort of made this up as I went along, so no pattern to share, however if you’re looking for plarn inspiration check out RecycledCindy’s blog, she has a lot of great ideas and free patterns.

I want to try VCR tape next, although I hear that it’s a little harder to work with,(it sticks to the hook).
I had a great weekend of thrift shopping, if you remember it was $.99 day at the Goodwill last Friday and Saturday.
I found a great selection of striped shirts, a few tie dyes, and some plain colors for matching. I also found a great orange dragon shirt and an interesting gaming shirt, it had Yoda and Darth Vader, so I had to get it.


I noticed that the Sienna Dress pattern (from Lilblueboo) was pretty unisex and I decided to make Little Sir a shirt with it. I had the perfect polo shirts to use, orange with stripes, we love orange! I used the tapered sleeve and made the body of the shirt slightly boxier and shorter. 
Maybe it’s just me, but shopping for baby clothes can be a bit overwhelming on the pastel cuteness. Don’t get me wrong, I like a cutely dressed baby as much as anyone else, but I do get sick of all the pastel blues and greens and I really get sick of all those cute-sy teddy bears!
I was really exited to find this tutorial for making newborn gowns from old t-shirts on This Mama Makes Stuff. I have to say that the pattern and tutorial are surprisingly simple, but I have been working with a lot of knit fabric lately. I spent a few hours making two gowns and I love the results!


I have a bit of knit left over and I think I will be making some matching hats and maybe a few fancy rags. Now I just need to get a few more t-shirts, I would love some classic concert tees to work with. If anyone has any cool shirts to trade, let me know.
I grew up in a drafty farm house and every winter the quilts would come out and be stacked on the beds. The heaviest of the quilts were called bone crushers because of how heavy they were. The best bone crushers were made from denim, old, soft, worn denim from our old jeans and overalls. I still love denim quilts, although now I prefer the lighter “rag” quilts as opposed to the traditional quilt top with batting, binding, and backing.
My Mother made an awesome denim quilt for my son with stars and even the pockets from the jeans. I love it, he has been using it for a couple of years and it just get softer and softer and it is super warm.


I love denim, it is such a versatile, long wearing fabric. I just wanted to share some of the great projects I have made with it. I have started a shag style rug, the strips are cut and I just need to decide what kind of backing to use and how big to make it. I’m lucky, I seem to have a never ending supply of denim, everyone in our family saves it, and if I do need more I can always pick up a few pairs of jeans at the Goodwill on dollar days! What kind of great projects have you made using denim?
As some of you know I have an elderly cat who has been a little sick lately. My cat Pookie had a severe ear infection and seems to be permanently dizzy, the vet thinks she may have even had a small stroke. She is also slowly loosing her vision. I have had to put up a baby gate to keep her from going upstairs because she has fallen down them and she is no longer able to get up on the furniture and so she has been sleeping on the bare wood floor.
I decided she needed a cat bed, she has had one before and was not impressed, so I didn’t want to invest a ton of money in something that many not be used. I found this tutorial that used an old sweater and decided it was perfect. My sweater is 100% cotton(I got this on in the last Bargain Hunter Swap on Craftster) and I think it turned out great, wool sweaters are getting hard to find in thrift stores because all of the crafting uses.
The real test was getting Pookie to use it. When I first showed it to her she was unimpressed, but my other cat Kiki figured out what it was right away.


On one of my recent trips to my local thrift store I found this adorable super small top. It was $.99 day and I really liked the fabric, I was thinking it would make a cute tote.
I removed one row of the elastic smocking about 2 inches from the “skirt” and then chopped the top off, I finished the edge with a stitch on my machine that looks like a blanket stitch (I’ve lost my manual and I have no idea what it’s called). I did the same thing to the smocking about 2 inches from the top and cut off and finished the edges. I used this strip to make the straps. I also cut another strip of smocking off of the scrap to make a headband, I just stitched a seam at the correct size and ta-da, matching headband!

So here’s my super cute $.99 dress, I had brown thread on hand. The great thing is that she will be able to wear this for several years, the smocking is loose fitting, with room to grow and the length is generous. I will definitely keep on the look out for smocked tube tops, this was just to easy!
I adore yard sales, the excitement of finding something that I never knew I needed for a dollar is one of the best feelings ever. I have tried to not “yard sale” this season and work on reducing my stash, but last weekend was my neighborhood sale, there were yard sales everywhere and I could not resist! I came home with a carload of books, clothes, games, and Tupperware. The real treasure I found was this souvenir dress from Mexico.
Now to decide what color to use for the binding: red, turquoise, pink or green. Let me know what you think, leave me a comment and help me decide :)
As I wandered through the Goodwill a few weeks ago this cute ruffled skirt caught my eye. It wasn’t my size or even my style, but I just had to have it! It was begging to become a twirl dress for my daughter. 

I hand dipped the skirt into the dye holding it for a few minutes for each layer, I was going for a gradation dyed effect. It’s a little wobbly, but I like it and besides she’s three, is she really going to hold still long enough for anyone to notice it’s not perfectly straight. The top two layers were just dipped and immediately removed to be rinsed.
Now I just need to decide how to cut it apart and put it back together, Oh and I need to find my sewing machine and unpack the craft room, everything is still in boxes. I hope to finish this up in the next few weeks, I want her to be able to wear it to my cousins wedding.


 I hope that you can see the ties in this one and also how close fitting the bust is.
 I also thought I should share this "out take" to give you a better idea of the chaos that is really going on here at my house and maybe explain why I look a little worn out on some of these photos.