 This is Little Miss’s new closet, can you believe how cute it turned out?!? I’ll add more details and photos later, I was just so excited to share :)


Showing posts with label upcycling. Show all posts
Showing posts with label upcycling. Show all posts
8.17.2012
From Trashed to Fabulous
I rescued this dresser from the curb last Friday and have been busy working on is all week. I have a super busy day today, but I wanted to share the before and after photo.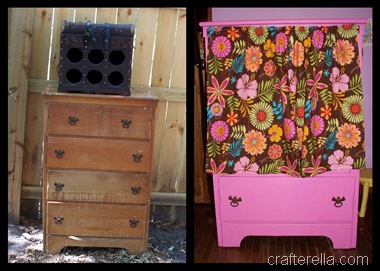 This is Little Miss’s new closet, can you believe how cute it turned out?!? I’ll add more details and photos later, I was just so excited to share :)
This is Little Miss’s new closet, can you believe how cute it turned out?!? I’ll add more details and photos later, I was just so excited to share :)


4.18.2012
Pasta Jar Lanterns
I love the look of Moroccan lanterns, but I have yet to find any in my price range and they aren’t really the sort of thing you see at a yard sale in Nebraska. When I saw these lanterns on DesignSponge I envisioned a backyard filled with them! I had plenty of jars on hand (yay, recycling!) and I decided to try some different paints. I picked gold and black puffy paint and I also got some liquid leading. For the glass tint I used stuff I had from a kit in iridescent purple, PermEnamel in rooster red, and PermEnamel Shimmers in blue ice. My tips for this project are:
This was the test, seriously I want a large collection of these for my back yard. I have a large selection of different sized jars and now I need to get some more of the shimmers glass paint and some sponge brushes. I am anxious to see if the paint will peel off the jars after being out in the elements.
I’m curious, do you use candles outside a lot or is it more of something that is just for show? What kind of out door decorations do you have in your yards?
 I had plenty of jars on hand (yay, recycling!) and I decided to try some different paints. I picked gold and black puffy paint and I also got some liquid leading. For the glass tint I used stuff I had from a kit in iridescent purple, PermEnamel in rooster red, and PermEnamel Shimmers in blue ice. My tips for this project are:
 - Be generous with the puffy paint, the jars that have a thick coat of paint look the best.
- You can use a sharpie to evenly divide your jar and make guide lines to follow (any mistakes or lines that show can be cleaned up with rubbing alcohol and a Q-tip).
- Use a sponge brush to apply the glass paint on the inside of the jars and don’t use too much, it will run and look bad (see the blue jar).
- If the color on the inside isn’t dark enough or is uneven another coat of glass paint will help.
- any brand names embossed in the glass can be easily hidden with the puffy, plan your pattern accordingly.

This was the test, seriously I want a large collection of these for my back yard. I have a large selection of different sized jars and now I need to get some more of the shimmers glass paint and some sponge brushes. I am anxious to see if the paint will peel off the jars after being out in the elements.
I’m curious, do you use candles outside a lot or is it more of something that is just for show? What kind of out door decorations do you have in your yards?
3.30.2012
Kitchen Step Stool Redo
I was so excited when I found this vintage kitchen step stool in mint condition, I knew exactly what I was going to do with it! It turned out exactly like I wanted and it was easy too. If you would like to redo a stool like this there are a few things to keep in mind:
I used spray adhesive to attach the vinyl on the back rest and tacky glue for the seat. There were a lot of curves that I needed to stretch around, using a ton of clips helped me work out all of the wrinkles. I let it dry overnight with the clips, did a final trim down and put it back onto the stool.
The chevron skirt is hot glued onto the bottom edge. Originally I had tried to install it under the seat, but there was too much bulk to get the seat reattached.
My kitchen is finally coming together, I really need to finish that giant silverware :D
Have a super crafty weekend!!!
 It turned out exactly like I wanted and it was easy too. If you would like to redo a stool like this there are a few things to keep in mind:
- Make sure the stool is in good working shape, I’ve seen a lot of these stools covered in rust.
- Look to see how the pieces are attached, if they are riveted on you won’t be able to take them off to recover them.
- Get a good quality vinyl to recover the piece. I used glitter vinyl with a stretchy backing, it makes the vinyl easier to stretch and there is no fear of tearing it.
I used spray adhesive to attach the vinyl on the back rest and tacky glue for the seat.
 There were a lot of curves that I needed to stretch around, using a ton of clips helped me work out all of the wrinkles. I let it dry overnight with the clips, did a final trim down and put it back onto the stool.
The chevron skirt is hot glued onto the bottom edge. Originally I had tried to install it under the seat, but there was too much bulk to get the seat reattached.
My kitchen is finally coming together, I really need to finish that giant silverware :D
Have a super crafty weekend!!!
1.25.2012
Mini Pin Cushion Jars
Eight years ago I was working at the Holiday Inn in Memphis, Tennessee. I delivered room service during the week and bartended on the weekends. Everyone who ordered a sandwich for room service got a tiny little jar of mayo, a tiny little jar of mustard, and a mini jar of ketchup. I loved those tiny little jars and I would often rinse them out and bring them home. They were stored in boxes and hauled to several new apartments, back here to Nebraska, a few more houses, a storage unit, and then to our new house where they we promptly stored in the basement with everything else. I brought a box of them up this weekend, one of the treasures found while cleaning.
A milk jug cap was the perfect size for a pin cushion for the lid, I have attached it permanently to the metal lid with a brad. The pin cushion will, of course, be embellished more (rick rack!!!) and the metal lid will be painted. This color combo reminds me of cotton candy, which then makes me think of the circus, so I will be painting “big top” stripes on the lid. (Yes, that is exactly how my brain works!)
Fill the jar with buttons, safety pins, and thread card, add some more pins and a needle to the pin cushion and it’s a mini sewing kit, wouldn’t it make a great gift?
I have a lot of these little jars, anyone have any ideas on what else I can do with them?
A milk jug cap was the perfect size for a pin cushion for the lid, I have attached it permanently to the metal lid with a brad.
 The pin cushion will, of course, be embellished more (rick rack!!!) and the metal lid will be painted. This color combo reminds me of cotton candy, which then makes me think of the circus, so I will be painting “big top” stripes on the lid. (Yes, that is exactly how my brain works!)
Fill the jar with buttons, safety pins, and thread card, add some more pins and a needle to the pin cushion and it’s a mini sewing kit, wouldn’t it make a great gift?
I have a lot of these little jars, anyone have any ideas on what else I can do with them?
1.18.2012
Champagne Chairs
The minute I saw these tiny chairs by Martha Stewart on Pinterest I knew I HAD to make them! I asked all my friends to save their champagne corks and cages on New Years Eve and I ended up with 3, I was soooo excited, I didn’t think I was going to get any (there were a lot of screw on lids this year)!
 I LOVE them, I love them so much that I’m thinking about starting a new tradition of drinking a bottle of champagne every New Year and making a little chair with the cage!
 I LOVE them, I love them so much that I’m thinking about starting a new tradition of drinking a bottle of champagne every New Year and making a little chair with the cage!
8.01.2011
It’s Hot
Yeah, I know it’s August, but really it seems like it’s hotter than usual. I have been working on this project all weekend, but I can only stand to be outside about 30 minutes and then I have to come in and cool off. I’m glad I don’t HAVE to be out in this weather, I don’t do well with hot (but who does?). Anyway, one down…

12.20.2010
Greeting Card Ornaments
I know that I’m not the only one who saves every card that has ever been sent to me. Cards are expensive and really pretty, but hidden away in a box no one has the chance to enjoy them. Go get you box of cards, I’ll wait.
You’ll need:
a greeting card, something round (I used a glass, a fancy circle cutter would be awesome), glue, a small diameter hole punch, crochet thread, and a small crochet hook.

Decide what part of the picture on the card you want to use. I decided to use the tree and the Merry Christmas text. You can also use the words from the inside or other paper for the back. This particular card was from the place we bought our gutters and the inside text wasn’t ornament worthy. I used a glass for my template, but anything you can trace around will work, and don’t feel obligated to used something round, ovals and other shapes would be great too.


I love how easy and inexpensive this project is! I really need to dig into my stash of cards. These are easy to mail and they also make great package decorations.
4.21.2010
More Sienna Dresses
I know that I have already shared some of these, but I really enjoy making them. I have had these cut out since our LNKHandmade team meeting on the 3rd. I guess my favorite part is shopping for the shirts, it’s a shopping challenge to find interesting shirts that can be reassembled in to adorable dresses.
The minute I saw this shirt I had to have it, unfortunately it wouldn’t fit anyone, but add some hearts and tie dye and it really makes a fun little dress. Little Miss says she only likes the hearts.


6.29.2009
Hunting for Treasure
I adore yard sales, the excitement of finding something that I never knew I needed for a dollar is one of the best feelings ever. I have tried to not “yard sale” this season and work on reducing my stash, but last weekend was my neighborhood sale, there were yard sales everywhere and I could not resist! I came home with a carload of books, clothes, games, and Tupperware. The real treasure I found was this souvenir dress from Mexico.
Now to decide what color to use for the binding: red, turquoise, pink or green. Let me know what you think, leave me a comment and help me decide :)
6.23.2009
I Love Mod Podge
Is there anything that can’t be made better with mod podge? I found these decoupage storage jars on The Swell Life and just had to make my own!
Subscribe to:
Posts (Atom)