Painting fabric can be a challenge, but it is really rewarding to make a custom design. Today I will share the technique that I use and some helpful tips, for this project you will need:
Fabric (I used a t-shirt for this project)
- acrylic paint
- textile medium
- dimensional fabric paint
- brushes
- freezer paper
- Exacto knife
- iron
- cosmetic sponge (I buy packs of these at the Dollar Tree, they come in handy for a lot of projects)
- a design (use free clip art, coloring book images, or you own designs)
For this project I used a purple shirt, to make sure that my colors showed up well and that I didn’t have to paint layers and layers of paint I started off with a stencil of the outline of my design. I traced it onto freezer paper and cut it out with an exacto knife. I fused the freezer paper to the shirt using an iron. I also fused another piece of freezer paper to the back of my shirt to keep the paint from bleeding through. Using a cosmetic sponge I applied white acrylic paint mixed with textile medium to my design shapes. I did two layers, will make a nice base so that my paint colors show up well, if you use a white or other light colored shirt this step isn’t necessary. At this point I removed my freezer paper, but I recommend that you leave yours on. If you smudge or splatter paint the freezer paper will protect the rest of your shirt.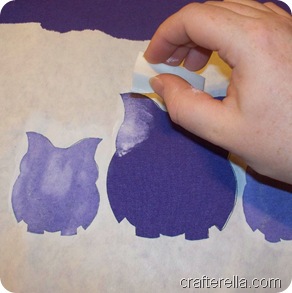 A note about paint: I like to use regular acrylic craft paint because I have a lot of different colors on hand, if you prefer you can use fabric paint instead of mixing in a textile medium. Mixing textile medium with the paint makes it permanent on fabric, follow the directions on your textile medium to get the proportions correct (mine was 2 parts paint to 1 part medium).
After the white base coat was dry I used a pencil to lightly trace my design onto the shapes. I mix up one color at a time and paint my fabric like a paint by number, doing all of one color before starting on the next. I still needed two coats of paint on some colors (the pink, yellow, and white), but the darker colors only needed one coat. Apply the paint in thin even coats, if you glob it on it will make the fabric super stiff and it may crack and peel with wear.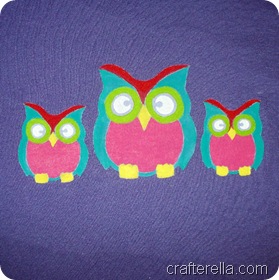 For this design I painted flat areas of color because I’m going to add texture and interest with dimensional paint. After the acrylic paint has dried, I waited about an hour, I started adding the details with dimensional paint. I like the tone on tone effect, so using different textures I layered on the dimensional paint. Dimensional paint is really fun and inexpensive and a great way to add some interest and bling, you’ll notice that some of mine has glitter or pearlescent additives. I also like to use it to add embellishments like rhinestones and wiggle eyes, although I didn’t add any of those to this project.
I add two colors at a time and allow to dry thoroughly before starting the next colors. I don’t want the lines to bleed together and I don’t want to risk smearing the colors. Tip: test the paint on scrap paper or your hand (like me) to keep it from globbing out on your fabric. The tips on these paints are easily clogged, especially the glitter ones, and nothing is more upsetting than a big glob of paint in the middle of your project. If you do accidently get a blob of paint try to carefully remove it or reshape it with a brush, if you are doing tone on tone it will be almost invisible.
 Allow everything to dry and heat set according to package directions, usually iron on the back using a press cloth. I also like to wash my fabric once before wearing or gifting, but that is more of a personal thing. I have to wait a week before I can wash this fabric (yeah, that what my textile medium says). Now you all finished, you can wear this shirt or, like me, cut it up and make something new!
 As you know, I have been working on these painted owls almost all week and it seems as if this project just didn’t want to get done! I think it’s almost ready to be cut up and sewn, but I would love some feedback, should I leave it as is or should I outline the owls in black or maybe turquoise?
Have a super crafty weekend and I’ll see you next week!


 It was really dirty, a combination of greasy and dusty, ewww! I took the cover off of the clock, removed the clock works and the clock face and scrubbed it down with some Dawn (takes grease out of your way!)
 Better, I was thinking about painting the whole thing a bright color, like lime green or turquoise, but I wanted to keep those bright orange eyes. The plastic eyes came right out, the glue must have yielded to the soapy water. I was trying to polish them up a bit, they were just so scratched and dull, it’s like they had been scrubbed with an abrasive cleaner or sponge. I had the brilliant idea to use the buffing wheel on my Dremel to shine them up a bit. It worked great, they looked new. I was even able to shine the badly scratched cover.
 The left side looks new, all shiny and clear. I buffed the entire clock. It brought back the shine on the plastic too! I scanned the old clock face, edited out some of the water damage and skewed the colors to give it an orange tint. Once that was printed out I Mod Podged it onto the clock and put everything back together.
 It looks brand new and I just finished hanging it up in the craft room. Not bad for a quarter and some time! What is your best yard sale/thrift shop redo?, I’d love to see it.