 I used a nail set to sink the nail heads, patched the holes and imperfections, and gave everything a good sanding before painting a bright turquoise. Not sure if I’ll leave them like this or distress/paint them more. All that’s left is to get the pots and decide which herbs to plant.


Showing posts with label kitchen. Show all posts
Showing posts with label kitchen. Show all posts
8.06.2012
Lucky Find
Last weekends yard sales yielded this lucky find, two unassembled wooden tool boxes (and a still unassembled sail boat) for a dollar! They are the perfect size to hold three small terra cotta pots. Say hello to my new kitchen herb boxes. I used a nail set to sink the nail heads, patched the holes and imperfections, and gave everything a good sanding before painting a bright turquoise. Not sure if I’ll leave them like this or distress/paint them more. All that’s left is to get the pots and decide which herbs to plant.


3.30.2012
Kitchen Step Stool Redo
I was so excited when I found this vintage kitchen step stool in mint condition, I knew exactly what I was going to do with it! It turned out exactly like I wanted and it was easy too. If you would like to redo a stool like this there are a few things to keep in mind:
I used spray adhesive to attach the vinyl on the back rest and tacky glue for the seat. There were a lot of curves that I needed to stretch around, using a ton of clips helped me work out all of the wrinkles. I let it dry overnight with the clips, did a final trim down and put it back onto the stool.
The chevron skirt is hot glued onto the bottom edge. Originally I had tried to install it under the seat, but there was too much bulk to get the seat reattached.
My kitchen is finally coming together, I really need to finish that giant silverware :D
Have a super crafty weekend!!!
 It turned out exactly like I wanted and it was easy too. If you would like to redo a stool like this there are a few things to keep in mind:
- Make sure the stool is in good working shape, I’ve seen a lot of these stools covered in rust.
- Look to see how the pieces are attached, if they are riveted on you won’t be able to take them off to recover them.
- Get a good quality vinyl to recover the piece. I used glitter vinyl with a stretchy backing, it makes the vinyl easier to stretch and there is no fear of tearing it.
I used spray adhesive to attach the vinyl on the back rest and tacky glue for the seat.
 There were a lot of curves that I needed to stretch around, using a ton of clips helped me work out all of the wrinkles. I let it dry overnight with the clips, did a final trim down and put it back onto the stool.
The chevron skirt is hot glued onto the bottom edge. Originally I had tried to install it under the seat, but there was too much bulk to get the seat reattached.
My kitchen is finally coming together, I really need to finish that giant silverware :D
Have a super crafty weekend!!!
5.27.2011
Return of the Giant Silverware
Alrighty, I am back to working on the giant silverware again. When we last saw the giant silverware I was attempting to smooth out the handles using Bondo. The Bondo was stinky and a little expensive and I was having to build it up in layers. Lumpy, bumpy layers that were going to need TONS of sanding.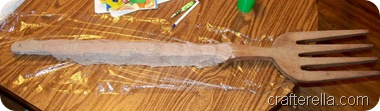 Round 3 – This time I will be using homemade paper mache clay. I had thought of paper mache in the beginning, but thought that strips of newspaper would be lumpy and I didn’t think I could count on store bought clay to get the results I wanted.
 I just globbed it on, this is about two rolls worth of clay. It was really easy to find the supplies and mix up, and I can think of a lot of great ways to use this stuff.
 Using a palette knife and water I shaped and smoothed the clay. This is where I started getting excited, it really looks like this might work. It has taken forever to dry (a week and a half). I am excited to start sanding, priming and painting, but first I need to finish the handles on the rest of the spoons and forks.
I think I am finally on the right track, I would really love to get these finished and hung soon, I think the only hold up will be drying time. I can’t wait to get more stuff finished for my kitchen.
Have a wonderful, crafty holiday weekend! I’ll see you guys next Wednesday!
 Round 3 – This time I will be using homemade paper mache clay. I had thought of paper mache in the beginning, but thought that strips of newspaper would be lumpy and I didn’t think I could count on store bought clay to get the results I wanted.
 I just globbed it on, this is about two rolls worth of clay. It was really easy to find the supplies and mix up, and I can think of a lot of great ways to use this stuff.
 Using a palette knife and water I shaped and smoothed the clay. This is where I started getting excited, it really looks like this might work. It has taken forever to dry (a week and a half). I am excited to start sanding, priming and painting, but first I need to finish the handles on the rest of the spoons and forks.
I think I am finally on the right track, I would really love to get these finished and hung soon, I think the only hold up will be drying time. I can’t wait to get more stuff finished for my kitchen.
Have a wonderful, crafty holiday weekend! I’ll see you guys next Wednesday!
5.16.2011
Now With More Curtains
I know you’re probably sick of seeing my kitchen, but we’ll be looking at it again today. When I was making my screen printed curtains I had originally planned to have another set to go below the sink, but I didn’t have enough fabric to print without piecing it. I am so glad that I decided not to make everything the same. I have wanted this Michael Miller chevron fabric ever since I saw it online (and now can’t even find a link for it, sorry) and I found it here in Lincoln!!!
This area is a real problem: This is what you see when you come in my back door, which we use a lot since we have a larger parking area in the back. You have to come up three steps to get into the kitchen, so you’re eye level with my under sink clutter. I have my recycling trash cans, plastic bags, and paper bags stored under here, it’s not really that messy, but it doesn’t exactly scream welcome to my home either.
And now: Ah, much better, Welcome to my home, come on in! I have officially decided that all I need to make my entire house look nicer is shelves and curtains.
 Here’s a shot from the other end. I still need some accessories and to paint the walls, but it’s already soooooo much better (flashback to the mess). I have a little bit of that chevron fabric left over, I’m thinking some hot pads or towels. Let me know if you have any great ideas, I have about a half yard left (in pieces).
Thanks for looking at my kitchen again, I’ll try to find something else to talk about for the rest of the week.
This area is a real problem:
 This is what you see when you come in my back door, which we use a lot since we have a larger parking area in the back. You have to come up three steps to get into the kitchen, so you’re eye level with my under sink clutter. I have my recycling trash cans, plastic bags, and paper bags stored under here, it’s not really that messy, but it doesn’t exactly scream welcome to my home either.
And now:
 Ah, much better, Welcome to my home, come on in! I have officially decided that all I need to make my entire house look nicer is shelves and curtains.
 Here’s a shot from the other end. I still need some accessories and to paint the walls, but it’s already soooooo much better (flashback to the mess). I have a little bit of that chevron fabric left over, I’m thinking some hot pads or towels. Let me know if you have any great ideas, I have about a half yard left (in pieces).
Thanks for looking at my kitchen again, I’ll try to find something else to talk about for the rest of the week.
5.13.2011
We Have Curtains
The curtains are finished AND hung. I love them, the kitchen looks so much brighter. The aprons were a good temporary (ahem, year and a half) fix, but these are just so much better.
I have another kitchen project planned for this weekend, I hope the sun comes out by Sunday so I can finish it up. Have a super crafty weekend!!!
5.11.2011
More Ghosts of Past Projects
Remember last year, before I had Little Man I had designed a silk screen to print my kitchen curtains? And then you never heard anything about it again? Ummm, yeah, well I found the screen while I was cleaning the craft room and was re-inspired to finish that project up. I worked on it all day yesterday and finished all the printing. I could never have done this a year ago with all the piles of clutter, but today it was easy with my clean dining room table (note, I did not say the craft room was clean). I learned a lot with this project
1. Do not expect perfection, drapery sheers, embroidery hoops, and Mod Pogde work well, but this is a low cost method, there will be imperfections. I am a bit of a perfectionist and this was really hard for me, but even with the mistakes I really like the graphic print and once they are hanging up I don’t think the imperfections will be as noticeable/bothersome.
2. Use a large hoop, make sure there is enough room around your design to easily get your squeegee to all parts of your design. I really should have used a bigger hoop and given myself a little more room. It was really hard to get the very top and very bottom to print good without going over it multiple times, which make the print blurry.
3. Don’t be stingy. Apply several layers of Mod Podge to your design to get a nice, sharp print. Also be generous with the printing ink, the excess can be scraped off the screen and reused.
4. Having a clean and organized work area makes the printing process go much faster and it a lot easier. I really could have used a clothes line, but luckily the ink dried really fast. 5. If you have a repeating pattern alternate your motifs so that you aren’t smearing wet designs. Use registration marks to make your designs line up and look professional.
 6. If you only need a few copies of you design it might be easier to stencil it with freezer paper.
 I am super excited to finish these up, I got too tired to finish sewing last night and I have a lot of stuff going on today. I’m over half way done with the sewing and I expect to finish them tonight. I can’t wait to hang them up!!! I'm trying to decide if I'm going to leave them plain or if I should add some giant rick rack or some pompom fringe.
Also, my scarf fail from last week is being featured on CraftFail today, so pop on over there for a few laughs. It’s always nice to see I’m not the only one who has weird, crafty mishaps.
 I learned a lot with this project
1. Do not expect perfection, drapery sheers, embroidery hoops, and Mod Pogde work well, but this is a low cost method, there will be imperfections. I am a bit of a perfectionist and this was really hard for me, but even with the mistakes I really like the graphic print and once they are hanging up I don’t think the imperfections will be as noticeable/bothersome.
2. Use a large hoop, make sure there is enough room around your design to easily get your squeegee to all parts of your design. I really should have used a bigger hoop and given myself a little more room. It was really hard to get the very top and very bottom to print good without going over it multiple times, which make the print blurry.
3. Don’t be stingy. Apply several layers of Mod Podge to your design to get a nice, sharp print. Also be generous with the printing ink, the excess can be scraped off the screen and reused.
4. Having a clean and organized work area makes the printing process go much faster and it a lot easier. I really could have used a clothes line, but luckily the ink dried really fast.
 5. If you have a repeating pattern alternate your motifs so that you aren’t smearing wet designs. Use registration marks to make your designs line up and look professional.
 6. If you only need a few copies of you design it might be easier to stencil it with freezer paper.
 I am super excited to finish these up, I got too tired to finish sewing last night and I have a lot of stuff going on today. I’m over half way done with the sewing and I expect to finish them tonight. I can’t wait to hang them up!!! I'm trying to decide if I'm going to leave them plain or if I should add some giant rick rack or some pompom fringe.
Also, my scarf fail from last week is being featured on CraftFail today, so pop on over there for a few laughs. It’s always nice to see I’m not the only one who has weird, crafty mishaps.
5.09.2011
Organized: Clutter Corner
The kitchen is the only area of my house that gets cleaned and de-cluttered daily, however there is one corner that is out of control. This area is supposed to be for my cookbooks and recipe box. It is also where I keep our frequently used medicines and reusable tissues. I have a lot of baking soda for some reason and there is a package of undershirts and a package of underwear in this mix too. This is really the “I don’t know where to put this so I’ll just shove it here” corner. The biggest problem is this mess makes it really hard to get to my recipes and plan my meals.
I found this free printable recipe binder cover on Prudent Baby (there are a variety of colors to match any kitchen) and decided to get the clutter corner under control. Everything got sorted and properly put away and all of my recipe books, cards, magazines, and print outs got hauled to the dining room table to be sorted and stored.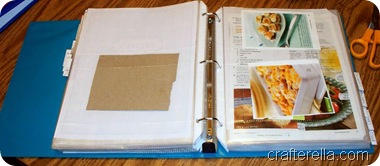 I printed out extra cover sheets to make my dividing pages, I added a label over the top of the word RECIPE and I used self adhesive tabs to label all of the category pages. I used a combination of sheet protectors and photo protector pockets to fill in the book. It took a while to sort all the scraps of paper out, but it was worth it.
 The recipe books will be filed away in a cupboard, I don’t use them often enough to keep them out, but I do use them enough to want to keep them (for now). I will be working on the drawers on the left next and hopefully there will be room for me to store my binder away in one of them. I think the bottom drawer has every kitchen towel I have ever owned in it and I only use the three that match the kitchen, so there might be some room in there. I also might store the binder with my command center, the recipes for the weekly menu are stored in the menu planning organizer I made, so I don’t need to use the binder in the kitchen daily. I only need to use it when I plan the menu, which I do in the dining room anyway, hmmm, definitely storing it on the command center (which also need a make over).
I am slowly getting everything the way I want it, now I’ll need to start working on some more decorations for the kitchen. I have several half finished projects that need to be wrapped up (cough, curtains and giant spoon and fork, cough).

 This area is supposed to be for my cookbooks and recipe box. It is also where I keep our frequently used medicines and reusable tissues. I have a lot of baking soda for some reason and there is a package of undershirts and a package of underwear in this mix too. This is really the “I don’t know where to put this so I’ll just shove it here” corner. The biggest problem is this mess makes it really hard to get to my recipes and plan my meals.
I found this free printable recipe binder cover on Prudent Baby (there are a variety of colors to match any kitchen) and decided to get the clutter corner under control. Everything got sorted and properly put away and all of my recipe books, cards, magazines, and print outs got hauled to the dining room table to be sorted and stored.
 I printed out extra cover sheets to make my dividing pages, I added a label over the top of the word RECIPE and I used self adhesive tabs to label all of the category pages. I used a combination of sheet protectors and photo protector pockets to fill in the book. It took a while to sort all the scraps of paper out, but it was worth it.
 The recipe books will be filed away in a cupboard, I don’t use them often enough to keep them out, but I do use them enough to want to keep them (for now). I will be working on the drawers on the left next and hopefully there will be room for me to store my binder away in one of them. I think the bottom drawer has every kitchen towel I have ever owned in it and I only use the three that match the kitchen, so there might be some room in there. I also might store the binder with my command center, the recipes for the weekly menu are stored in the menu planning organizer I made, so I don’t need to use the binder in the kitchen daily. I only need to use it when I plan the menu, which I do in the dining room anyway, hmmm, definitely storing it on the command center (which also need a make over).
I am slowly getting everything the way I want it, now I’ll need to start working on some more decorations for the kitchen. I have several half finished projects that need to be wrapped up (cough, curtains and giant spoon and fork, cough).
4.15.2011
Sunburst Utensil Kitchen Clock Tutorial
I am so excited to share my latest project for my kitchen. This is a really quick and easy project. You will need:
Battery powered clock
a package of plastic silverware (24 pieces) in your desired color
a pack of plastic picnic plates to match (you’ll only need 1)
hot glue gun
scissors/exacto knife
Start by cutting a hole in your plastic plate that will allow you to easily change the battery of you clock. I used my exacto knife to start the hole and then finished cutting it out with scissors. Now is also the time to punch a hole to hang the clock or you can use velcro fasteners and avoid damaging you wall.
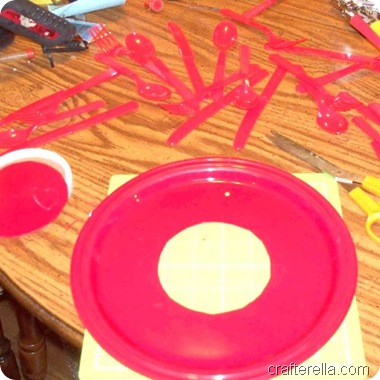 Random tip: do not try to photograph a red plate on a lime green cutting mat using the automatic setting on your camera, it really freaks the saturation out (sorry).
I did a practice run to decide how I wanted my silverware to look and ended up using a mirrored pattern: knife, fork, spoon, knife, spoon, fork. Then fire up you glue gun and get to work. I did not measure, just eyeballed, started by placing the knives, first four at the top, bottom, left and right. Then four more knives equally spaced between those. I filled in with the spoons and forks, using the whole package. Finally I hot glued the clock to the center of the plate. I hung it above my shelves and stepped back to enjoy the view. I LOVE how it turned out. I really need to get going on my other projects, this turned out so cute I’m super motivated to finish up another.
If you decide to give it a try I’d love to see your results, leave me a link.
Have a super crafty weekend!
 You will need:
Battery powered clock
a package of plastic silverware (24 pieces) in your desired color
a pack of plastic picnic plates to match (you’ll only need 1)
hot glue gun
scissors/exacto knife
Start by cutting a hole in your plastic plate that will allow you to easily change the battery of you clock. I used my exacto knife to start the hole and then finished cutting it out with scissors. Now is also the time to punch a hole to hang the clock or you can use velcro fasteners and avoid damaging you wall.
 Random tip: do not try to photograph a red plate on a lime green cutting mat using the automatic setting on your camera, it really freaks the saturation out (sorry).
I did a practice run to decide how I wanted my silverware to look and ended up using a mirrored pattern: knife, fork, spoon, knife, spoon, fork. Then fire up you glue gun and get to work. I did not measure, just eyeballed, started by placing the knives, first four at the top, bottom, left and right. Then four more knives equally spaced between those. I filled in with the spoons and forks, using the whole package. Finally I hot glued the clock to the center of the plate.
 I hung it above my shelves and stepped back to enjoy the view. I LOVE how it turned out. I really need to get going on my other projects, this turned out so cute I’m super motivated to finish up another.
If you decide to give it a try I’d love to see your results, leave me a link.
Have a super crafty weekend!
3.25.2011
The New Menu Board
I know I already made a dry erase menu board, but I wasn’t 100% happy with it and since it is something I use all the time it was really starting to get on my nerves. The biggest problem is that I had made the paper insert before actually buying my frame and when it came time to get a frame I couldn’t find one the right size and I had to get one that was bigger than my finished menu and it just bugged me. This time I already had my frame, all I needed to do was to cut my paper to fit.
I cut out squares for my days and rounded the corners, everything is just lightly tacked down with scrapbook adhesive tape. I really like the glitter letters for the days of the week, everything is better with glitter! The menu board has been a big hit here, it’s so nice to know what’s for dinner. I hadn’t realized how much time I was devoting to last minute dinner planning and now we are eating out a lot less. I always thought menu planning was kind of silly, but it makes my day soooo much easier. You should definitely give it a try and when you make your menu board, buy your frame first.
Have a super crafty weekend!
11.10.2010
Giant Spoon and Fork Progress
My Craftfail giant spoon and fork project has been on hold for quite a while. I decided to give Bondo a try. I bought a gallon can of it, but after reading the warnings and instructions on the can I was a little nervous about using it (and that is what was holding up this project). I hate it when my “craft supplies” are made of chemicals that are known to cause cancer and that I get a contact high from the smell. This was definitely an outside project.

I have a major amount of sanding to do and I need a palm sized sander, my Dremel is taking forever on these large pieces. Once the sanding is finished I will need to prime and paint them all. It doesn’t look like the great weather we’ve been having is going to last much longer (and really, it is November, we’ve been really lucky with the mild weather) and this whole project is dependant on good weather, I may have to put this back on hold until next spring.
I am excited to finish this project, but I want the results to be fabulous and that means no rushing!
10.22.2010
Mushroom Canisters In Progress
In July I scored this awesome vintage mushroom canister set for $10. The set was a little beat up, but still really cute. We had a set of mushroom canisters when I was a kid and they really bring back happy memories. 


I’m going to use acrylic paint to touch up the white areas where the original glaze is completely gone and maybe add some touches of turquoise. Then I’ll finish it all with a coat of sealer. Luckily the original glaze is multi-colored and I think the touch up should blend well. BTW, I’m not using these for flour and sugar, they are for decoration and kitchen clutter storage. I wouldn’t use them for unwrapped food storage after all that painting and sealing.
I think they’re going to turn out really fun, now I just need to get back to that giant spoon and fork! Have a super crafty weekend!!!
8.09.2010
A Great Idea
I saw this really cute PDF for a dry erase menu board and decided that was just what I needed. Cute and organized, perfect, but wait, I can make one myself (famous last words).
I decided to make mine using watercolors and a crayon resist. I had been making magic pictures for Little Miss to paint earlier and thought that this would be a great way to keep the negative space white. I penciled in my design and started filling in all the areas I wanted to stay white with my crayons. Once that was finished I washed the entire paper with red watercolor. 


I think I’m on the right track now, and I do like the clean, modern lines in this one. I’m excited to have a menu board, I like planning my meals, but have gotten out of the habit since Little Man arrived. The thought of looking at the menu in the morning and knowing what will be for dinner is soooo much better than waiting until four and trying to dash to the grocery store with three kids. I always come home with a bag full of junk. Do you like to plan out a weekly or monthly menu? Does it keep you more organized and do you save money?
5.17.2010
To Shower or Blog
I have to say that lately the choice has been shower, ah, life with a new baby. He is adorable, but very high maintenance. I have managed to finish a few projects here and there. I have also learned to knit over him while he nurses and sleeps, so it’s not too bad. I really need to learn to type efficiently with one hand.
I finally found the perfect turquoise buttons for my kitchen towels and got them sewed on. I covered a button with gingham for the remaining one. The white one is my favorite.
What a productive day for me, a shower and a blog post and maybe when Daddy gets home I’ll get to do a little sewing.
4.26.2010
Welcome to Week 41 and My Messy Kitchen
I really expected to be holding a baby by now, but I guess he’s not quite ready. I am officially to the point of making no plans for anything, I can’t even plan dinner. I have a very long list of things that I want to be doing, but I just can’t/don’t want to do them. I have worked on a few things, knitting and crochet are still do-able, but pretty much everything else is out. I miss bending.
Okay, enough whining, I still haven’t finished the Mod Podge screen printing of the fabric for my kitchen curtains, but I have been doing a little work in there. Prepare to see a mess…don’t judge me, I know I have a hoarding/clutter problem and I am working on it.


I think that once I get everything arranged and the new curtains and hand knitted towels out and the pot rack hung (once I find it, it’s in the basement of doom) that it will look nicer. If anyone has suggestions for the shelves, let me know, I would really like to make them work. I am also trying to decide how to store my spices without taking up a lot of room, but keeping them handy for use. I’ll keep updating everyone on baby watch 2010, at this rate I might just wait until May!
4.13.2010
The Perfect Kitchen Scrubbie
I am all about having the perfect tool for the job at hand and when I realized that my kitchen sponges just weren’t cutting it I decided to try making my own.
I need something that is abrasive, but safe for non stick cookware. I also need something absorbent to wipe up messes. I decided that a double sided sponge was just what I needed, nylon netting on one side (I bought a roll of tulle, but cutting your own is usually less expensive), cotton yarn on the other side, and maybe a sponge in the middle for good measure.

I’m going to be using these two scrubbies for a couple of weeks to see how they work and wear and decide if I need to give it another try. I may just need to perfect the size and shape.
What is your favorite sponge/scrubbie to use in the kitchen? Do you have any patterns you recommend?
4.08.2010
Kitschy Kitchen
I have finished adding more Mod Podge to my silverware silk screen and the revised prints look a lot better. Now I need to get the fabric printed. I’m thinking that I will cut the fabric to size for the curtain panels, then print it, and then sew it. This will make the fabric more manageable. I have also decided that the curtains need rick rack and ball fringe.
In the meantime I have been dreaming about all the other things I want to have in my kitchen. I need some super accessories, lots of red with pops of turquoise. I need towels. I have several red towels, they hang on the handle to my stove, but it seems like they spend more time on the floor and once they hit the floor, ewww, I need a fresh one. So, I made a towel that won’t fall off.
I used the Leftover Dishtowel pattern and added a turquoise stockinette stitched stripe and made the top hanging part of the towel in stockinette stitch also, 
Subscribe to:
Posts (Atom)